Collins top

ISSUE 162 - HOW TO ALTER A PATTERN WITH PANELS

THE Q & A SERIES

HOW TO ALTER A PATTERN WITH PANELS

Hi Emily,

I love this idea. It is so very helpful and generous of you to share all that you’ve learnt and your experience. Very cool.

I have a question about raising the back neckline of the Collins Top. Would you extend the back piece and the back sleeve and sleeve shoulder panel pieces and blend to the front neckline? I’m never sure how to deal with the curve of the neckline. I have discovered I need to do a High Round Back Adjustment on most tops, so I use the Centre Back seam to add length and a curve, but maybe I need to add this to the next seam along too (where the back meets the back sleeve?). Thanks for your help!

Cheers,

Genevieve

Brisbane, Australia


Hi Genevieve,

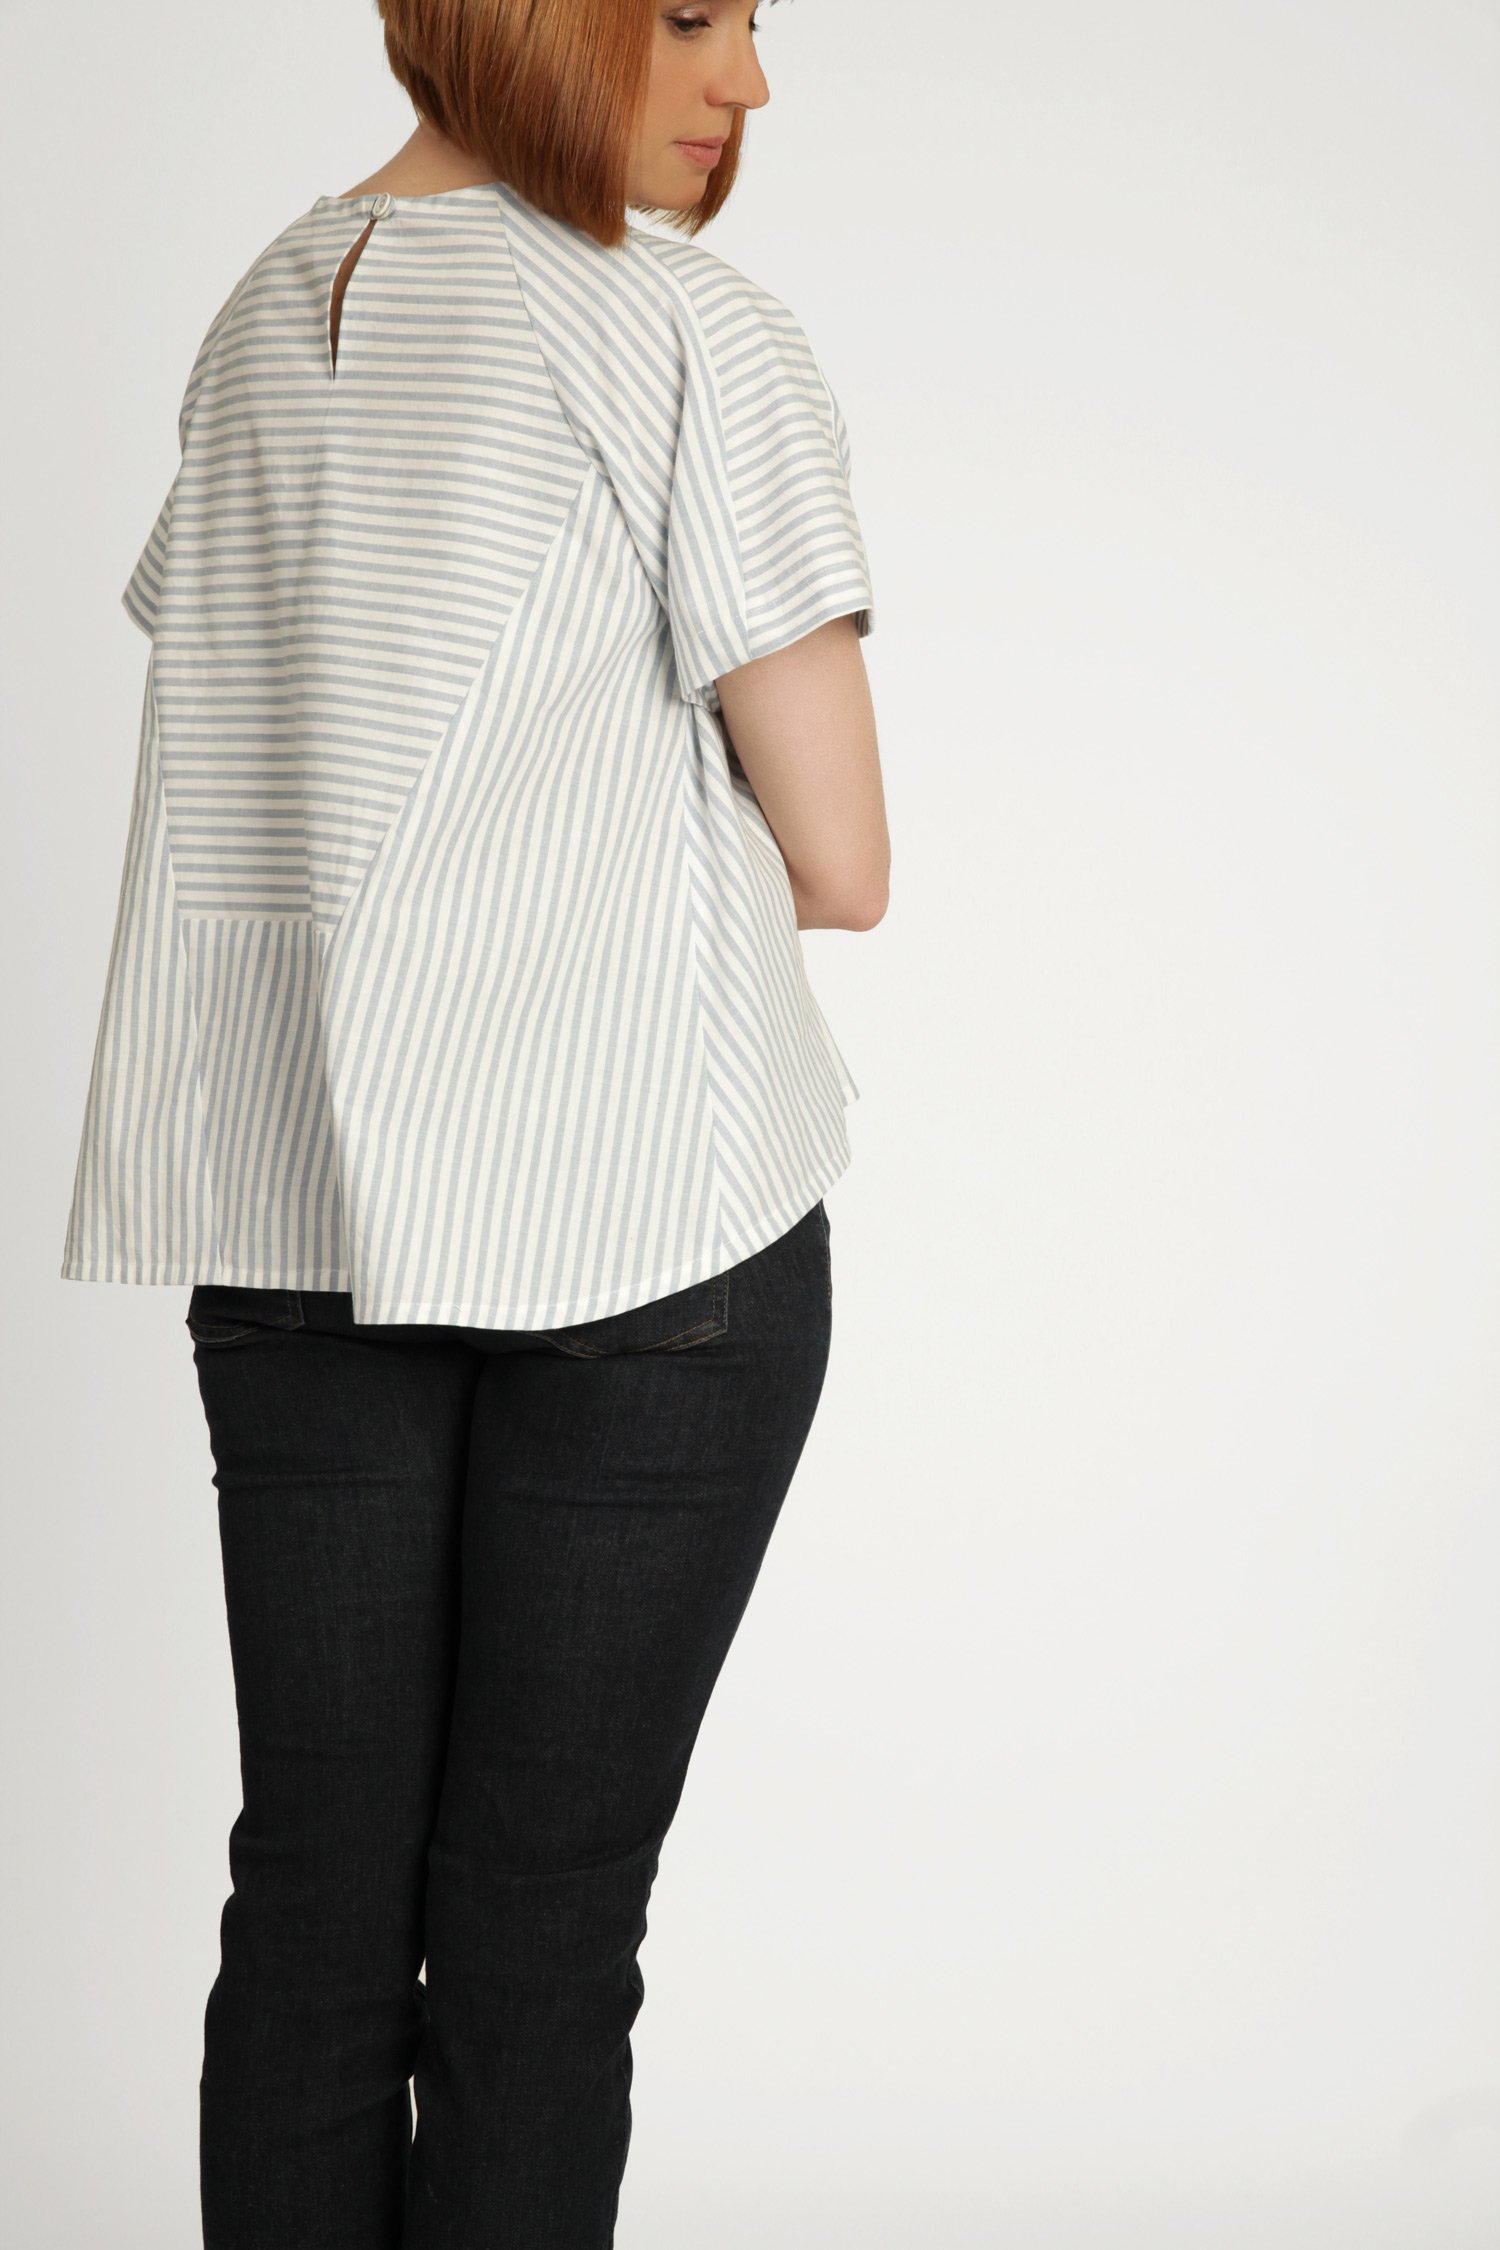
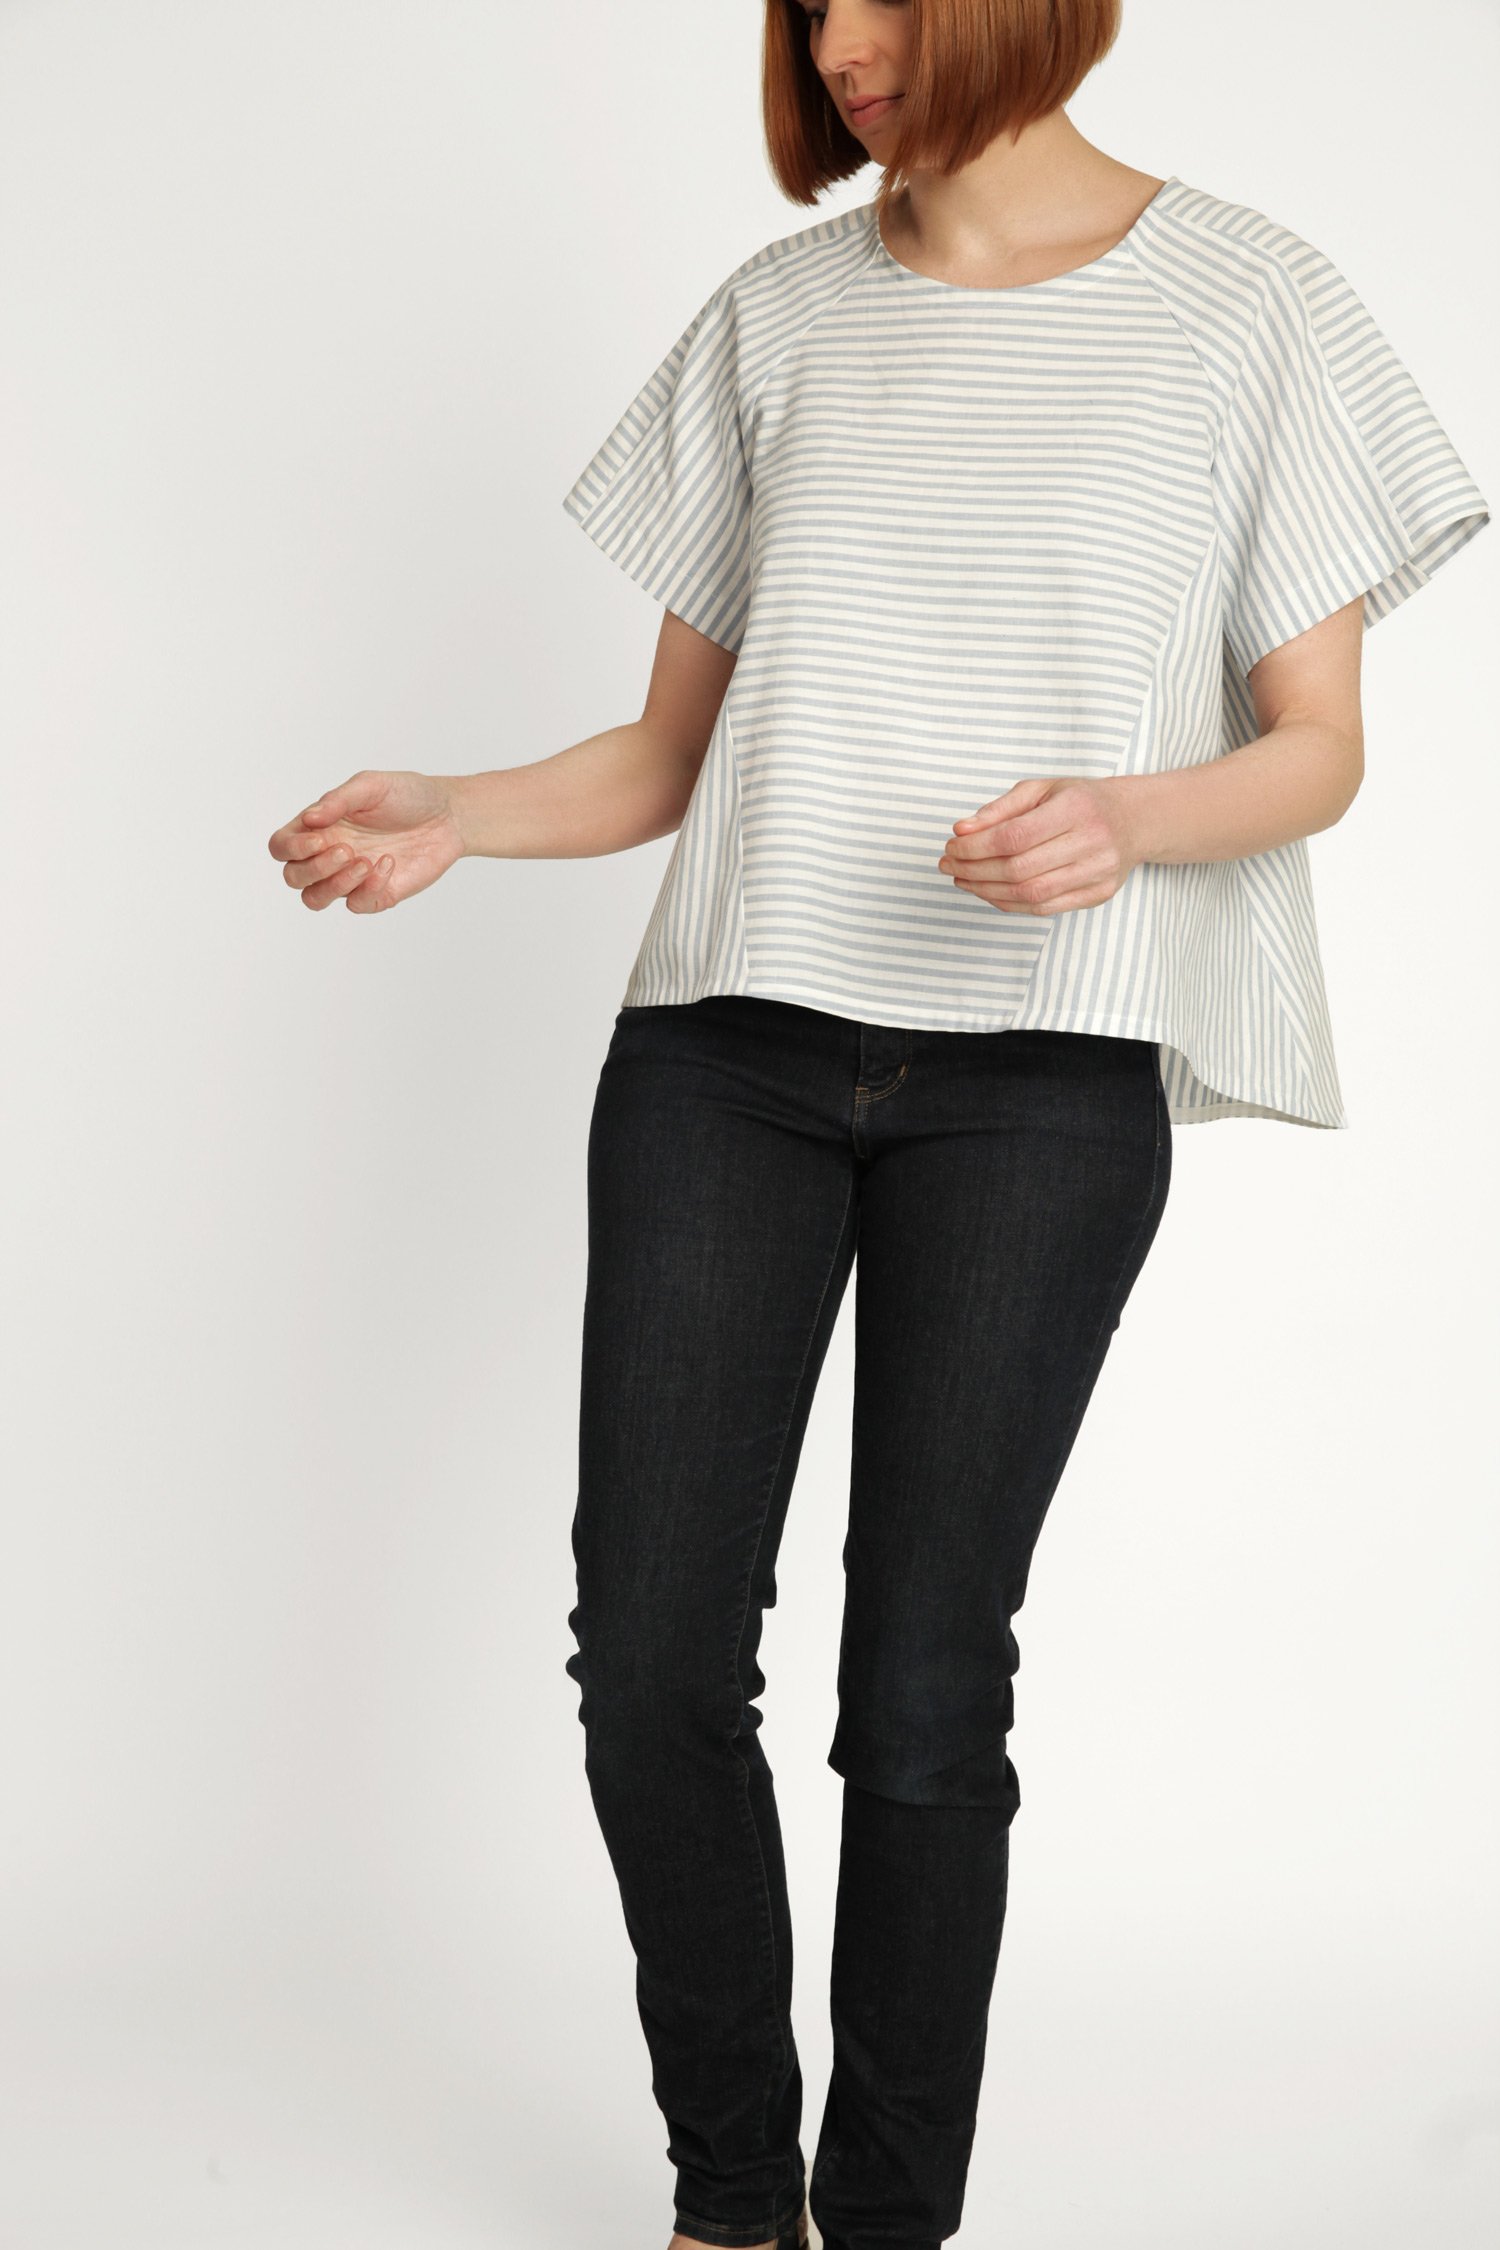
We thought this would be a great question to answer this week as we have just released the Elwood dress pattern

You’ll notice some similarities between Elwood and our Collins top, because Elwood was drafted from the Collins top. I always had this niggling feeling that I wasn’t quite done with the Collins top pattern, and had revisited it a number of times when experimenting with 3D pattern drafting. 

When our community asked for a signature In the Folds pattern for 2024, I knew it was time to revisit what I’d been working on in Clo3D and bring one of these ideas to fruition. (Check out this blog post if you’re interested in reading more about my Clo3D adventures!)

What this means for you (and any of our other customers thinking about sewing Elwood) is that our fitting tutorials created for the Collins top, will also apply to the Elwood dress. If you’d like to check out some of these tutorials, you can find some links to them below.

Here’s how to:

How to make fit alterations to a panelled pattern

When making fitting alterations to a pattern that has panel lines, there are a few things you need to do. This process will allow you to make any alterations you like to a pattern.

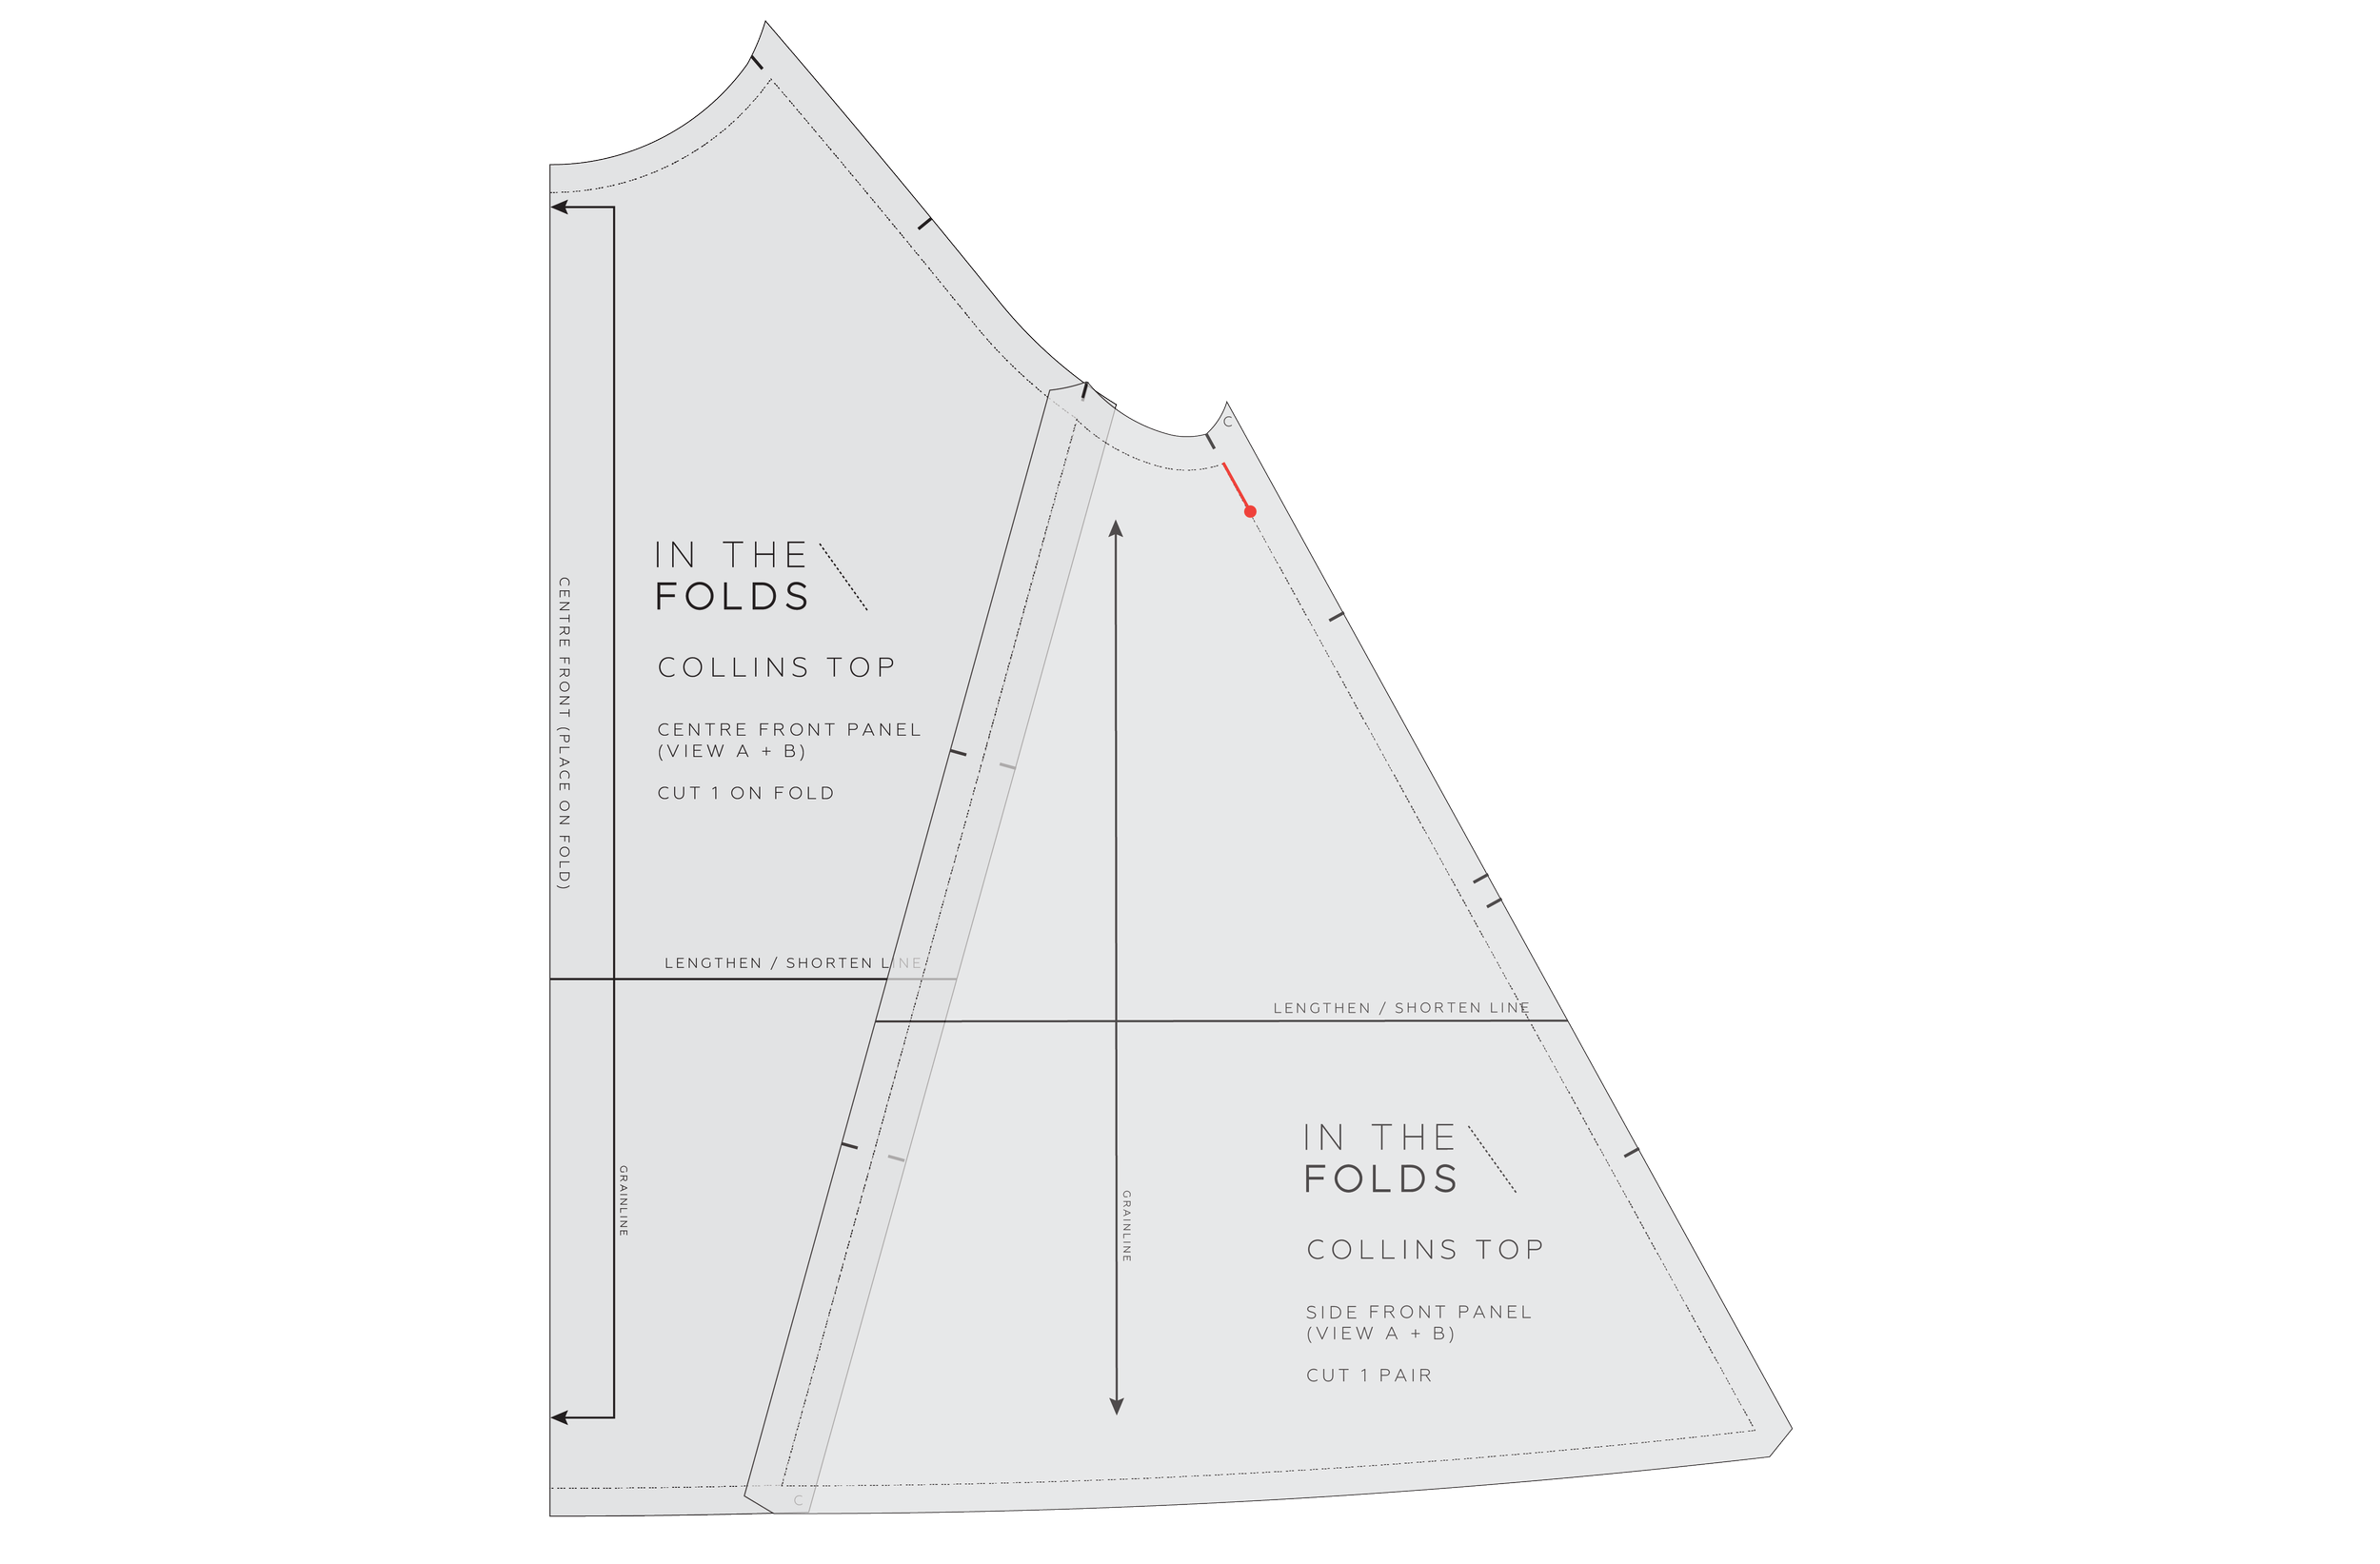
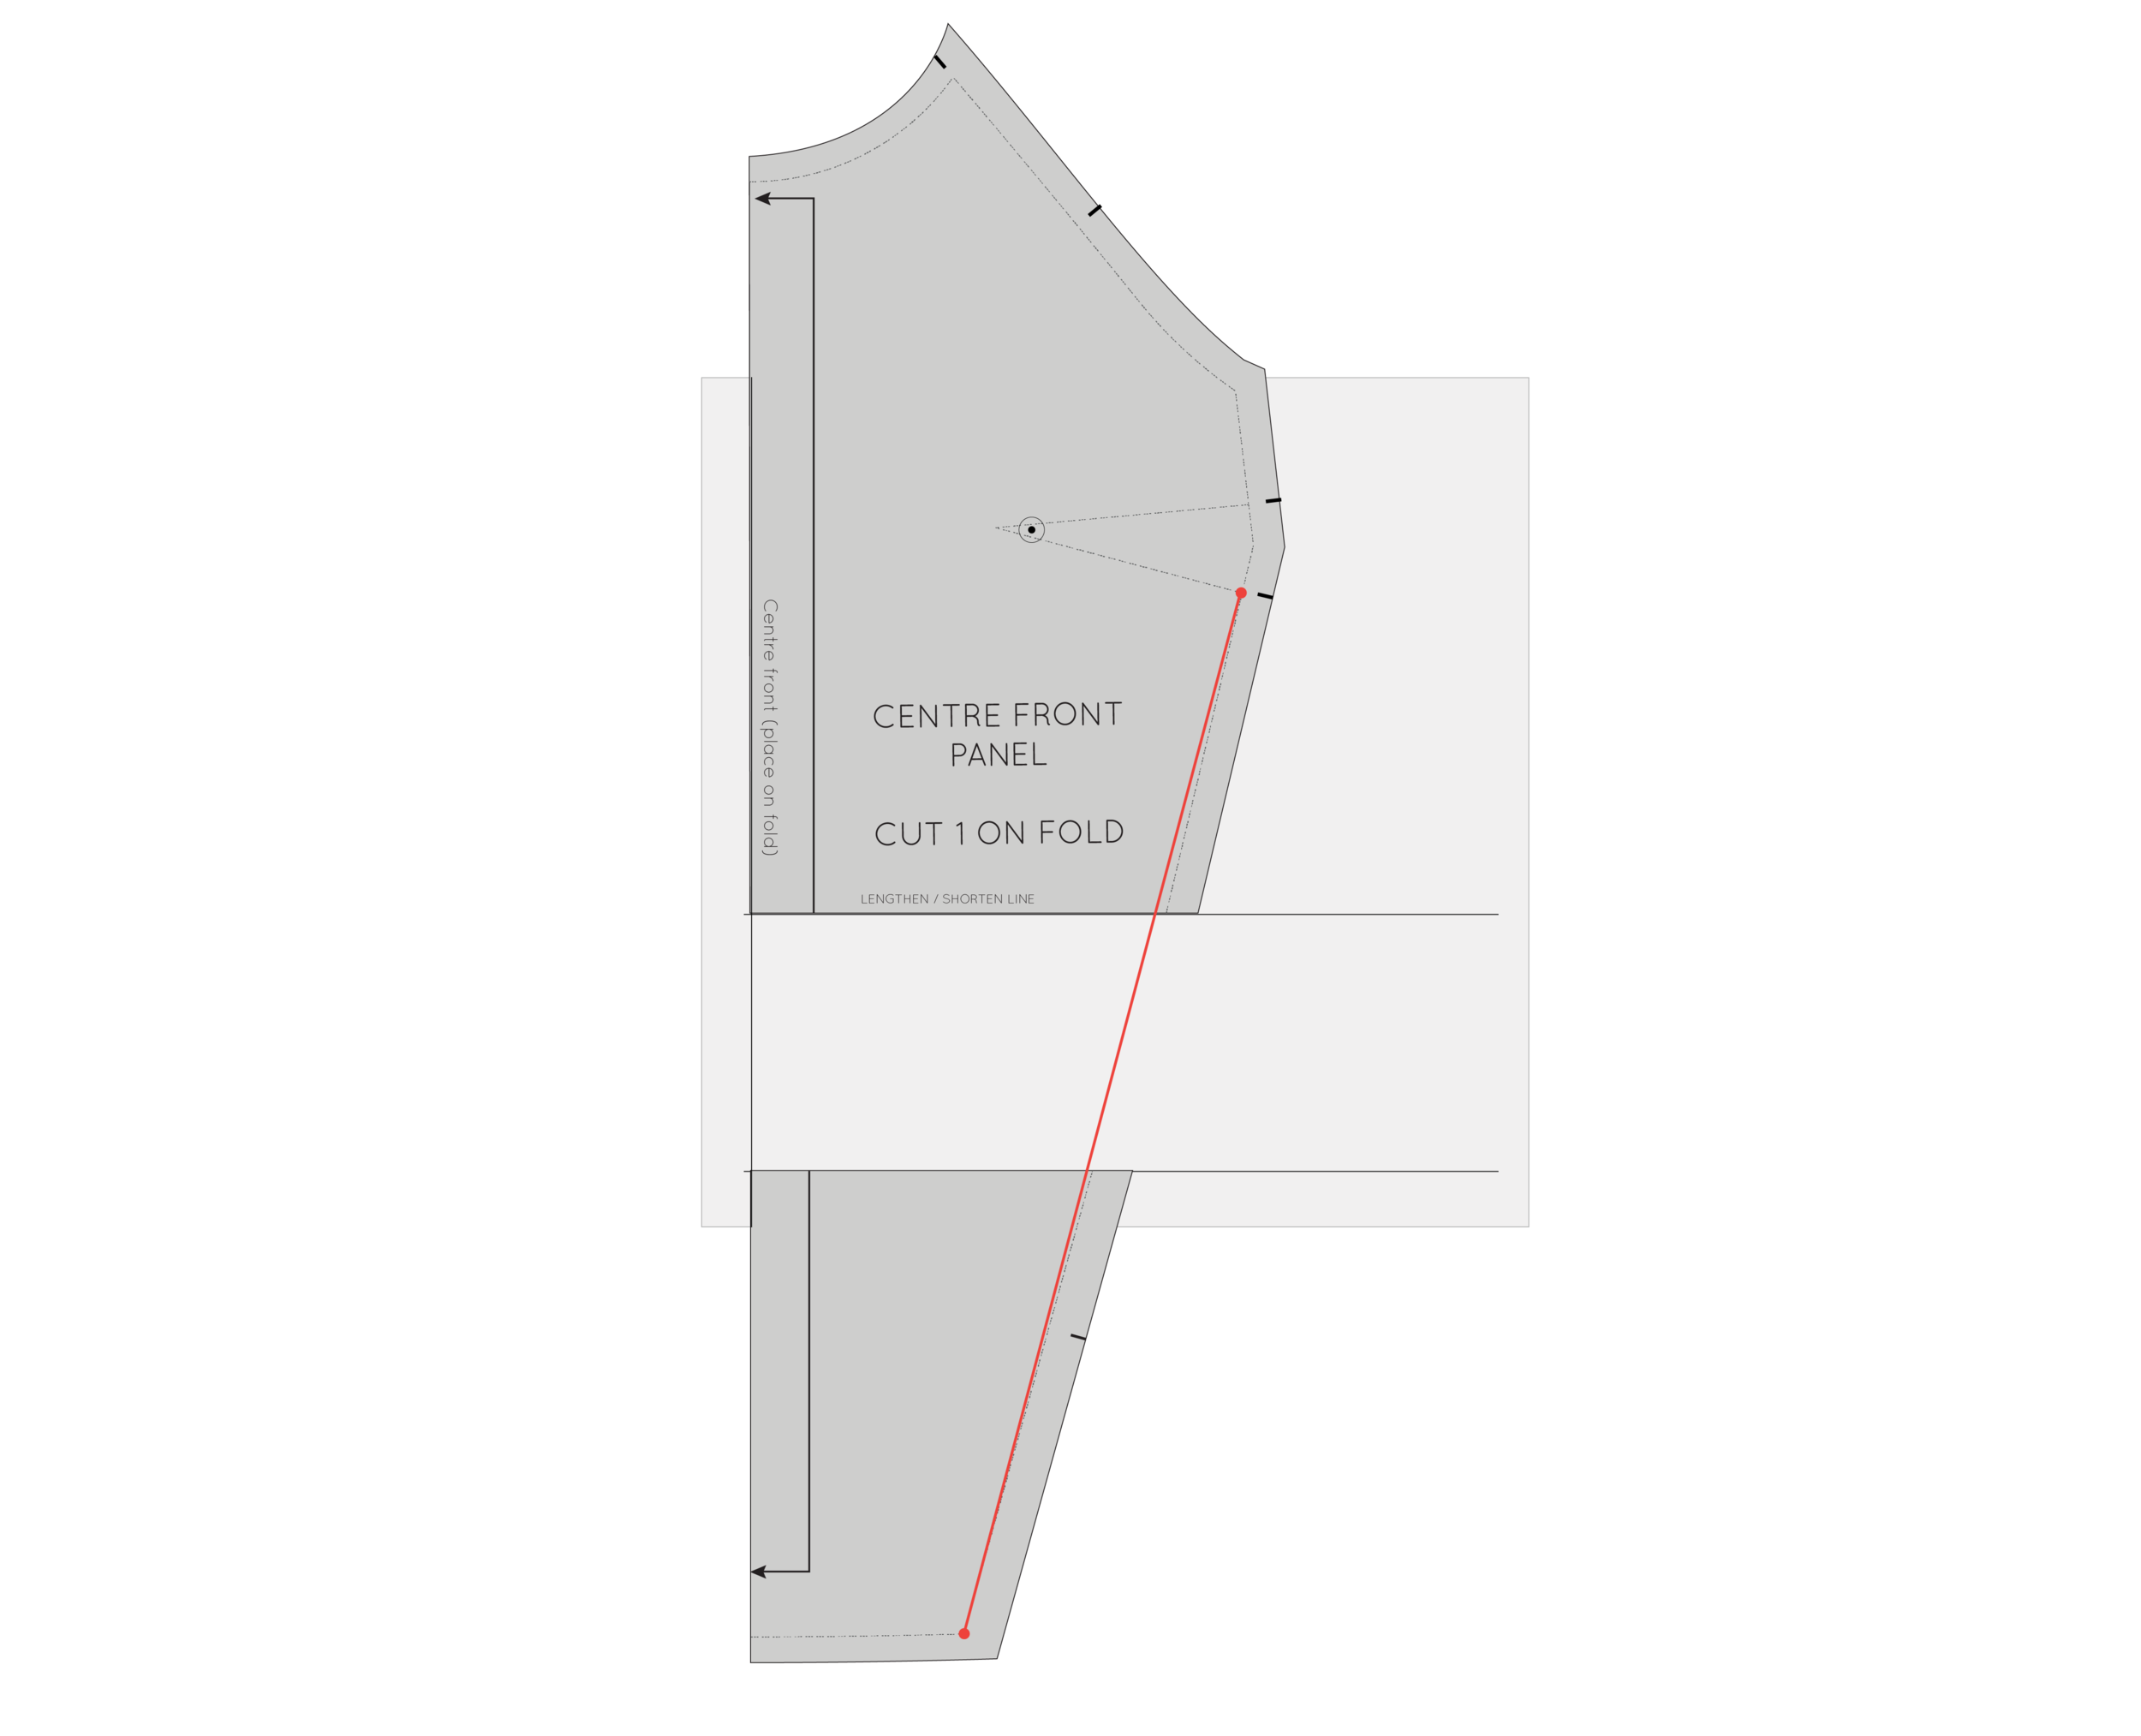
Step 1: Mark the stitch line on the pattern

Mark stitch lines on pattern.

When making pattern alterations the stitch line should be marked on the pattern. All In the Folds patterns have the stitch line marked, and we thought this was just standard in the sewing industry, but turns out it’s not! So what this means is you may need to mark in the seam allowance on the pattern yourself. 

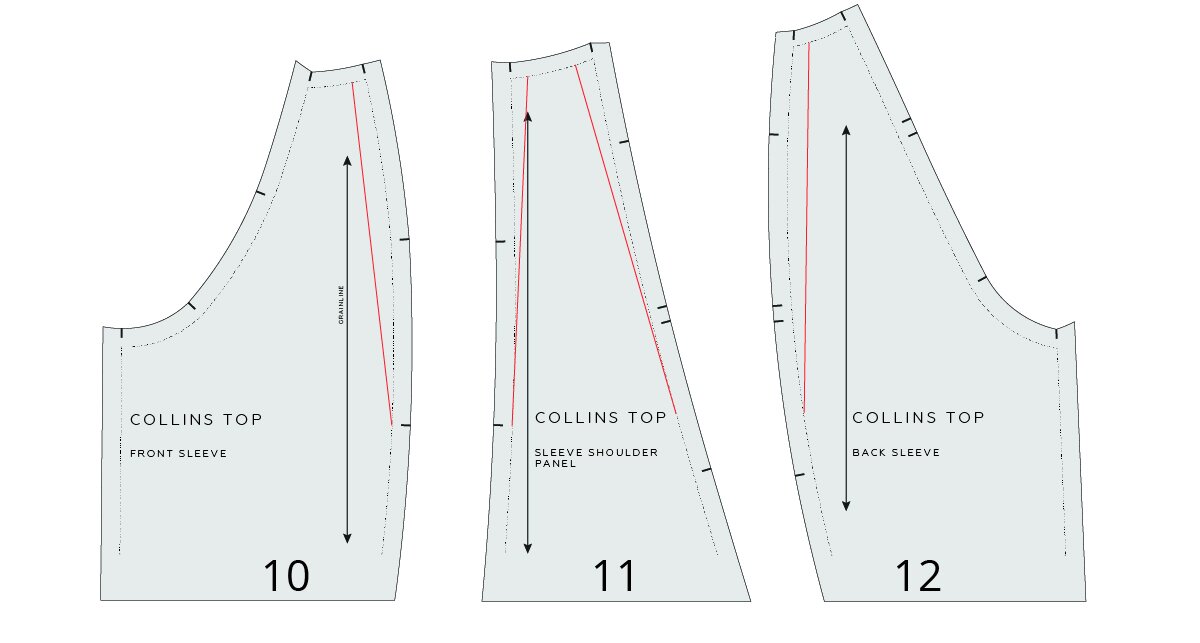
Step 2: Remove panel lines

Remove panel lines for upper back adjustment.

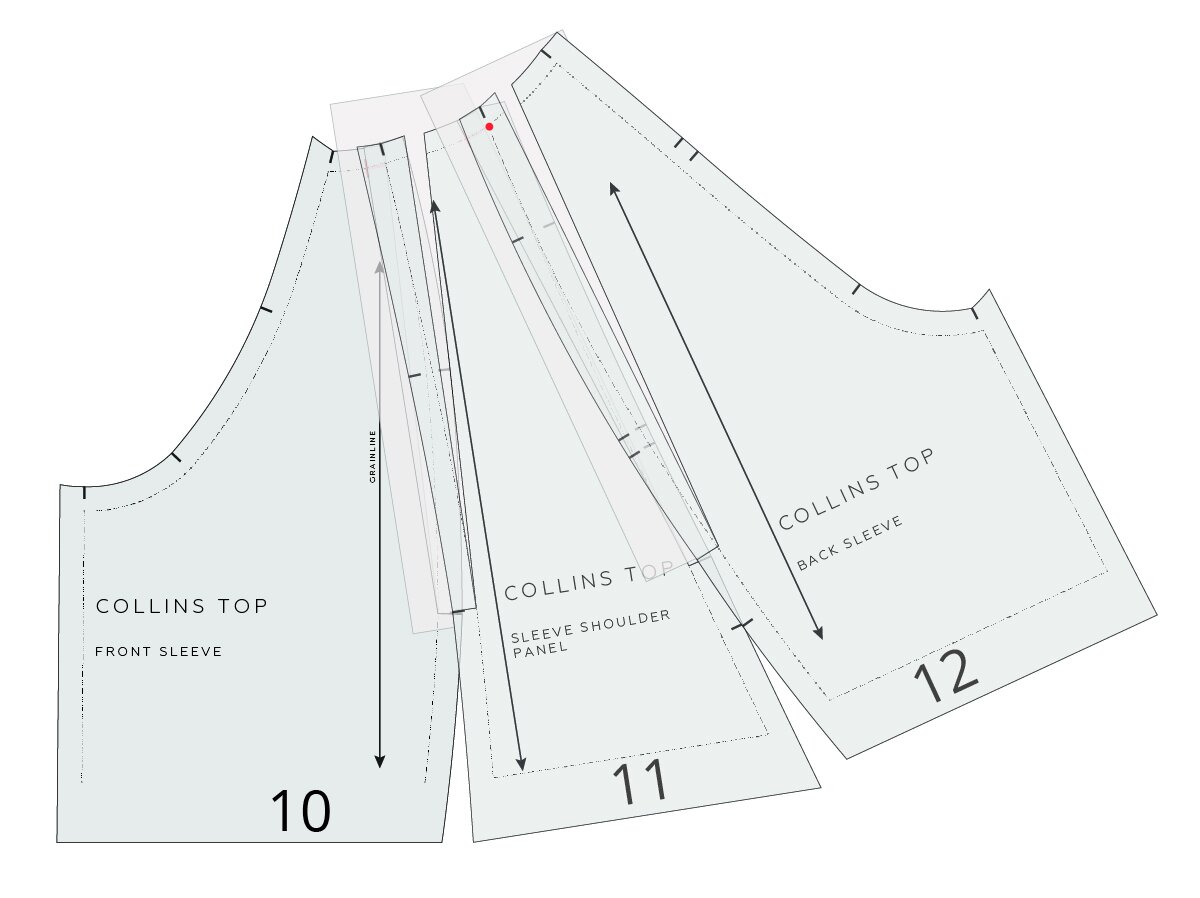
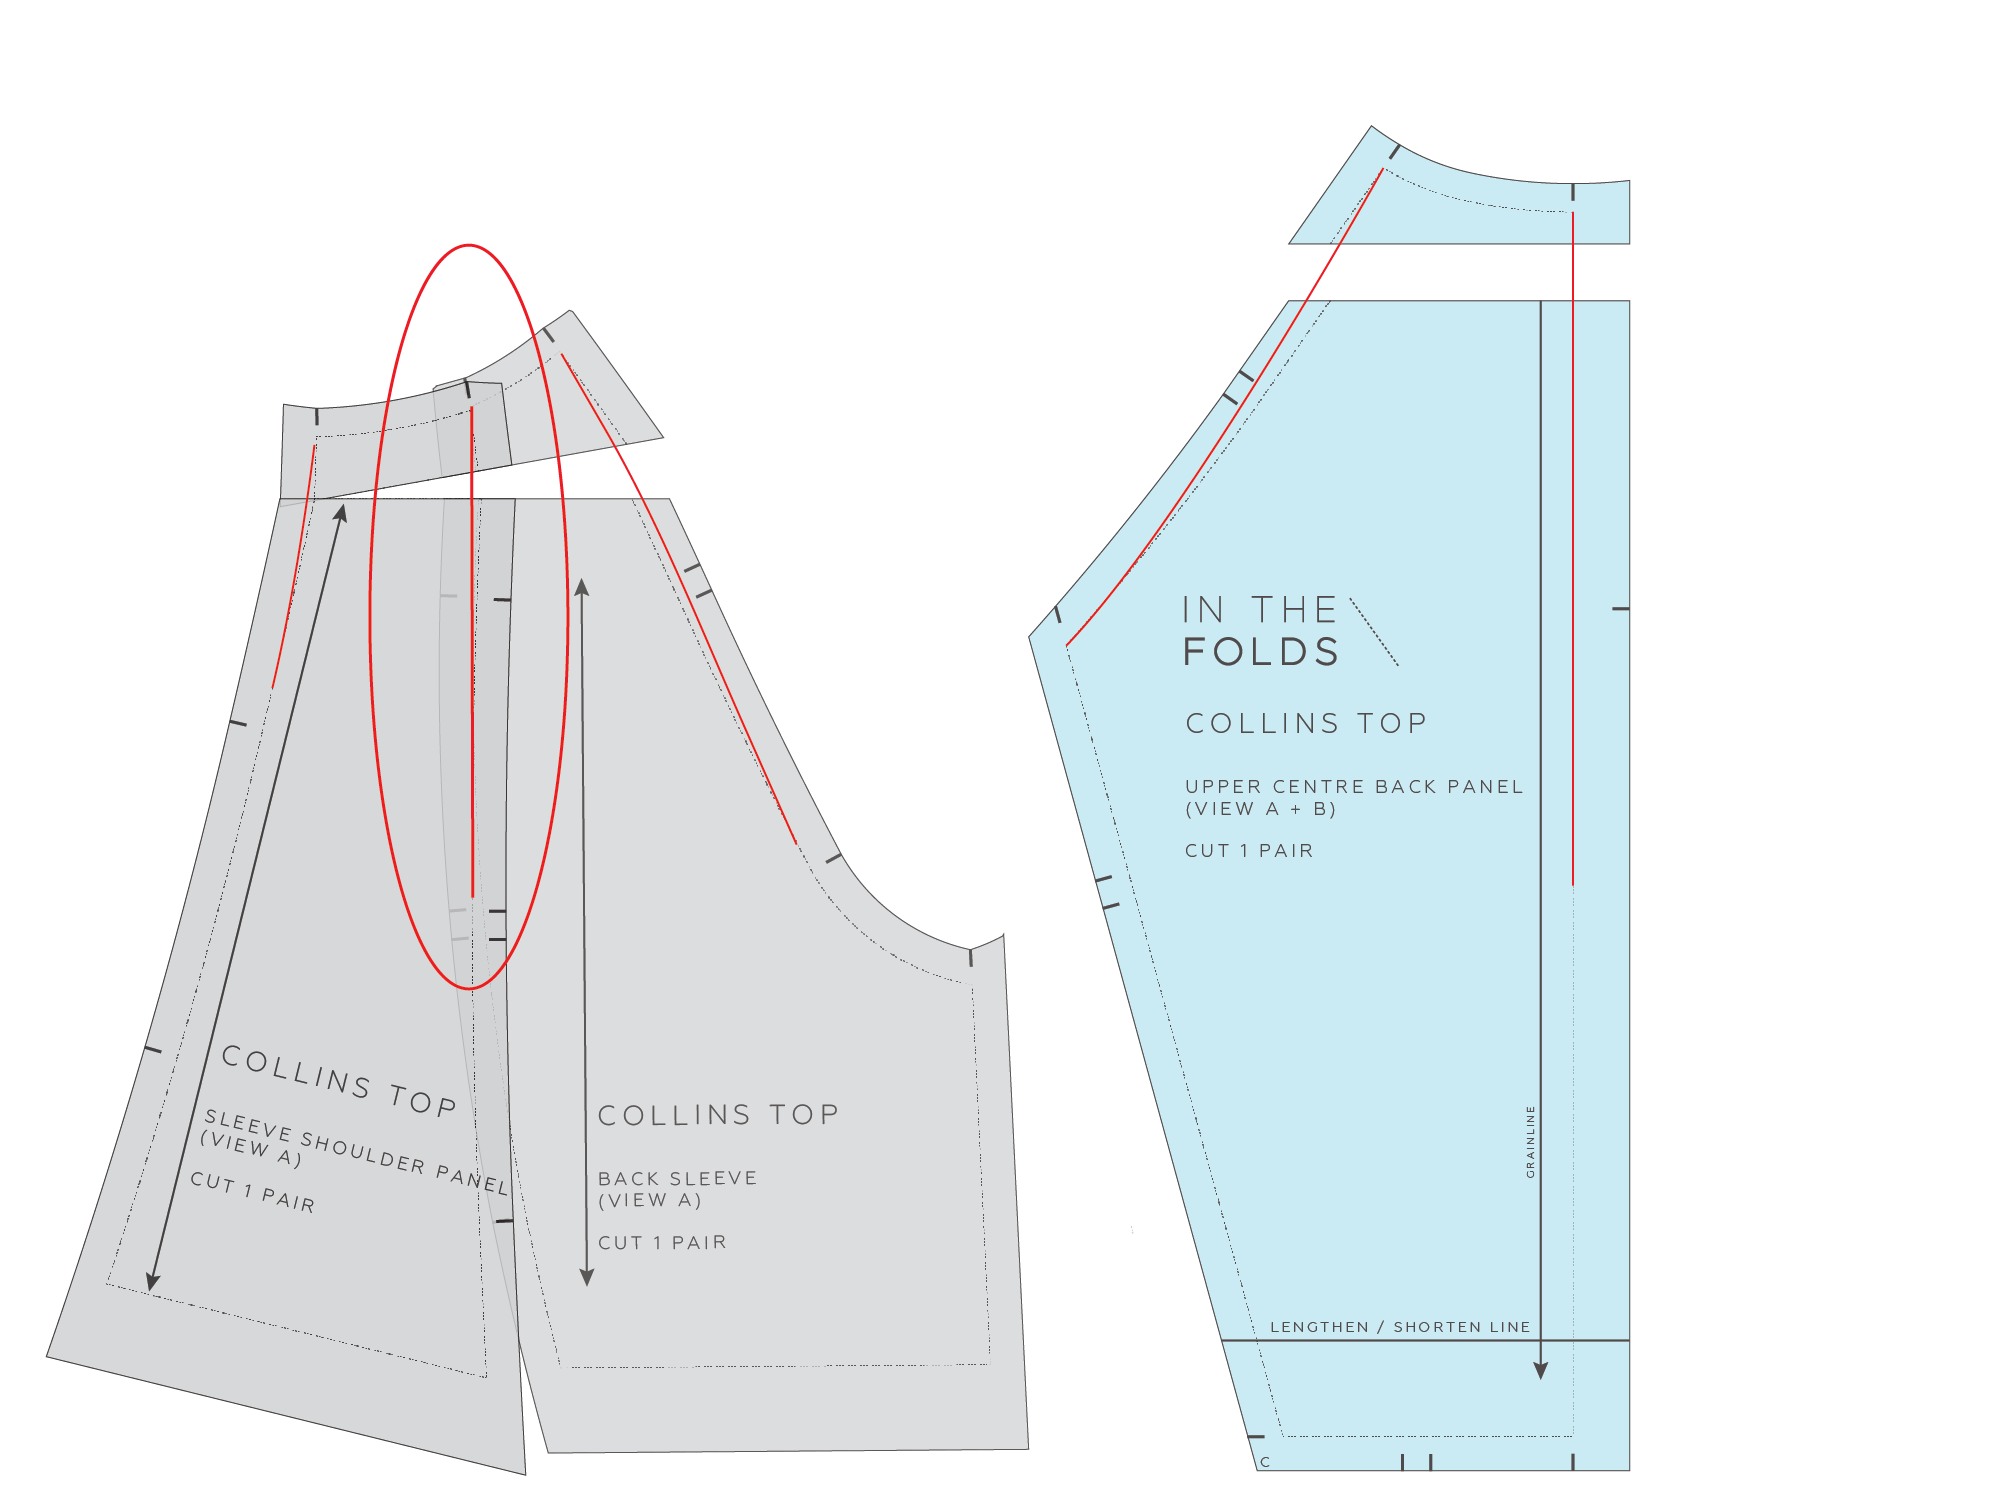
Place pieces together to temporarily remove the panel lines. In the case of the Collins top, this means joining the SHOULDER PANEL piece to the BACK SLEEVE. This is when your stitch lines come in handy because you need to position your pieces stitch line on stitch line as if the pieces have been sewn together. This doesn’t mean we’ll be losing our panel lines, just that we’re removing them to make the alteration easier to manage and then we’ll bring it back. Hold the pattern pieces together with tape or pins… something that won't rip your pattern piece or be too hard to remove.

Step 3: Make the alteration

Make the upper back alteration.

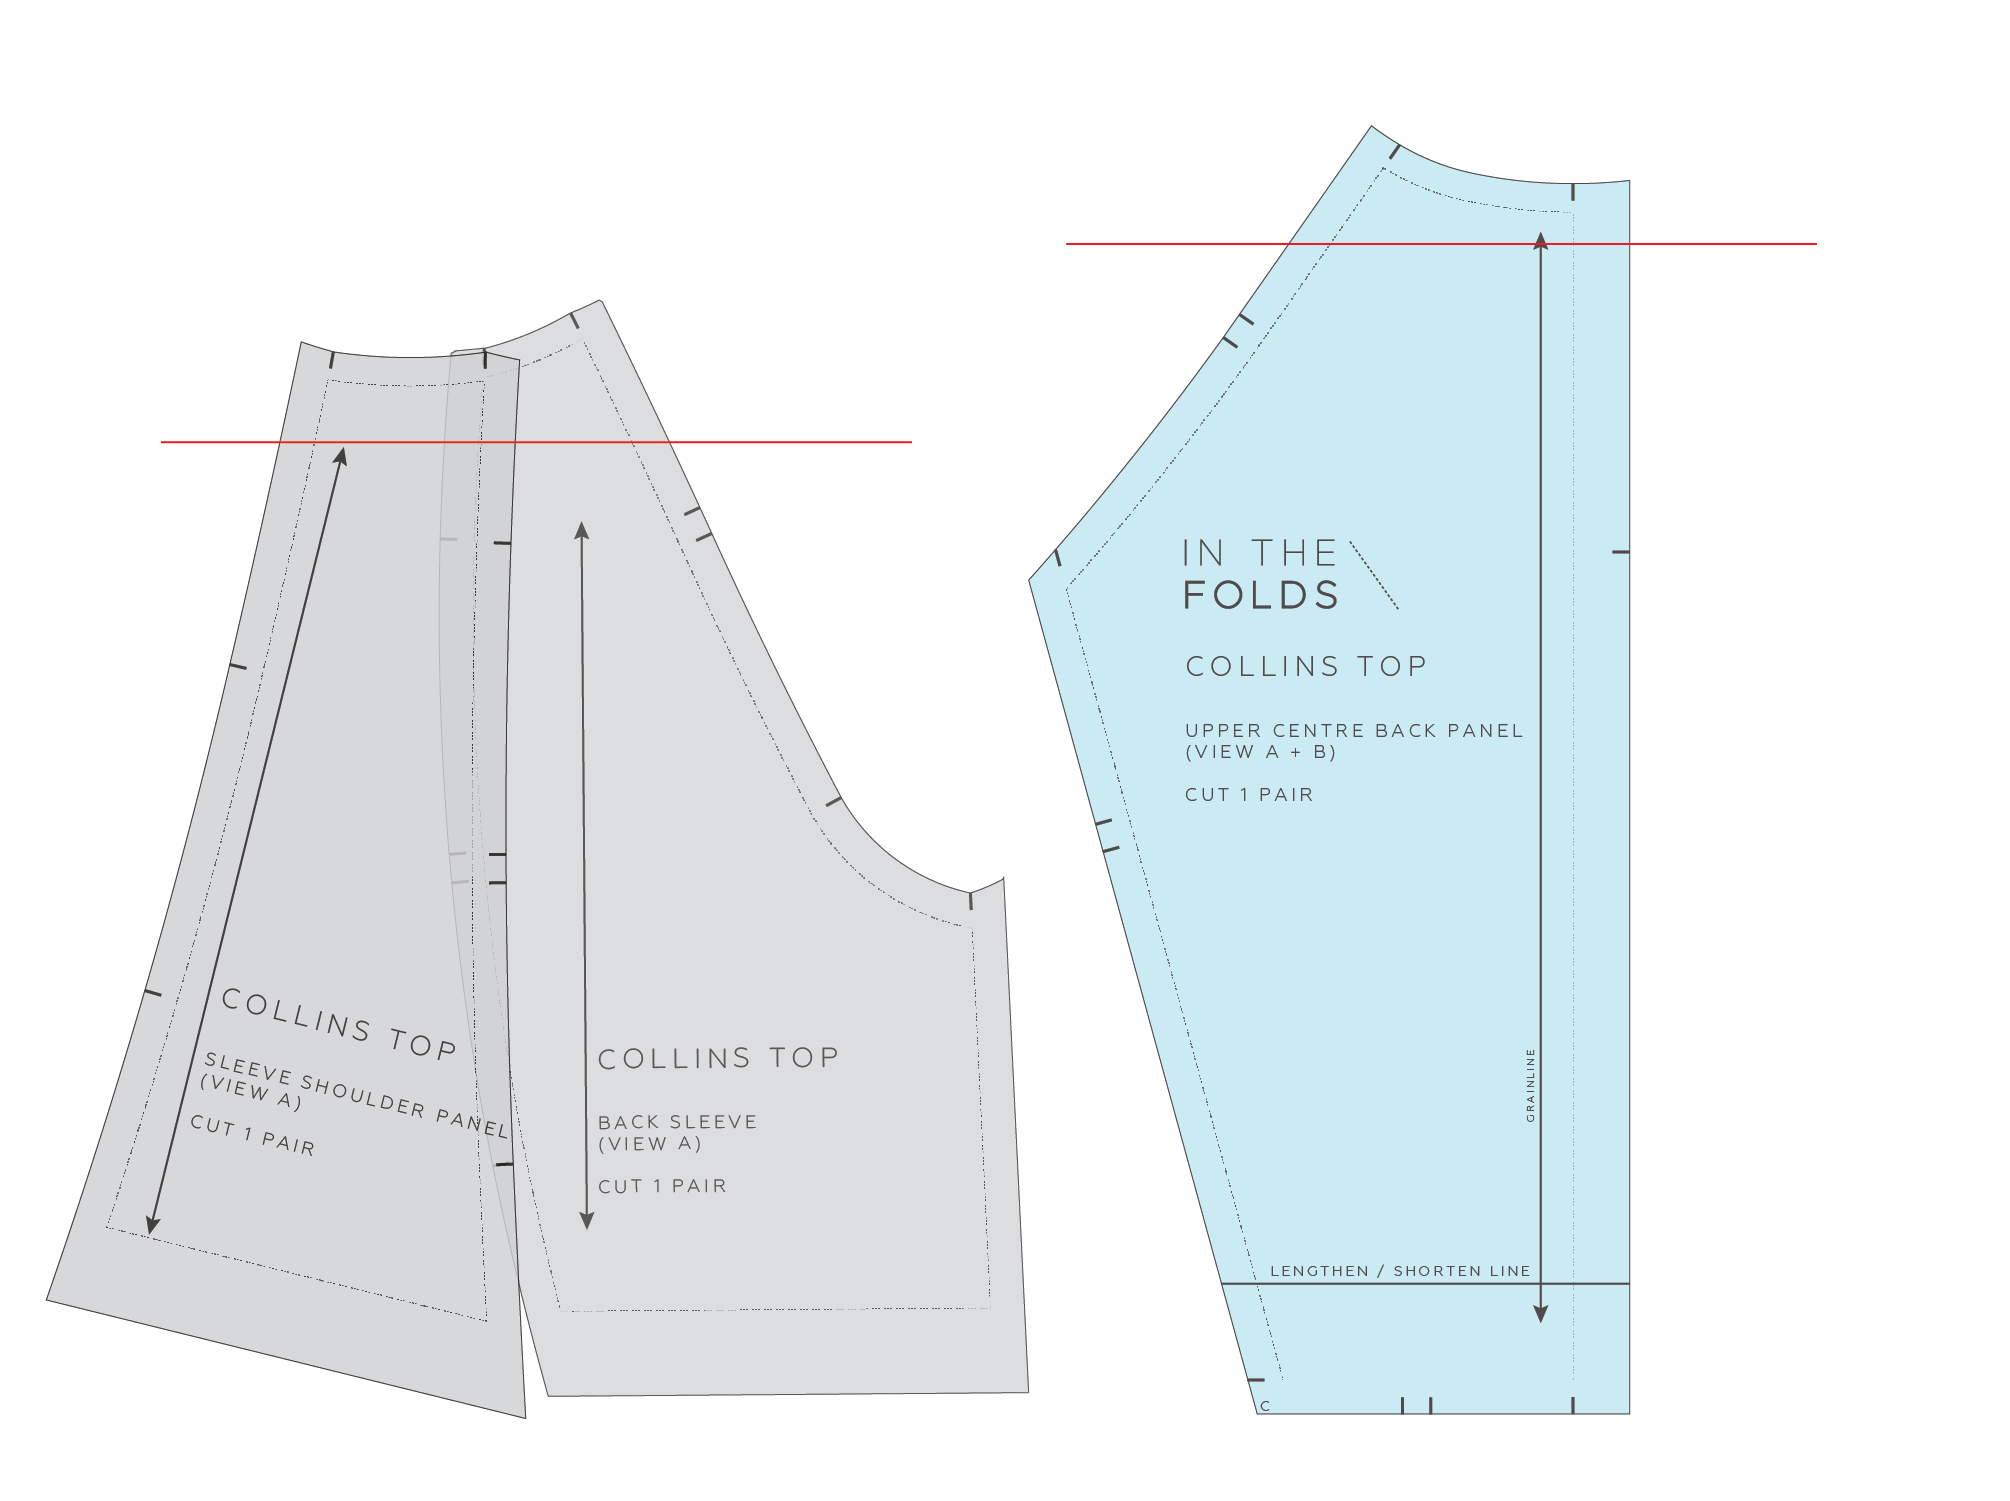
In this case we’ll be drawing a horizontal line through our back piece, towards the neck, and through the similar area on the sleeve pieces. On the sleeve I have marked the alteration line perpendicular to the back sleeve grainline.

Add the alteration amount required.

Add the amount required. This is when having a toile to refer to is very helpful. Or, if this is an alteration you regularly have to make, then you might have a good idea how much is required.

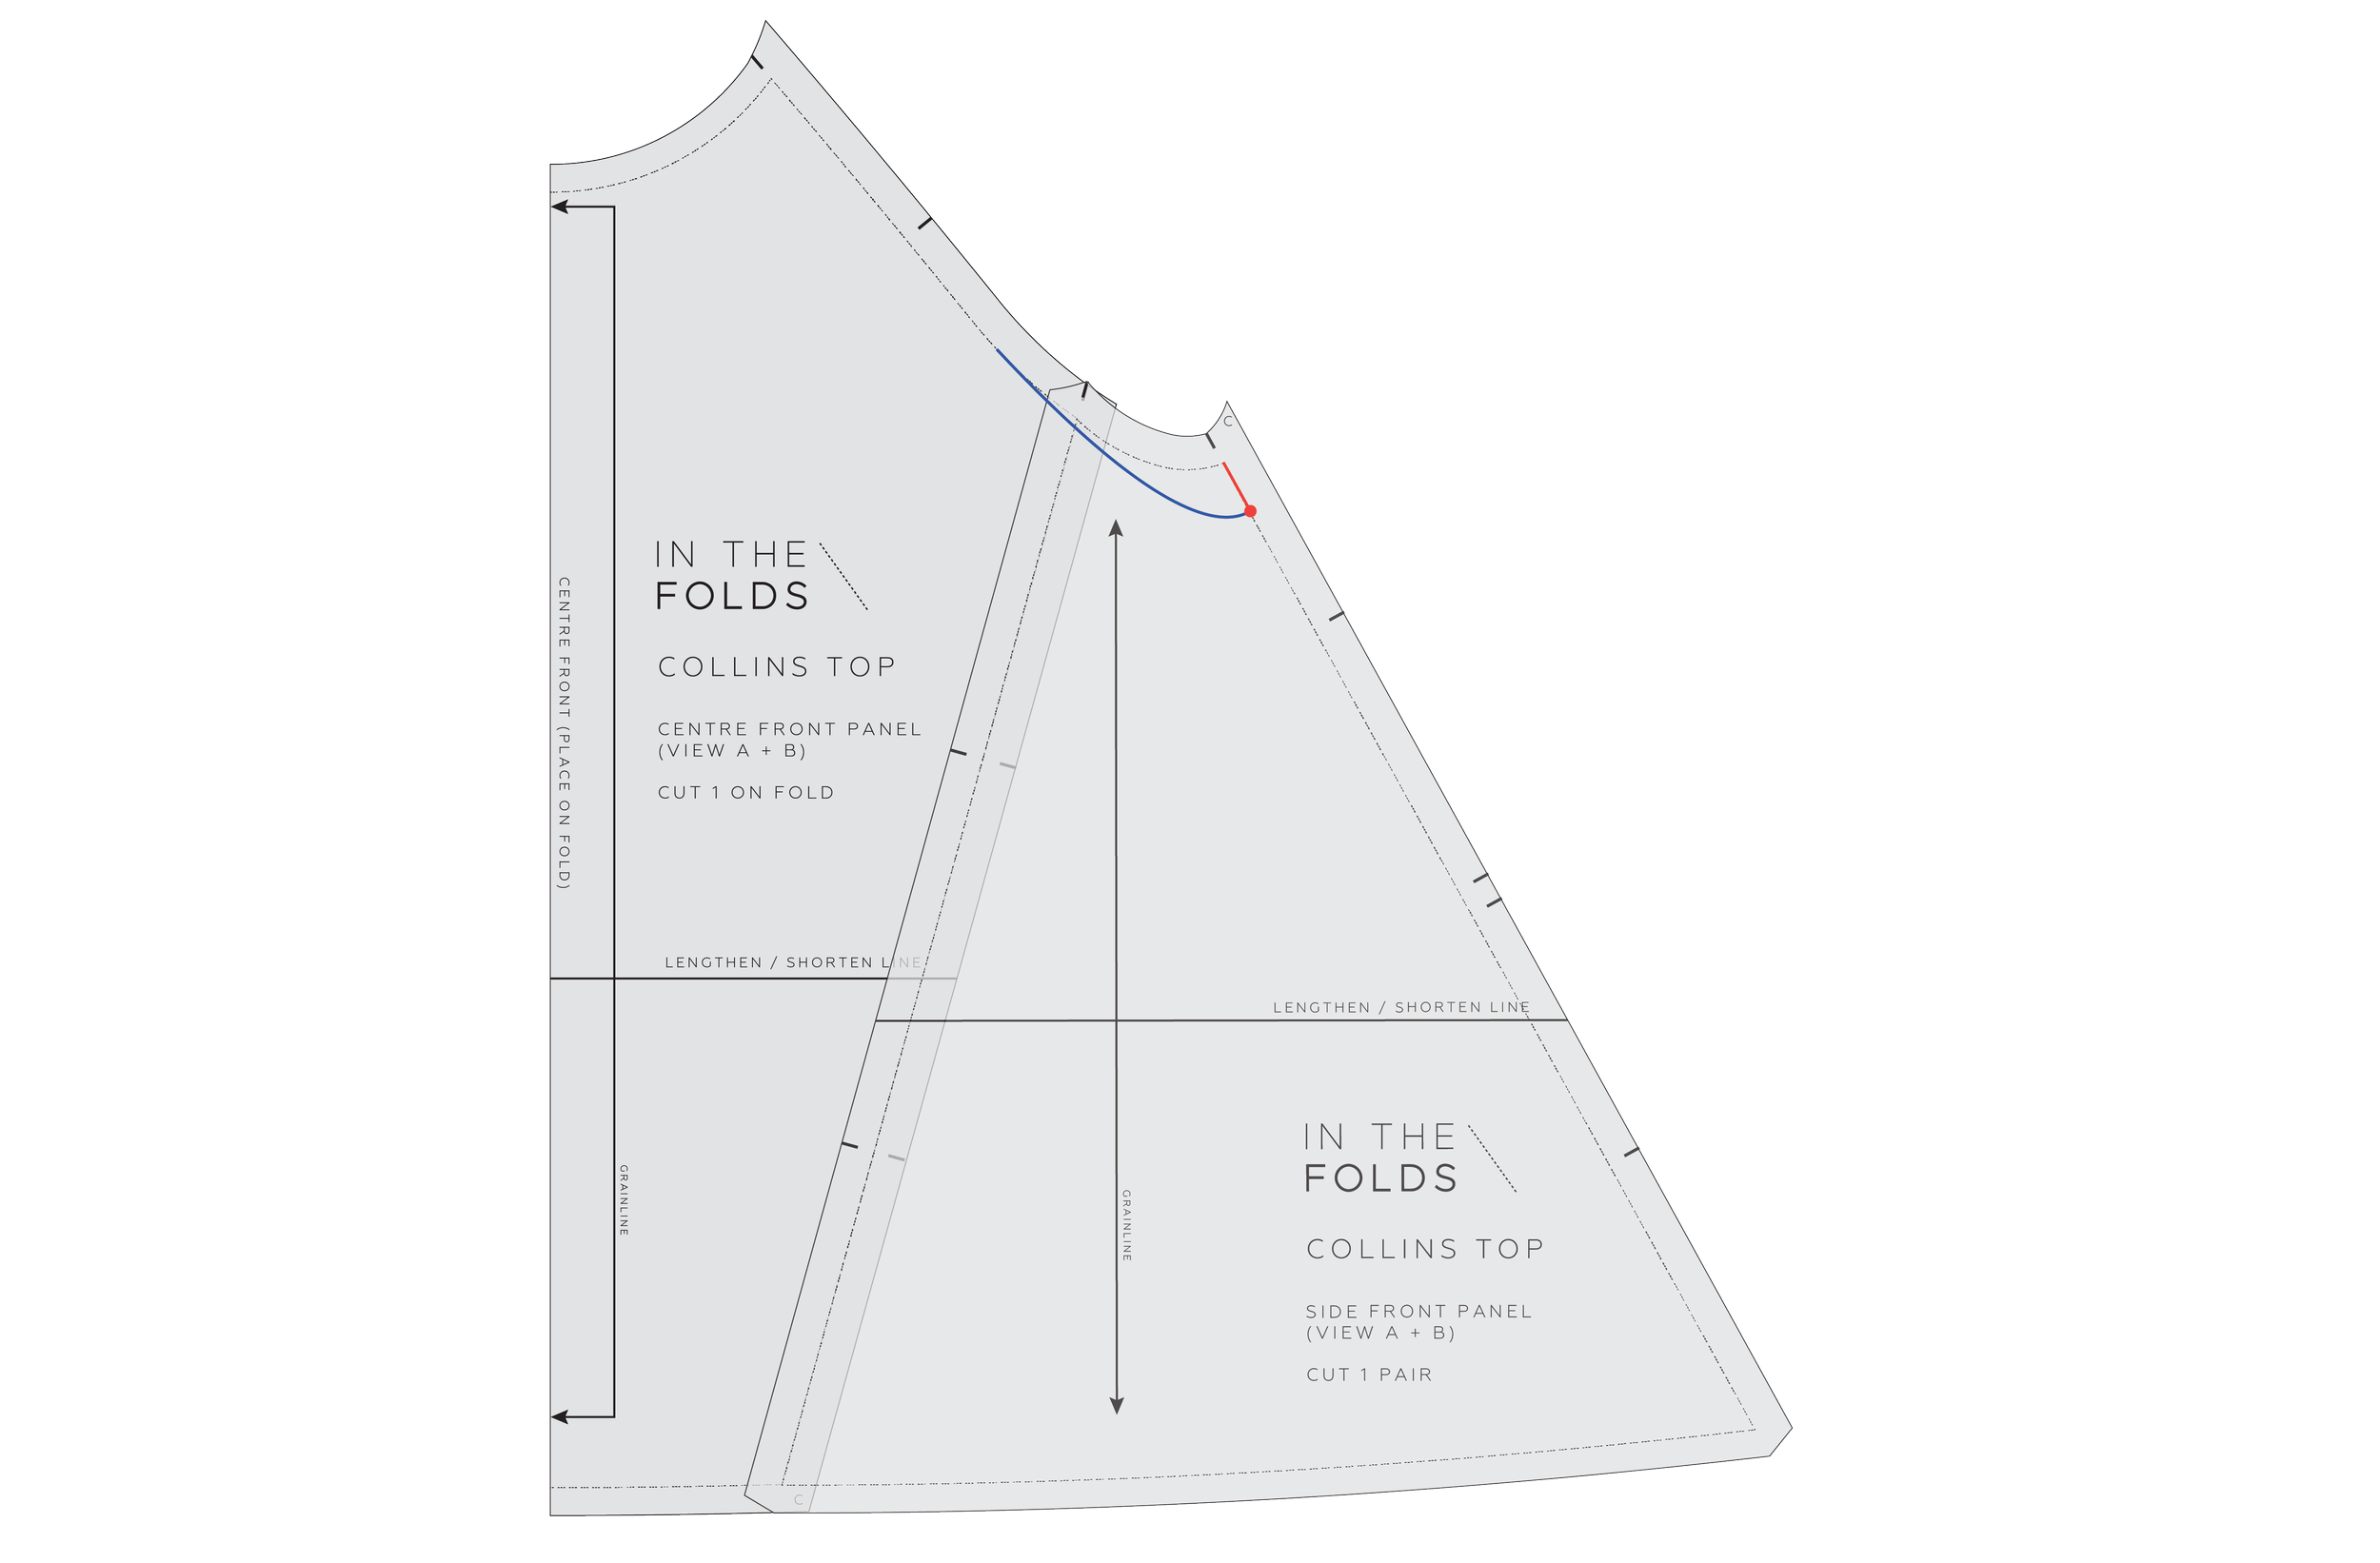
Step 4: True the lines

True the lines of your pattern alteration.

“Truing” your lines means that you need to draw a smooth line over the alteration. This takes some practice, so be sure to use a pencil. I like to use a transparent ruler and pivot it to create a nice smooth curve (similar to the way I add seam allowance on a pattern), but you may prefer to use a French curve.

Step 5: Add your panel lines back in

Add panel lines back in.

If you have joined any pattern pieces together to make the alteration, mark the panel lines back in. Do this the same way as how you trued your lines. You want the lines to be as smooth as possible.


Step 6: Finalise the pattern piece

Finalise the pattern piece.

To finalise the pattern pieces you will need to add seam allowance onto the areas that have been altered.

Trace altered pattern pieces onto pattern paper.

For pieces that have been joined, trace the altered pieces onto pattern paper, then add seam allowance on. When tracing a pattern, be sure to always transfer the notches and the grainline.

Step 7: Check the pattern pieces

Check the pattern pieces.

Walk the seams to check that everything fits together nicely and that none of the notches have moved. By doing this you are checking that seams that you will be joining together are the right length, so you don’t get any nasty surprises at the sewing stage. You also need to check that you have smooth lines. For example, in the diagram I am checking that the neckline is still a nice smooth curve. If you realise that the line is no longer smooth, smooth it out and use a tracing wheel to transfer the new line onto the overlapped paper.

Step 8: Make a toile

It’s always a good idea to make a toile to check a pattern alteration you’ve made. In the case of this alteration, you may also want to check if you need more shaping through the back. To do this you can get someone to help you and pinch our excess fabric through the back seams.

As with any pattern alteration, the important thing is to take it one step at a time. It’s usually when we’re rushing that we make mistakes, so I recommend working through the process bit by bit and having a practise before you start chopping into your good fabric!

Happy Elwood and Collins sewing!

Emily


RESOURCES MENTIONED IN THIS ISSUE

  • The Elwood dress pattern is currently available with a Curated by ITF subscription for the month of February 2024. More information can be found here.

  • The Collins top pattern can be found here.

  • Fitting tutorials that relate to the Collins top can also be applied to the Elwood dress. They can be found here.

  • How to make a toile - post can be found here.

  • Checking and truing seams - post can be found here.


For more issues of the Q & A series, you can check out the archive here.


WHAT YOU’VE BEEN MAKING


MORE POSTS IN THE SERIES

ISSUE 158 - HOW TO LOWER THE COLLINS TOP ARMHOLE (VIEW A)

THE Q & A SERIES

HOW TO LOWER THE COLLINS TOP ARMHOLE

Hi Emily,

I would like to lower the armhole on the Collins top with sleeves. I found a tutorial on the sleeveless version but could not find one for the version with sleeves.

Could you help me please?

Thank you so much in advance!

M


Hi there!

We love it when our customers ask us how to customise their makes to fit their own unique bodies and measurements. We also know how uncomfortable it is when a garment cuts in under the arm, so we’re very happy to be able to answer this question!

HOW TO CHECK IF YOU NEED TO LOWER THE ARMHOLE

Before we get started, I think it’s worth checking that you are sure this is the alteration you need. I raise this, because this same fit issue could be caused by the need to add length between the shoulder and the bust line. This adjustment also lowers the position of the armhole and could correct the problem.

The best way to work out if you need this adjustment in a garment is to check where the dart is sitting. If it's sitting too high then that's a pretty good indication that length is required. If not, then you're right and just lowering the armhole should do the trick.

In the case of the Collins top (which doesn’t have a dart) I would say to consider your wardrobe in general. Do you often have problems with armholes cutting in? If so, then it’s likely that you need to add length between the shoulder and bust line, rather than lower the armhole specifically.

Some of our Curated by ITF members have realised, through the process of learning to fit clothes specifically to their unique body measurements, that this is a consistently needed adjustment, and it has become one of their standard adjustments when making clothes for themselves.

If the problem of armholes cutting in is not a common issue for you, then read on!

HOW TO LOWER THE ARMHOLE ON THE COLLINS TOP (VIEW A)

Because of the puzzle element of the Collins top (which happens to be one of most loved parts of this pattern!) we know it might feel a little daunting to attempt fit alterations, but as with anything, if you just take it step by step, you’ll have no trouble at all.

Here you go!

STEP 1

Pin or tape (with something that is easily removed) the SIDE FRONT PANEL to the CENTRE FRONT PANEL as if they have been joined.

On the side seam STITCH LINE, mark the amount you would like to lower the armhole by.

STEP 2

Redraw the armhole with a nice smooth curve, joining the point marked in the previous step. Keep the line as similar to the original as you can and meet the side seam at a right angle.

STEP 3

Line up the sleeve panels, STITCH LINE on STITCH LINE as if they have been joined and pin / tape in place. Mark in the bicep line (red line), which runs from the top of the underseam on the front through to the underseam on the back. Take half the measurement you used in STEP 1 and lower the bicep line by this amount (blue line).


OUR CUSTOMERS LOVE THE COLLINS TOP FOR ITS SATISFYING PUZZLE-LIKE CONSTRUCTION


STEP 4

Re-draw the armhole lines with a smooth curve.

STEP 5

Walk the front sleeve into the front armhole, STITCH LINE on STITCH LINE, starting at the neck side of the line.

It is likely that the STITCH LINE on the FRONT SLEEVE is not long enough to reach the end of the armhole curve due to the alteration.

Measure the distance between the sleeve STITCH LINE and the side seam on the SIDE FRONT PANEL. This is the amount that needs to be added to the FRONT SLEEVE.

STEP 6

Add this amount to the sleeve curve and then join to the hem STITCH LINE.

If it is a large alteration and the shape of the sleeve underseam is going to change drastically, we suggest also adding some width at the hem to keep the shape of the piece intact.

STEP 7

Now, repeat the same alteration for the back pieces, then check the front and back side seams line up nicely at the top and bottom of the seam.

Add seam allowance to the new lines (red) and cut away any excess.

Happy fitting!

Emily


RESOURCES MENTIONED IN THIS ISSUE

  • The Collins top pattern can be found here.

  • Adjusting length above the bust - blog post here.

  • Checking patterns: Curved seams - blog post here.

  • How to add seam allowance to a sewing pattern - blog post here.


For more issues of the Q & A series, you can check out the archive here.


WHAT YOU’VE BEEN MAKING


MORE POSTS IN THE SERIES

ISSUE 120 - Changing a high-low hem to a straight hem

THE Q & A SERIES

Changing a high-low hem to a straight hem

Hello from France,

I want to make the Collins top but I would like the front and back to be the same length. Is it possible? How can I make the changes? Can you help me?

Thank you.

Liliane


At In the Folds it is our mission to help sewists make clothes that will be worn, loved and cherished. A big part of this is empowering makers by teaching them the skills to alter pattern fit and style to better suit their needs.

When altering the design of a pattern, we call this ‘pattern hacking'.

What is pattern hacking?

Pattern hacking means that you use an existing pattern to draft a new pattern.

This could mean just making small changes, such as adding a pocket or changing the neckline. It could also mean making large-scale changes, such as adding a sleeve to a sleeveless pattern or combining multiple patterns to create an entirely new design.

Why pattern hack?

The main benefit of pattern hacking is that it saves time! This is because you can take a pattern that you already know fits you well and create a new design. You don't need to dive back into assessing the fit all over again, as you have already done that work with the original pattern.

For large-scale hacks you may still need to make some fit alterations after checking your toile, but these will be far fewer than if you had started with a new pattern.

Pattern hacking also increases the longevity of a pattern, which ultimately saves you money. For example, you may see a garment style that you like somewhere, and with some pattern hacking skills up your sleeve, you will be able to adapt a pattern that you already have in your stash, rather than buying another pattern.

Another reason you might choose to hack a pattern is that sometimes it is difficult to know what changes you would like to make until after you have spent some time wearing it. You may start to think, 'If only it was a bit longer...' or 'If only it had pockets...' Pattern hacking gives you a chance to make the clothing you want to wear without needing to draft patterns from scratch.

Pattern hacking is also a great opportunity to learn patternmaking skills and build on these skills gradually over time. Like any new skill or hobby getting good at it will take time! Be patient and enjoy the process. After all, that's what it's all about!

In the Folds Collins top

The Collins top is a loose-fitting trapeze-shaped top designed for woven fabrics and is perfect for hot summer days!

One of the main features of the Collins top is that it has a high-low hem. This means that the front is shorter than the back. But, with a few pattern hacking skills, you can alter the hem so that it is the same length around the whole top.

You can choose to add length to the front (so that the whole top is the same length as the back) or remove length from the back (so the whole top is the same length as the front). We suggest looking at the product photos to work out your preference. Or, compare the length of the centre front panel pattern piece to a top you already own.

Whatever you decide, this tutorial will show you how to achieve both options.

First steps of changing a high-low hem to a straight hem

Step 1

Due to the panel lines in the top, we first need to put the pieces together as if they have been sewn so that we have a full front piece and a full back piece.

Place the front panels together as if they have been sewn - STITCH LINE on STITCH LINE. (Stitch lines are the grey lines on In the Folds patterns). Tape or pin in place. If taping, use small pieces of tape that can be easily removed (eg. magic tape).

Repeat for the 3 back panel pieces.

Step 2

Place the front and back together at the side seam. You will need to flip the front to do this. Line up the pieces at the top of the side seam.

Rotate the front so that the CENTRE FRONT and CENTRE BACK are aligned. Remember the CENTRE BACK has seam allowance - this is why only the pieces that will be cut on the fold line up.

Measure the length between the front and back hems at the CENTRE FRONT / CENTRE BACK. Record the amount.

Step 3

Flip the front back over and line up the pieces at the side seam STITCH LINE as if they have been joined.

If removing length from the back, move to STEP 8. If adding length to the front, continue to Step 4.


Lengthening the front of the Collins top

Step 4

Tape/glue pieces of pattern paper to the bottom of each pattern piece that will be lengthened (front panels and side back panel). Make sure you’re attaching the paper to each individual piece, as you will be separating the pieces back into panels after making the alteration.

Extend the CENTRE FRONT by the amount you will be lengthening the front by (found in Step 2).

Step 5

Re-draw the hemline with a smooth curve from the new CENTRE FRONT hem point. You want the line to transition back into the original hem around the back panel line. The new hemline needs to meet the CENTRE FRONT at a right angle. This ensures a smooth line when the piece is cut on the fold. It might take a couple of attempts to create the curve you want. Use a pencil so you can erase it and try again if you need to. We suggest drawing curves with broken lines as it makes it easier to get an accurate line.

Step 6

Extend the panel lines onto the attached paper. Be sure to extend the STITCH LINE, rather than the edge of the pattern pieces.

Step 7

Separate the panel pieces and add seam allowance onto the new lines. Cut along the new lines to remove excess paper. 

Due to how much the FRONT SIDE PANEL piece has changed, rotate the piece slightly so that the hem sits closer to a straight line. Alter the grainline to reflect this.

The pattern is now complete and you’re ready to get sewing!

Shortening the back of the Collins top

Step 8

Measuring up from the CENTRE BACK hem, mark the amount to remove from the back length (found in Step 2).

Step 9

Re-draw the hem line with a smooth curve from the new CENTRE BACK hem line. You will want the line to transition back into the original hem around the front panel line.

The new hemline needs to meet the CENTRE BACK at a right angle. This ensures a smooth line when the piece is cut on the fold. It might take a couple of attempts to create the curve you want. Use a pencil so you erase it and try again if you need to. Cut along the new hemline to remove the excess length.

Separate the panel pieces and you’re ready to cut the pattern from fabric.

We hope this tutorial got you thinking about all the different ways you can adjust a pattern to make it your own! 

Happy hacking!

Emily


RESOURCES MENTIONED IN THIS ISSUE

  • More info about Curated by ITF can be found here.

  • Barkly skirt Hack Kit is currently only available with a Curated by In The Folds subscription for the month of July 2022. During this time it can be found here. It will be released as a standalone resource in the future.

  • Collins top pattern can be found here.

  • How to add seam allowance to a sewing pattern tutorial can be found here.


For more issues of the Q & A series, you can check out the archive here.


WHAT YOU’VE BEEN MAKING


MORE POSTS IN THE SERIES

ISSUE 96 - Forward shoulder adjustment on the Collins top

THE Q & A SERIES

Forward shoulder adjustment on the Collins top

Hi Emily,

I found your post last week about doing a forward shoulder adjustment really helpful! Is it possible to make a forward shoulder adjustment on the Collins top pattern? I just finished one and it slips to the back on my shoulders and after reading your last email, I realised this is the alteration I need!

Thanks,

J


Hi J,

You can definitely make a forward shoulder adjustment on the Collins top pattern. The process is just slightly different due to how the seams work on that pattern.

There is no shoulder seam on the Collins top, but we do need to move the seams there are so that it's balanced across the shoulder.

Step 1

Trace a copy of FRONT SLEEVE [10], SLEEVE SHOULDER PANEL [11] AND BACK SLEEVE [12]. As there is no shoulder seam, for a forward shoulder adjustment, the aim is to move the seam lines forward.

Mark slash lines on each pattern piece as illustrated. Start with the FRONT SLEEVE [10] and draw the line from the neckline STITCH LINE, down to the lower notch. Keep each slash line close to the seam line.

Step 2

a Take the FRONT SLEEVE [10]. Cut down the slash line from the neckline. Stop 1-2mm from the STITCH LINE to create a hinge.

b Cut in from the seam allowance on the seam, towards the point where you stopped cutting on the slash line. Again, stop 1-2mm from the end of the cut line.

Step 3

a Mark the amount you would like to move the front seam by on the neckline STITCH LINE. Mark the line towards the front of the sleeve. If you have made a toile, refer to it to get an idea. For the example, we are moving the seam line 1cm forward.

b Use the hinge created in STEP 2, to slide the cut line over to the point marked. The seam has now been moved forward. Smooth out the seam line at the transition point if required.

Step 4

a Cut into the slash line on the front side of the SLEEVE SHOULDER PANEL [11]. The front of the panel is indicated by single notches. Cut in through the seam allowance to create a hinge.

b Use the hinge top open the slash line.

Step 5

a Slide pattern paper under the slash line. Attach the main section of the piece to the paper. Mark the amount you will be adding at the neckline STITCH LINE. This will be the same amount that we removed from the FRONT SLEEVE [10]. This means that the sleeve will still be the same size when we complete the alteration, as what we remove from one panel, we add to another.

b Use the hinge created to slide the cut line over to the point marked. The seam has now been moved forward.

Step 6

a Cut through the slash line on the back side of the SLEEVE SHOULDER PANEL [11]. Mark the amount you need to move the back seam by on the neck STITCH LINE. In the example, we are keeping this move consistent with the original design, so are moving it 1cm forward.

b Use the hinge created to slide the cut line over to the point marked. The seam has now been moved forward. Smooth out the seam line at the transition points if required.

Step 7

Repeat process for BACK SLEEVE [12]. Move the seam forward by the amount removed from the SLEEVE SHOULDER PANEL[11] in STEP 6a.

Step 8

We now need to re-draw the neckline over the altered seams. Line up the STITCH LINE on the FRONT SLEEVE [10] and SLEEVE SHOULDER PANEL [11] at the neckline, as if the two pieces have been joined together. Hold in place with a pattern weight or pins.

Step 9

Line up the STITCH LINE on the BACK SLEEVE [12] and SLEEVE SHOULDER PANEL [11] at the neckline, as if the two pieces have been joined together. Hold in place with a pattern weight or pins.

Step 10

Re-draw the neckline, by drawing a line of best fit through the points of the original STITCH LINE. Use a French curve if you have one.

Step 11

Take a tracing wheel and use it to trace over the new neckline. This will transfer the new line onto the overlapping bits.

Step 12

Separate the pieces and mark in the lines marked by the tracing wheel. Add seam allowance (1cm) on to the new neckline.

Happy sewing,

Emily


RESOURCES MENTIONED IN THIS ISSUE

  • Collins top pattern can be found here.


For more issues of the Q & A series, you can check out the archive here.


WHAT YOU’VE BEEN MAKING


MORE POSTS IN THE SERIES

ISSUE 72 - Using striped fabric on the Collins top

THE Q & A SERIES

USING STRIPED FABRIC ON THE COLLINS TOP

Hi Emily

I'm making my third Collins top and I wanted to try something fun with stripes.

If I change the direction of the fabric like your model picture so some stripes are going different directions, do you have any advice on which pieces don't run parallel with the selvedge or does it not matter once the garment is all together? Should I also need to buy more fabric to allow for direction change?

Many thanks for your help.

Nicola


Hi Nicola,

I am pleased to hear you have been enjoying using the Collins top pattern and have another one in the works.

I would suggest cutting the pieces the same way I did. I think swapping them out, so that the side panels were cut the other way, might look a little strange at the side seams due to the stripes running horizontally and the pieces being A-line. You could swap the way the sleeves were cut if you like, so that the stripes run in the opposite direction to how I cut them. Make sure you are using a fabric that has a consistent amount of give in both directions, so that cutting on the crossgrain doesn't impact the drape. The fabric I used had the stripes running parallel to the selvedge - this is also something to keep in mind when considering using a striped fabric.

If you want to have a play with stripe direction on a technical drawing, you can download a copy here.

I just looked at the cutting plans, and it does look like you might need a little bit more fabric for changing the cutting direction. Potentially though, if you cut the pattern pieces on flat fabric, rather than on the fold, this might limit the amount of fabric you require. 

If you want to know exactly how much fabric you will need, you could print the A0 pattern out on A4 paper and work out what scale the pattern is in by measuring the test square. You could then place the pieces on a table / paper to work out how much fabric you need in relation to the width of fabric you have or want to buy. 

Let me know how you go!

Happy sewing,

Emily


resources mentioned in this issue

  • The Collins top pattern - can be found here.


For more issues of the Q & A series, you can check out the archive here.


What you’ve been making


More posts in the series

ISSUE 48 - Raising the Collins top armhole

HEADER_ISSUE_48.jpg
HEADING - V1.png

Hello Emily,

I would just like to say how easy your Collins top pattern was to sew with.

From printing with layers, professional drafting and markings, concise, well written directions, and clear diagrams, this pattern was a pleasure to use.

The high bust measurement is a great inclusion in the instructions, a great basis to begin with for a better fit. Congratulations on the quality of your design and format.

I was wondering if you could take the time to answer an adjustment question, or direct me to a tutorial on making the length/ depth of the armhole smaller.

My daughter also needs the same adjustment necessary to cover her bra under the arm.

I’m not sure how to adjust the length without affecting the top shoulder panel seam joins at the front and back that form part of the armhole edge. Ideally, I would need to raise the armhole by approx 2-3 cm. The shoulders and chest area fit well in length and width.

Thank you in advance for taking the time to reply to my question.

Chris 


Hi Chris,

Thank you for your lovely email. I am thrilled to hear you enjoyed the experience of using the Collins top pattern

I'm more than happy to help you with this question. It's not too difficult, but there are a few more steps involved than if it was a regular sleeveless top without the panel lines.

redraw the armhole

2. WRAP-SKIRT-GRADING-SIZES-3.jpg

Step 1
To start we will be putting all the panels of the top together to make a full front pattern piece. Place SIDE FRONT PANEL [2] on the CENTRE FRONT PANEL [1] - stitch line on stitch line (grey line on the pattern) - as if the pieces have been sewn together.

Hold in place with masking tape (or a tape that is easy to remove).

3.COLLINS-TOP-ALTER-ARMHOLE.jpg

Step 2
Place FRONT SHOULDER PANEL [6] on to the CENTRE FRONT PANEL [1] - again, with stitch line one stitch line (grey line on the pattern) - as if the pieces have been sewn together.

Hold in place with tape.

4.COLLINS-TOP-ALTER-ARMHOLE.jpg

Step 3
Place a scrap piece of pattern paper under your pattern - around the armhole / top of side seam section. Tape in place.

At the armhole point (where the side seam meets the armhole on the stitch line), extend the side seam by the distance you would like to raise the armhole by.

In the example I have extended the side seam by 3cm / 1 1/4, but this will depend on your preference. Make sure the new line runs at the same angle as the side seam.

5.COLLINS-TOP-ALTER-ARMHOLE.jpg

Step 4
Re-draw the armhole with a nice smooth curve - joining the top of the new side seam to the original armhole line on the FRONT SHOULDER PANEL [6]. A french-curve will come in handy if you have one, to draw this curve.

redraw panel lines

6.COLLINS-TOP-ALTER-ARMHOLE.jpg

Step 5
Extend the panel seam line that connects the CENTRE FRONT PANEL [1] and the SIDE FRONT PANEL [2] so that it reaches the new armhole line.

7. GRADING-BETWEEN-WRAP-SKIRT-SIZING.jpg

Step 6
Re-draw the line that joins the CENTRE FRONT PANEL [6] and the CENTRE FRONT PANEL [1]. Again - a French curve will come in handy to get a nice smooth curve.

Mark a notch on the new seam line (in a similar position to the original, although does not need to be exact).

trace copies of new pattern pieces

Page 1 copy 8.jpg

Step 7
Trace your new pattern pieces onto paper by following the new lines and easing back into the original panel lines where they meet. Add seam allowance back on where necessary and be sure to transfer the notches.

Step 8
Repeat the process for the back pattern pieces.

finalising the pattern

Step 9
When making alterations to a pattern, it is always a good idea to check and true the pattern before cutting from fabric.

Step 10
Due to the changes made to the body of the pattern, you will also need to redraft the facing, so it fits the new pattern pieces. You can find a tutorial about how to do that here

Happy sewing!

Emily


resources mentioned in this issue

  • The Collins pattern can be found here.

  • How to add seam allowance to a pattern. Tutorial can be found here.

  • How to check and true sewing patterns. Tutorial can be found here.

  • The Collins top sew-along: Re-draft the facing. Tutorial can be found here.


P.S. Would you like to know what the Q & A series is all about? This page tells you a little bit more about the motive behind the series. Past issues from the Q & A series can be found here.

Don't have a question, but found this newsletter helpful? I'd love to hear from you! Get in touch and say hi. 


What you’ve been making


More posts in the series

ISSUE 13 - Alternative seam finishes for the Collins top

ISSUE 13 - ALTERNATE-FINISHING-TECHNIQUES.jpg

THE Q & A SERIES - ALTERNATE SEAM FINISHES FOR THE COLLINS TOP

Hi Emily!

I just have a quick question about the Collins Top! I’ve just started sewing with French seams because my fabric is pretty lightweight.. but struggling to work out how to do the middle back seam leaving the opening for the button. Do you have any tips?

- Polly


Hi Polly,

How exciting! I am thrilled to hear you are making the Collins top!

FLYNN JACKET IN THE FOLDS.jpg

I'd say that your options are:

1. Finish the edges of the centre back with bias binding. This one might not be ideal if your fabric is too lightweight. The photo above is from the Flynn jacket - but should give you a good idea of what this finish looks like!

ROLLED HEM IN THE FOLDS.jpg

2. Finish the centre back seam allowances with a double turn and stitch (almost like a rolled hem). You can find instructions on how to do this in the Little Book of Seam Finishes (a free e-book that you can download), along with the other finishes mentioned in this email (and many more).

SEWING FRENCH SEAMS.jpg

3. Stitch the centre back seam closed with a French seam. You can actually get the Collins on and off without the button closure, so if you’re not too attached to the idea of having the opening this option could be a good one. You can find a tutorial in the Rushcutter sew-along here (pictured above).

Happy sewing,

Emily


RESOURCES MENTIONED IN THIS ISSUE

  • The Collins top sewing pattern. Pattern can be found here.

  • The Flynn jacket sewing pattern. Pattern can be found here.

  • The Little Book of Seam Finishes e-book can be downloaded for free here.

  • Sewing French seams (from the Rushcutter dress sew-along). Tutorial can be found here.


P.S. Would you like to know what the Q & A series is all about? This page tells you a little bit more about the motive behind the series. Past issues from the Q & A series can be found here.

Don't have a question, but found this newsletter helpful? I'd love to hear from you! Get in touch and say hi.


More posts in the series

Issue 1 - Lengthening the Collins top (with a FBA)

ISSUE 1 - LENGTHENING-THE-COLLINS-TOP-WITH-FBA.jpg

Welcome the the Q & A series.

Over the last few years of running In the Folds, I have struggled with the idea of sending an email newsletter. At a time when we are constantly bombarded with information from all different directions, I kept wondering what I could create that would be truly valuable to the community that I serve.

I want to create something that you will look forward to receiving, something that will encourage you to sit down with a cup of tea and take it all in, not another piece of content that will interrupt your day, but something that will inspire and encourage you on your handmade journey.

The Q & A series - What it’s all about

The format I settled on is the Q & A series, an opportunity to share the questions I often receive in my inbox, with all of you. I realised that my answer to one person's question is a chance for us all to learn something new and an opportunity to continue the conversation about the many different parts of the process of making our own clothes.

It is my hope that this series takes us to interesting and unexpected places. I will be sending the newsletter weekly for the time-being (this is something I might adjust after seeing what the response to the newsletter is) and I hope you choose to continue on this journey with me.

If you have a question you would like to ask, please scroll to the bottom of this email to find the link to the question page. I look forward to hearing from you!

COLLINS-TOP-LENGTHEN-1.jpg

THE Q & A SERIES - LENGTHENING THE COLLINS TOP (WITH FULL BUS ADJUSTMENT)

I am in the midst of making your lovely Collins top pattern (which is so well drafted!) but I am stuck. I just went through all the steps of a FBA (full bust adjustment), finished truing and then realized I also wanted to lengthen it considerably.

Would it make sense to lengthen the front via your tutorial but true the side seams from below the new dart- maybe the bottom leg? It seems if I true again for lengthening from the top to the hem I’ll mess up the shape of the dart.

- Melissa


Hi Melissa,

Thank you for getting in touch, and for your lovely email. I am more than happy to help you with this! Always a good idea to get a second opinion when you can, and I agree the Collins top FBA does involve a bit of work, so you don't want that going to waste!

I just printed the front piece with the dart added from the FBA tutorial and had a look what happens for both options for lengthening.

OPTION 1

COLLINS-TOP-LENGTHEN-2.jpg

Add the desired length to the pattern using this tutorial. Fold out the dart (the way you would have done in the FBA tutorial to create the dart shaping) and then true the seam from the top of the seam. Cut the new seam line and then open up dart.

OPTION 2

Collins-1-01.png

Add the desired length to the pattern using this tutorial. True the seam from the lower dart arm.

THE VERDICT

COLLINS-TOP-LENGTHEN-4.png

As you will see in the above illustration, the difference between the two approaches is minimal (barely noticeable in fact). By trueing from the top of the seam the dart shaping wasn't impacted. I'd say you can choose whichever option you feel more comfortable with as the difference is only about 2-3 millimetres.

Happy sewing,

Emily


RESOURCES MENTIONED IN THIS ISSUE

  • Collins top FBA (Full bust adjustment) tutorial. Tutorial can be found here.

  • Lengthening the Collins top pattern. Tutorial can be found here.

  • How to check and true sewing patterns. Tutorial can be found here.

  • Collins top sewing pattern. Get the pattern here.


P.S. Don't have a question, but found this newsletter helpful? I'd love to hear from you! Get in touch and say hi.


More posts in the series