
THE Q & A SERIES
Forward shoulder adjustment on the Collins top
Hi Emily,
I found your post last week about doing a forward shoulder adjustment really helpful! Is it possible to make a forward shoulder adjustment on the Collins top pattern? I just finished one and it slips to the back on my shoulders and after reading your last email, I realised this is the alteration I need!
Thanks,
J
Hi J,
You can definitely make a forward shoulder adjustment on the Collins top pattern. The process is just slightly different due to how the seams work on that pattern.
There is no shoulder seam on the Collins top, but we do need to move the seams there are so that it's balanced across the shoulder.
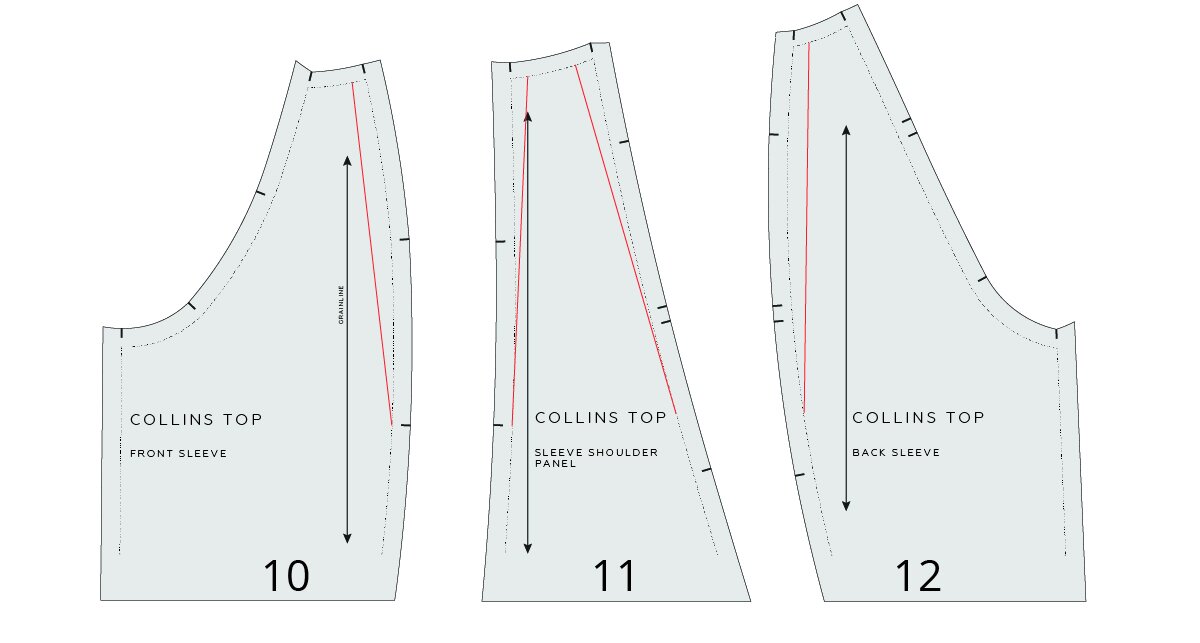
Step 1
Trace a copy of FRONT SLEEVE [10], SLEEVE SHOULDER PANEL [11] AND BACK SLEEVE [12]. As there is no shoulder seam, for a forward shoulder adjustment, the aim is to move the seam lines forward.
Mark slash lines on each pattern piece as illustrated. Start with the FRONT SLEEVE [10] and draw the line from the neckline STITCH LINE, down to the lower notch. Keep each slash line close to the seam line.

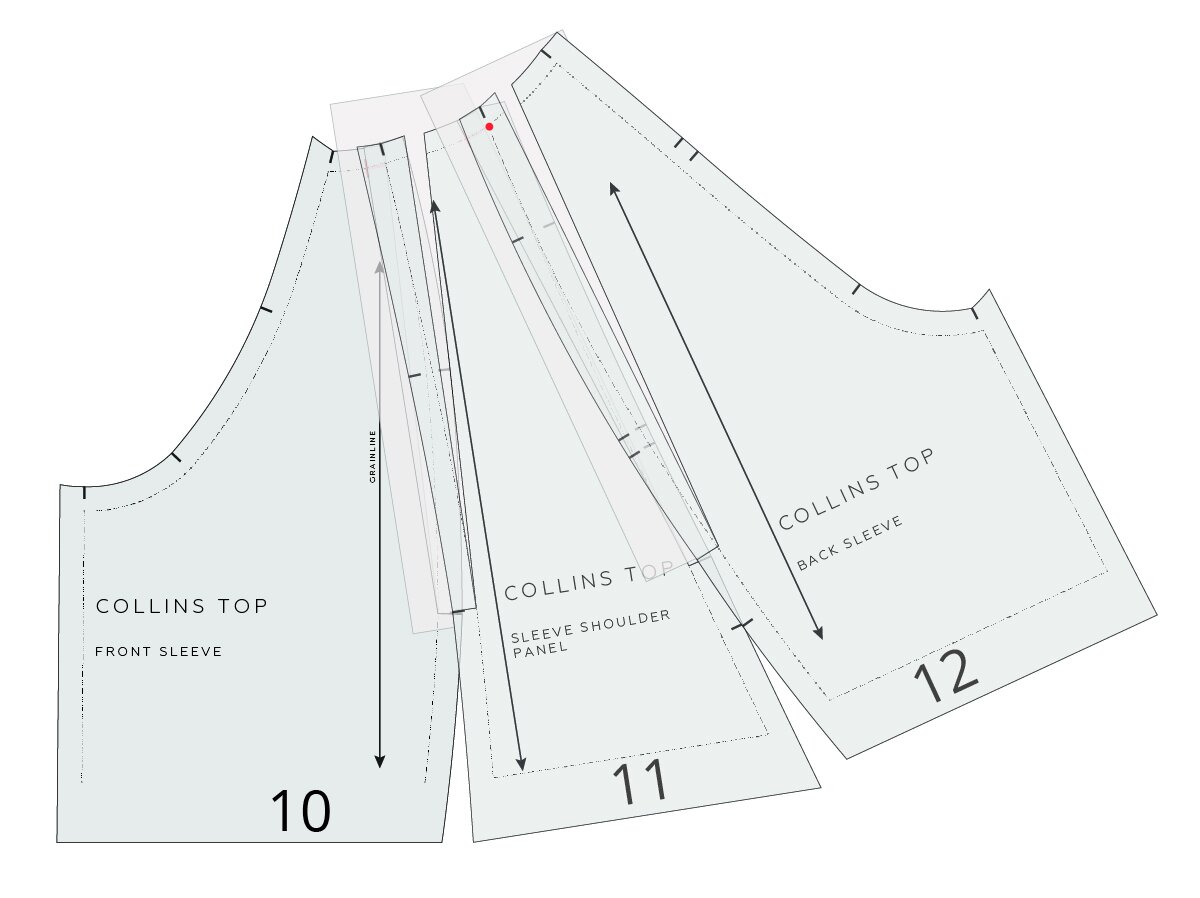
Step 2
a Take the FRONT SLEEVE [10]. Cut down the slash line from the neckline. Stop 1-2mm from the STITCH LINE to create a hinge.
b Cut in from the seam allowance on the seam, towards the point where you stopped cutting on the slash line. Again, stop 1-2mm from the end of the cut line.

Step 3
a Mark the amount you would like to move the front seam by on the neckline STITCH LINE. Mark the line towards the front of the sleeve. If you have made a toile, refer to it to get an idea. For the example, we are moving the seam line 1cm forward.
b Use the hinge created in STEP 2, to slide the cut line over to the point marked. The seam has now been moved forward. Smooth out the seam line at the transition point if required.

Step 4
a Cut into the slash line on the front side of the SLEEVE SHOULDER PANEL [11]. The front of the panel is indicated by single notches. Cut in through the seam allowance to create a hinge.
b Use the hinge top open the slash line.

Step 5
a Slide pattern paper under the slash line. Attach the main section of the piece to the paper. Mark the amount you will be adding at the neckline STITCH LINE. This will be the same amount that we removed from the FRONT SLEEVE [10]. This means that the sleeve will still be the same size when we complete the alteration, as what we remove from one panel, we add to another.
b Use the hinge created to slide the cut line over to the point marked. The seam has now been moved forward.

Step 6
a Cut through the slash line on the back side of the SLEEVE SHOULDER PANEL [11]. Mark the amount you need to move the back seam by on the neck STITCH LINE. In the example, we are keeping this move consistent with the original design, so are moving it 1cm forward.
b Use the hinge created to slide the cut line over to the point marked. The seam has now been moved forward. Smooth out the seam line at the transition points if required.

Step 7
Repeat process for BACK SLEEVE [12]. Move the seam forward by the amount removed from the SLEEVE SHOULDER PANEL[11] in STEP 6a.

Step 8
We now need to re-draw the neckline over the altered seams. Line up the STITCH LINE on the FRONT SLEEVE [10] and SLEEVE SHOULDER PANEL [11] at the neckline, as if the two pieces have been joined together. Hold in place with a pattern weight or pins.
Step 9
Line up the STITCH LINE on the BACK SLEEVE [12] and SLEEVE SHOULDER PANEL [11] at the neckline, as if the two pieces have been joined together. Hold in place with a pattern weight or pins.

Step 10
Re-draw the neckline, by drawing a line of best fit through the points of the original STITCH LINE. Use a French curve if you have one.

Step 11
Take a tracing wheel and use it to trace over the new neckline. This will transfer the new line onto the overlapping bits.

Step 12
Separate the pieces and mark in the lines marked by the tracing wheel. Add seam allowance (1cm) on to the new neckline.
Happy sewing,
Emily
RESOURCES MENTIONED IN THIS ISSUE
Collins top pattern can be found here.
For more issues of the Q & A series, you can check out the archive here.
WHAT YOU’VE BEEN MAKING

Everyday dress made by @zhimmakes
Wide leg pants made by @sarah.eloise.sews

Peplum top made by @kali.makes

Everyday dress made by @melissaloh80


