To kick off the Acton sew-along series, we'll be talking about selecting your size.
The Acton sewing pattern is available in sizes A - K (approximately equivalent to AU size 6-24).
TAKE YOUR MEASUREMENTS
To select the appropriate size, first take your measurements.
It is best to take your measurements while wearing only underwear, or otherwise very tight clothing, so that you can get true measurements. Get someone to help you, if you can. Otherwise take your measurements in front of the mirror, so that you can check that your tape measure remains parallel to the floor, and is not twisted, as it is wrapped around your body.
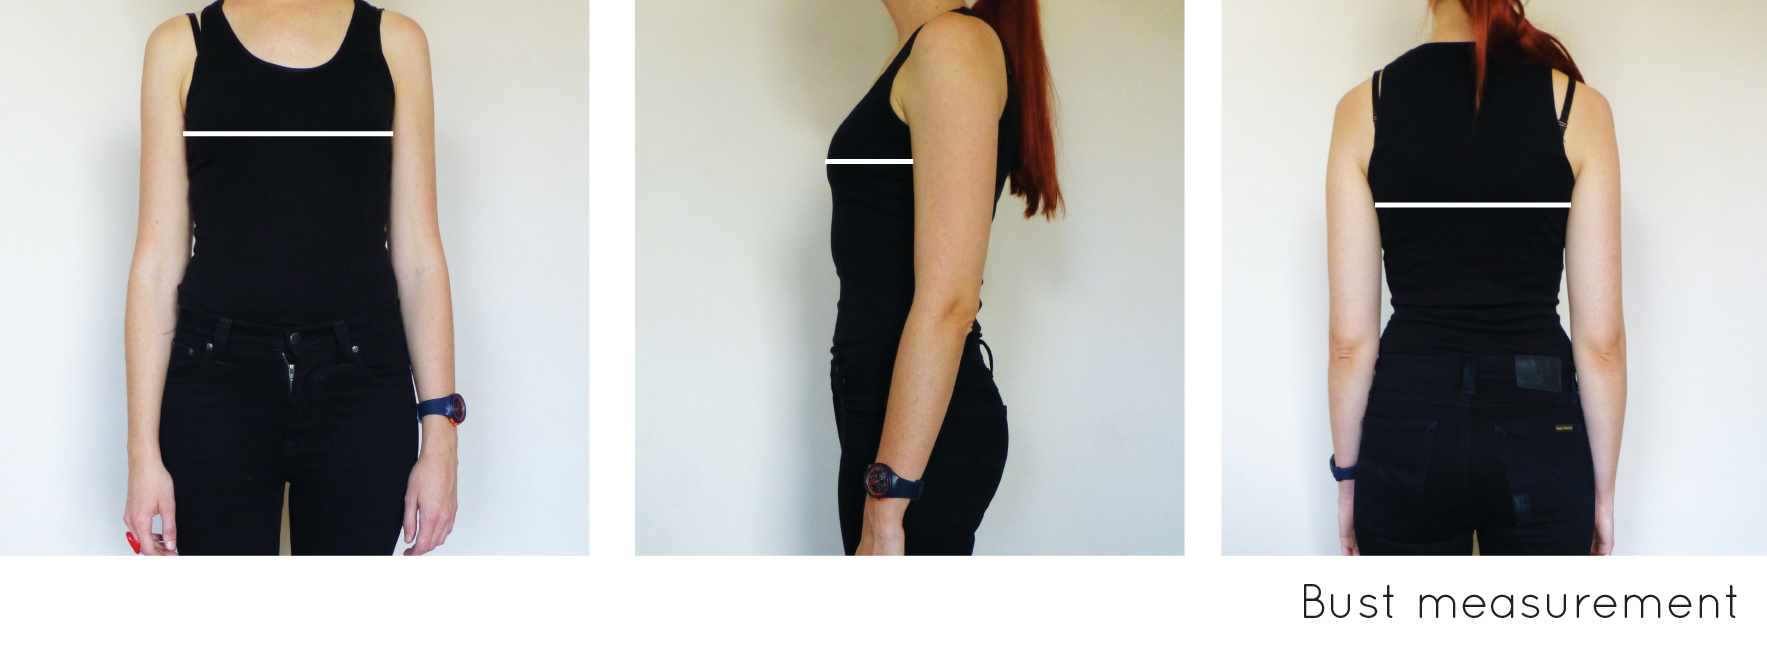
First, measure your bust and take note of the measurement.

As the Acton has quite a fitted bodice, you should also take your high bust measurement. This will help you determine whether or not you will need to do a Full or Small Bust Adjustment. The 'high bust' is the area above your breasts and under your arms.

Measure your waist... and (if you want to be able to eat in your Acton) don't suck in your tummy like me!

And then measure your hips. Make sure you are measuring your low hip (i.e. the fullest part of your hips - that includes your butt!)
BODY MEASUREMENTS
Now look at the size chart and circle where your measurements lie. Your measurements may lie across several sizes or between sizes - that's no problem at all!

Before going ahead, we need to check that you are choosing the right size for your bust measurement (you may need to select a different size to your measurements and then to a full or small bust adjustment to get a good fit).
WILL YOU NEED TO DO A FULL / SMALL BUST ADJUSTMENT?
Most indie pattern companies (including In the Folds) draft for a B cup bust. There are of course exceptions to this rule (such as Cashmerette and Colette), so make sure you check on your pattern before assuming the bust cup size.
This means that if your bust cub size is smaller than a B you will need to do a Small Bust Adjustment, otherwise known as a SBA (tutorial coming soon), and if your bust cup size is larger than a B you will need to do a Full Bust Adjustment or FBA (tutorial coming soon).
WORK OUT YOUR CUP SIZE
Your cup size in sewing patterns may not always correspond to the bra cup size you wear. To be safe, check your measurements before deciding if you need to make any adjustments to the pattern.
Find the difference between your bust measurement and your high bust measurement.
If the difference is 2.5cm (1") your bust is an A cup, 5cm (2") it's a B cup, 7.5cm (3") is a C cup and so on.
CHOOSE YOUR SIZE
Now, go back to your high bust measurement and add 5cm (2"). This is what your bust measurement would be if you were a B cup and therefore the size you should be choosing from the pattern.
Change your size selection on the chart if necessary.
For example, let's say your upper bust measures 81cm (32"). Add 5cm (2") to this measurement to find out what size your bust measurement falls into on the In the Folds sizing chart (and what size you would be if you had B cup breasts). 81cm + 5cm = 86cm which corresponds to a size C. Your actual bust measurement is 89cm though - 3cm (1") larger than the cup size of the pattern. This means you will need to do a Full Bust Adjustment and add this 3cm (1") to your pattern.
An example - looking at my measurements

I thought I'd show you my measurements and how I go about selecting my size, to give you a concrete example of this process. As my patterns do not fit me straight out of the packet! Some designers use themselves as a fit model, but I choose to use a "standard" size 10 model as a base, which means I have to make alterations to my patterns before I can get sewing too.
Bust : My high bust measurement is 82cm. I will add 5cm to this measurement to check whether or not I need to do a FBA or SBA. The result is 87cm - which puts me in a size C. My actual bust measurement is only 84cm though (not the 86cm of the size C bust measurement), which means I will need to do a Small Bust Adjustment to remove the excess 2cm from this area.
Waist : My waist measures 72cm. This is slightly bigger than the size C waist measurement (which is 71cm), so before choosing to use a size C, I will check the pattern's finished garment measurements to see if that will work.

Looking at the "Finished Measurements" table, you can see the finished waist measurement of the size C is 81.5cm (there is about 10cm ease in the waist), which means that the fact that my waist measurement is 1cm bigger than the size C measurement, is absolutely fine.
Hips : My hip measurement is 100cm, which moves me from the size C, up to the size D. Again, my measurement is 1cm over the size D measurement, but by looking at the Finished Measurement table, I can see that again this won't be problem due to the amount of ease in the hip, so I can stick to a D.

NOTE : The wrap on view B is deigned in such a way that there is A LOT of extra room at the hips (to allow for the wrap). If your hip measurement is only slightly outside your waist size range, I would not bother grading up at the hips (there will be ample room). If your hip size is more than a size bigger than your waist I suggest grading up. For my measurements, C at the waist and D at the hips, for the wrap version (view B), I just made a straight C (with only alterations made to the bust).
What size to print?
The pattern has been made with embedded layers so that you can just print the size/s you need! Layers make it much less confusing to cut the right size, and also saves on ink (and paper, in some sizes). Take note of the size or sizes you need to print and then check out this post how to print and assemble your PDF pattern.