flynn jacket

Flynn jacket : Remove box pleat

REMOVE BOX PLEAT.jpg

Welcome back to the pattern adjustment series for the Flynn jacket!

I thought some of you might be interested in how to remove the box pleat from the Flynn jacket View A (sleeve version), and have it have a flat back like View B (sleeveless version). This is a really quick alteration to make and won’t take you longer than a couple of minutes.


Step 1

FLYNN - remove pleat-01.jpg

Take the BACK [2] and mark a vertical line down through the pattern - starting at the notch on the neckline that indicates the pleat stitch line - and drawing to the bottom of the pattern piece (through the drill hole marking). Be sure to keep the line parallel to the centre back.

Step 2

FLYNN - remove pleat-02.jpg

A - Cut along the line marked in STEP 1 to remove the pleat.

B - You will now be able to use the BACK HEM FACING [10] from View B. All you need to do is transfer the notch on to the top edge of the BACK HEM FACING [10] to the bottom edge of the BACK [2]. For more details on transferring notches - check out this post.

You will need to cut both the BACK [2] piece and the BACK HEM FACING [10] piece on the fold.


I hope you have enjoyed these posts! If there is a tutorial that would like to see, that wasn’t in the series, please leave me a comment or send me an email.

Posts in the series:

Flynn jacket : Narrow / broad shoulder adjustment

SHOULDER ADJUSTMENTS.jpg

Welcome back to the fitting series for the Flynn jacket!

Today we will be talking shoulder adjustments.

View B of the Flynn jacket is sleeveless and you will want the shoulder seam to end on the tip of your shoulder. (You might want to adjust View A (version with sleeves) for broad or narrow shoulders, but it will be more likely you will need it for the sleeveless version, so that is what I will be focusing on today).

If you have made a toile / muslin and noticed that the end of the shoulder seam is sitting beyond the tip of your shoulder, you may choose to do a narrow shoulder adjustment.

If the end of the shoulder seam does not reach the tip of your shoulder, you may choose to do a broad shoulder adjustment.


Step 1

FLYNN shoulder adjustment SMALL-01.jpg

Take the FRONT [8] pattern piece. You can use the original piece or trace a copy of it - depending on your preference. If you do choose to trace a copy, be sure to also trace the stitch line (the grey line on the pattern) of the shoulder seam and armscye.

A - Mark a point halfway along the shoulder (on the stitch line). Mark another point, approximately one third of the way down the armscye. Join these two points with a straight line running through the pattern piece [Line 1].

B - Join the corner of the shoulder and armscye to Line 1 with another line, this will be Line 2. Check that Line 2 is perpendicular to Line 1.

Step 2

FLYNN shoulder adjustment SMALL-02.jpg

A - Cut along Line 1, starting at the shoulder. Slow down as you approach the stitch line on the armscye. Stop cutting 1-2mm from the stitch line (indicated by the blue dot in the illustration).

B - Cut in from the other side of the line (through the seam allowance on the armscye), again stopping 1-2mm from the stitch line. This will create a small “hinge” that will allow the sections of the pattern to move quite flexibly without become detached.

FLYNN shoulder adjustment SMALL-03.jpg

A - Cut along Line 2, starting at the point that you just cut. Slow down as you approach the stitch line at the corner. Stop cutting 1-2mm from the stitch line (indicated by the blue dot in the illustration).

B - Cut in from the other side of the line (through the seam allowance on the corner), again stopping 1-2mm from the stitch line. This will create a small “hinge” that will allow the sections of the pattern to move quite flexibly without becoming unattached.


Broad shoulder adjustment

FLYNN shoulder adjustment SMALL-04.jpg

A - Take a piece of scrap paper and place it behind the shoulder section of the FRONT [8].

B - Carefully swing open the pattern (at the place that was Line 1), using the hinge to help you.

C - Measuring from the main section of the pattern piece (not the unattached triangles), mark the amount of width you would like to add to the shoulder. Remember to mark this on the stitch line and not the seam allowance line.

FLYNN shoulder adjustment SMALL-05.jpg

A - Use the hinges to manoeuvre the triangles back towards the shoulder. Line up the stitch line on the triangle with the mark you made in the previous step. You will notice that this requires the triangle sections to overlap.

B - Once the triangles are lined up with the point and all sections are sitting nice and flat, tape or glue in place onto the paper underneath.

FLYNN shoulder adjustment SMALL-06.jpg

Re-draw the seam lines - both the shoulder and the armscye - using a ruler (and a french curve if you have one).

Re-cut the pattern, removing the excess paper.

Repeat the process on the back piece.

Take the ARMHOLE FACING [11] piece and transfer the changes to the pattern piece.


Narrow shoulder adjustment

FLYNN shoulder adjustment SMALL-07.jpg

A - Take a piece of scrap paper and place it behind the shoulder section of the FRONT [8]. Carefully swing open the pattern (at the place that was Line 1), using the hinge to help you. On the main section of the pattern piece (not the unattached triangles), mark the amount of width you would like to remove from the shoulder. Remember to mark this on the stitch line and not the seam allowance line.

B - Use the hinges to manoeuvre the triangles back towards the shoulder. Line up the stitch line on the triangle with the mark you made. You will notice that this requires the triangle sections to overlap.

C - Once the triangles are lined up with the point and all sections are sitting nice and flat, tape or glue in place onto the paper underneath. Re-draw the seam lines - both the shoulder and the armscye - using a ruler (and a french curve if you have one). Re-cut the pattern, removing the excess paper.

Repeat the process on the back piece.

Take the ARMHOLE FACING [11] piece and transfer the changes to the pattern piece.


Keep your eyes out for more posts over the coming days!

During this series I will show you how to:

Flynn jacket : Full bust adjustment

FBA.jpg

The Flynn jacket is intended to have a substantial amount of design ease, to create an oversized shape, designed for layering. For this reason, I suggest focusing on your high bust measurement when selecting your size. The size chart for the Flynn jacket can be found here.

This pattern is drafted for a B cup bust. Due to the large amount of ease, it is unlikely you will need to do a full bust adjustment (or small bust adjustment) for View A. Check the finished garment measurements to ensure it will fit through the waist and hip.

For View B, which is closer fitting, due to its sleeveless nature, you may consider this alteration to achieve a better fit through the shoulders and armhole (and also so you can close it, if you would like to add a hook and eye). For today’s post, I will get you started for doing the adjustment and then will link to a past post that I wrote about full bust adjustments.

WHEN YOU'LL NEED TO DO A FULL BUST ADJUSTMENT 

Most indie pattern companies (including In the Folds) draft for a B cup bust. There are of course exceptions to this rule (such as Cashmerette and Colette Patterns), so make sure you check on your pattern before assuming the bust cup size.

In terms of the Flynn jacket, it is a loose style which means it is a little more forgiving than more fitted patterns (such as the Acton, for example) so in some cases you can probably get away with not making a bust adjustment. For example, if your bust is smaller than a B cup, it is unlikely you need to bother doing a Small Bust Adjustment. I have an A cup bust, but have not made adjustments to any of my Flynn jackets. Also if your bust is just slightly bigger than a B cup, it is also likely you will be okay without the adjustment.

Check the finished garment measurements and go from there. 

WORK OUT YOUR CUP SIZE

Your cup size in sewing patterns may not always correspond to the bra size you wear. To be safe, check your measurements before deciding if you need to make any adjustments to the pattern. 

To do this, measure your high bust measurement (the area above your breasts, under your arms) as well as your full bust  (the fullest part of your chest) and then take note of each measurement, as well as the difference.

If the difference is 2.5cm (1") your bust is an A cup, 5cm (2") it's a B cup, 7.5cm (3") is a C cup and so on. 

CHOOSE YOUR SIZE

Now, go back to your high bust measurement and add 5cm (2"). This is what your bust measurement would be if you were a B cup and therefore the size you should be choosing from the pattern.

For example, let's say your upper bust measures 81cm (32"). Add 5cm (2") to this measurement to find out what size your bust measurement falls into on the In the Folds sizing chart (and what size you would be if you had B cup breasts). 81cm + 5cm = 86cm which corresponds to a size C. Your actual bust measurement is 89cm  though - 3cm (1") larger than the cup size of the pattern. This means you need to do a FBA and add this 3cm (1") to your pattern. 

As the front pieces are cut as a pair, you need to take the measurement you will be adding and divide it by two. For example, this 3cm (just over 1") mentioned in the example, will be split between either side of the front - 1.5cm (1/2") on each side. 


Step 1

FLYNN FBA-01.jpg

For the sake of the example, I will be making the adjustment to the pieces of View B (as this is the style most likely to require the adjustment), but you can follow this tutorial for View A too.

Take the two pieces that make the front of the Flynn jacket - the FRONT HEM FACING [5] and the FRONT [8]. The first step will be to turn these pieces into one pattern piece (removing the panel line) as this will make the adjustment much easier to manage. At the end, we'll put the panel line back in place, so there won't be any change to the design (except for the addition of the dart - which can be removed later on, if you prefer). 

Step 2

FLYNN FBA-02.jpg

A - Take the SIDE FRONT [8] piece and place it on top of the FRONT HEM FACING [5], lining up the stitch lines (the grey line on the pattern), as if the pieces have been sewn together. If you are struggling to see the lines, it can help to put the pieces up to a window and see through the paper that way (or a lightbox, if you have one). Once the pieces are correctly lined up, use masking tape (or similar) to hold the pieces in place. 

As you can see in the example, you won’t be able to align the stitch line for whole seam, as the lines slightly change directions towards the shoulder (which is what gives you a nice shape in that area). Just focus on lining up the stitch line in the lower section of the pattern (as illustrated).

B - Take a piece of pattern paper and trace the piece - being sure to include all pattern markings (in this case: the grainline and notches). Also trace the panel line.

Make sure you trace both the cutting line and the stitching line - this is really important. In the Folds patterns include the stitching line on each pattern piece so that it is easier for you to make alterations to your pattern. I know we would all love to be able to cut a pattern in a straight size and for it to fit perfectly, but unfortunately that's not the way it is (I even have to make adjustments to In the Folds patterns so they fit my figure properly), so having the stitch lines can help you make adjustments more quickly and easily. When making pattern alterations, I normally suggest removing the seam allowance, but because the stitch line is marked on the pattern, you can leave it on. 

From this point you are ready to make the adjustment. Head over to this tutorial - starting at STEP 3 and work through the tutorial.


Keep your eyes out for more posts over the coming days!

During this series I will show you how to:

Flynn jacket : Shortening / Lengthening the sleeves

ADJUST SLEEVES.jpg

Today in the Flynn jacket pattern alteration series, I will be showing you how to lengthen or shorten the sleeves.

There are times when you can just add some (or remove) length to the hem of a sleeve (when the underseams of a sleeve are straight), but in the case of the Flynn jacket (and other patterns like it), you need to add/remove the length to the inside of the pattern piece, so that you can keep the shape intact - due to the tapered nature of the sleeve. As well as this, the Flynn jacket sleeve is finished with a hem facing, so by adding / removing length from the inside section of the sleeve, the hem facing will still fit and will not require any changes.


Lengthening the sleeve

Step 1

LENGTHENING + SHORTENING SLEEVE-SMALL-01.jpg

Take the SLEEVE [3] pattern piece. You can use the actual pattern piece, or trace a copy if you would prefer to keep the original piece intact.

Step 2

LENGTHENING FLYNN-SMALL-01.jpg

You will need to work out how much length you would like to add to the sleeve. You can do this by looking at your toile / muslin (for more details on making a toile / muslin look at this post from the Rushcutter sew-along), or holding the pattern pieces up to your body and getting an idea of where they will sit on your arm (keep in mind that the jacket has a dropped shoulder and the sleeve cap does not sit at your shoulder point).

A - Cut through the lengthen/shorten line on the SLEEVE [3].

B - Take the upper section of the sleeve, and tape or glue a piece of paper to the lower section - with enough paper extending past the pattern to add your length extension. Leave some paper either side too.

C - Extend the grainline onto the attached paper and then mark a horizontal line on each piece of paper, measuring down from the cut line the distance equal to the amount of length you would like to add. In the example above, you can see the red line is 5cm (2in) below the cut line (which is how much length we will be adding to the sleeve).

Step 3

LENGTHENING + SHORTENING SLEEVE-SMALL-03.jpg

A - Attach the lower part of the sleeve to the added paper, lining up the cut edge with the line marked in the previous step. Use the grainline to ensure that you line the pieces up correctly.

B - Glue or tape in place.

Step 4

LENGTHENING + SHORTENING SLEEVE-SMALL-04.jpg

Re-draw the seam lines with a straight line over the adjustment.

You can choose to trace the pattern on to fresh pattern paper or tape on small pieces of paper / masking tape where you need to fill a small gap to complete the seam line.

Cut off any excess paper that is outside of the new lines.


Shortening the sleeve

Step 1

LENGTHENING + SHORTENING SLEEVE-SMALL-05.jpg

You will need to work out how much length you would like to remove from the sleeve. You can do this by looking at your toile / muslin (for more details on making a toile / muslin look at this post from the Rushcutter sew-along), or holding the pattern pieces up to your body and getting an idea of where they will sit on your arm (keep in mind that the jacket has a dropped shoulder and the sleeve cap does not sit at your shoulder point).

A - Cut through the lengthen/shorten line on the SLEEVE [3].

B - Measuring up from the cut line, mark a horizontal line on each pattern piece, the distance of the amount of length you would like to remove.

In the example, you can see the red line is 5cm (2in) above the cut line and the shaded section shows the amount of length that will be removed from the sleeve

Step 2

LENGTHENING + SHORTENING SLEEVE-SMALL-06.jpg

A - Move the lower part of each pattern piece up to the line marked in the previous step. Use the grainline to ensure that you line the pieces up correctly.

B - Glue or tape in place.

Step 3

LENGTHENING + SHORTENING SLEEVE-SMALL-07.jpg

Re-draw the seam lines with a straight line over the adjustment (you can cut off any excess paper that is now outside the lines).


Keep your eyes out for more posts over the coming days!

During this series I will show you how to:

Flynn jacket : Lengthening the pattern

LENGTHEN FLYNN.jpg

As I have just released a new pattern (yay for the new Flynn jacket), I thought it would be helpful to post a few tutorials about making alterations to the pattern. Yesterday I showed you how to shorten the pattern, so today I thought I would show you how to lengthen the pattern.

All In the Folds patterns are drafted for a height of 170cm (5'7") , so you might need to shorten or lengthen my patterns if you are taller or shorter than this height (although it does sometimes come down to preference).


GETTING STARTED

Step 1

SHORTENING FLYNN-01.jpg

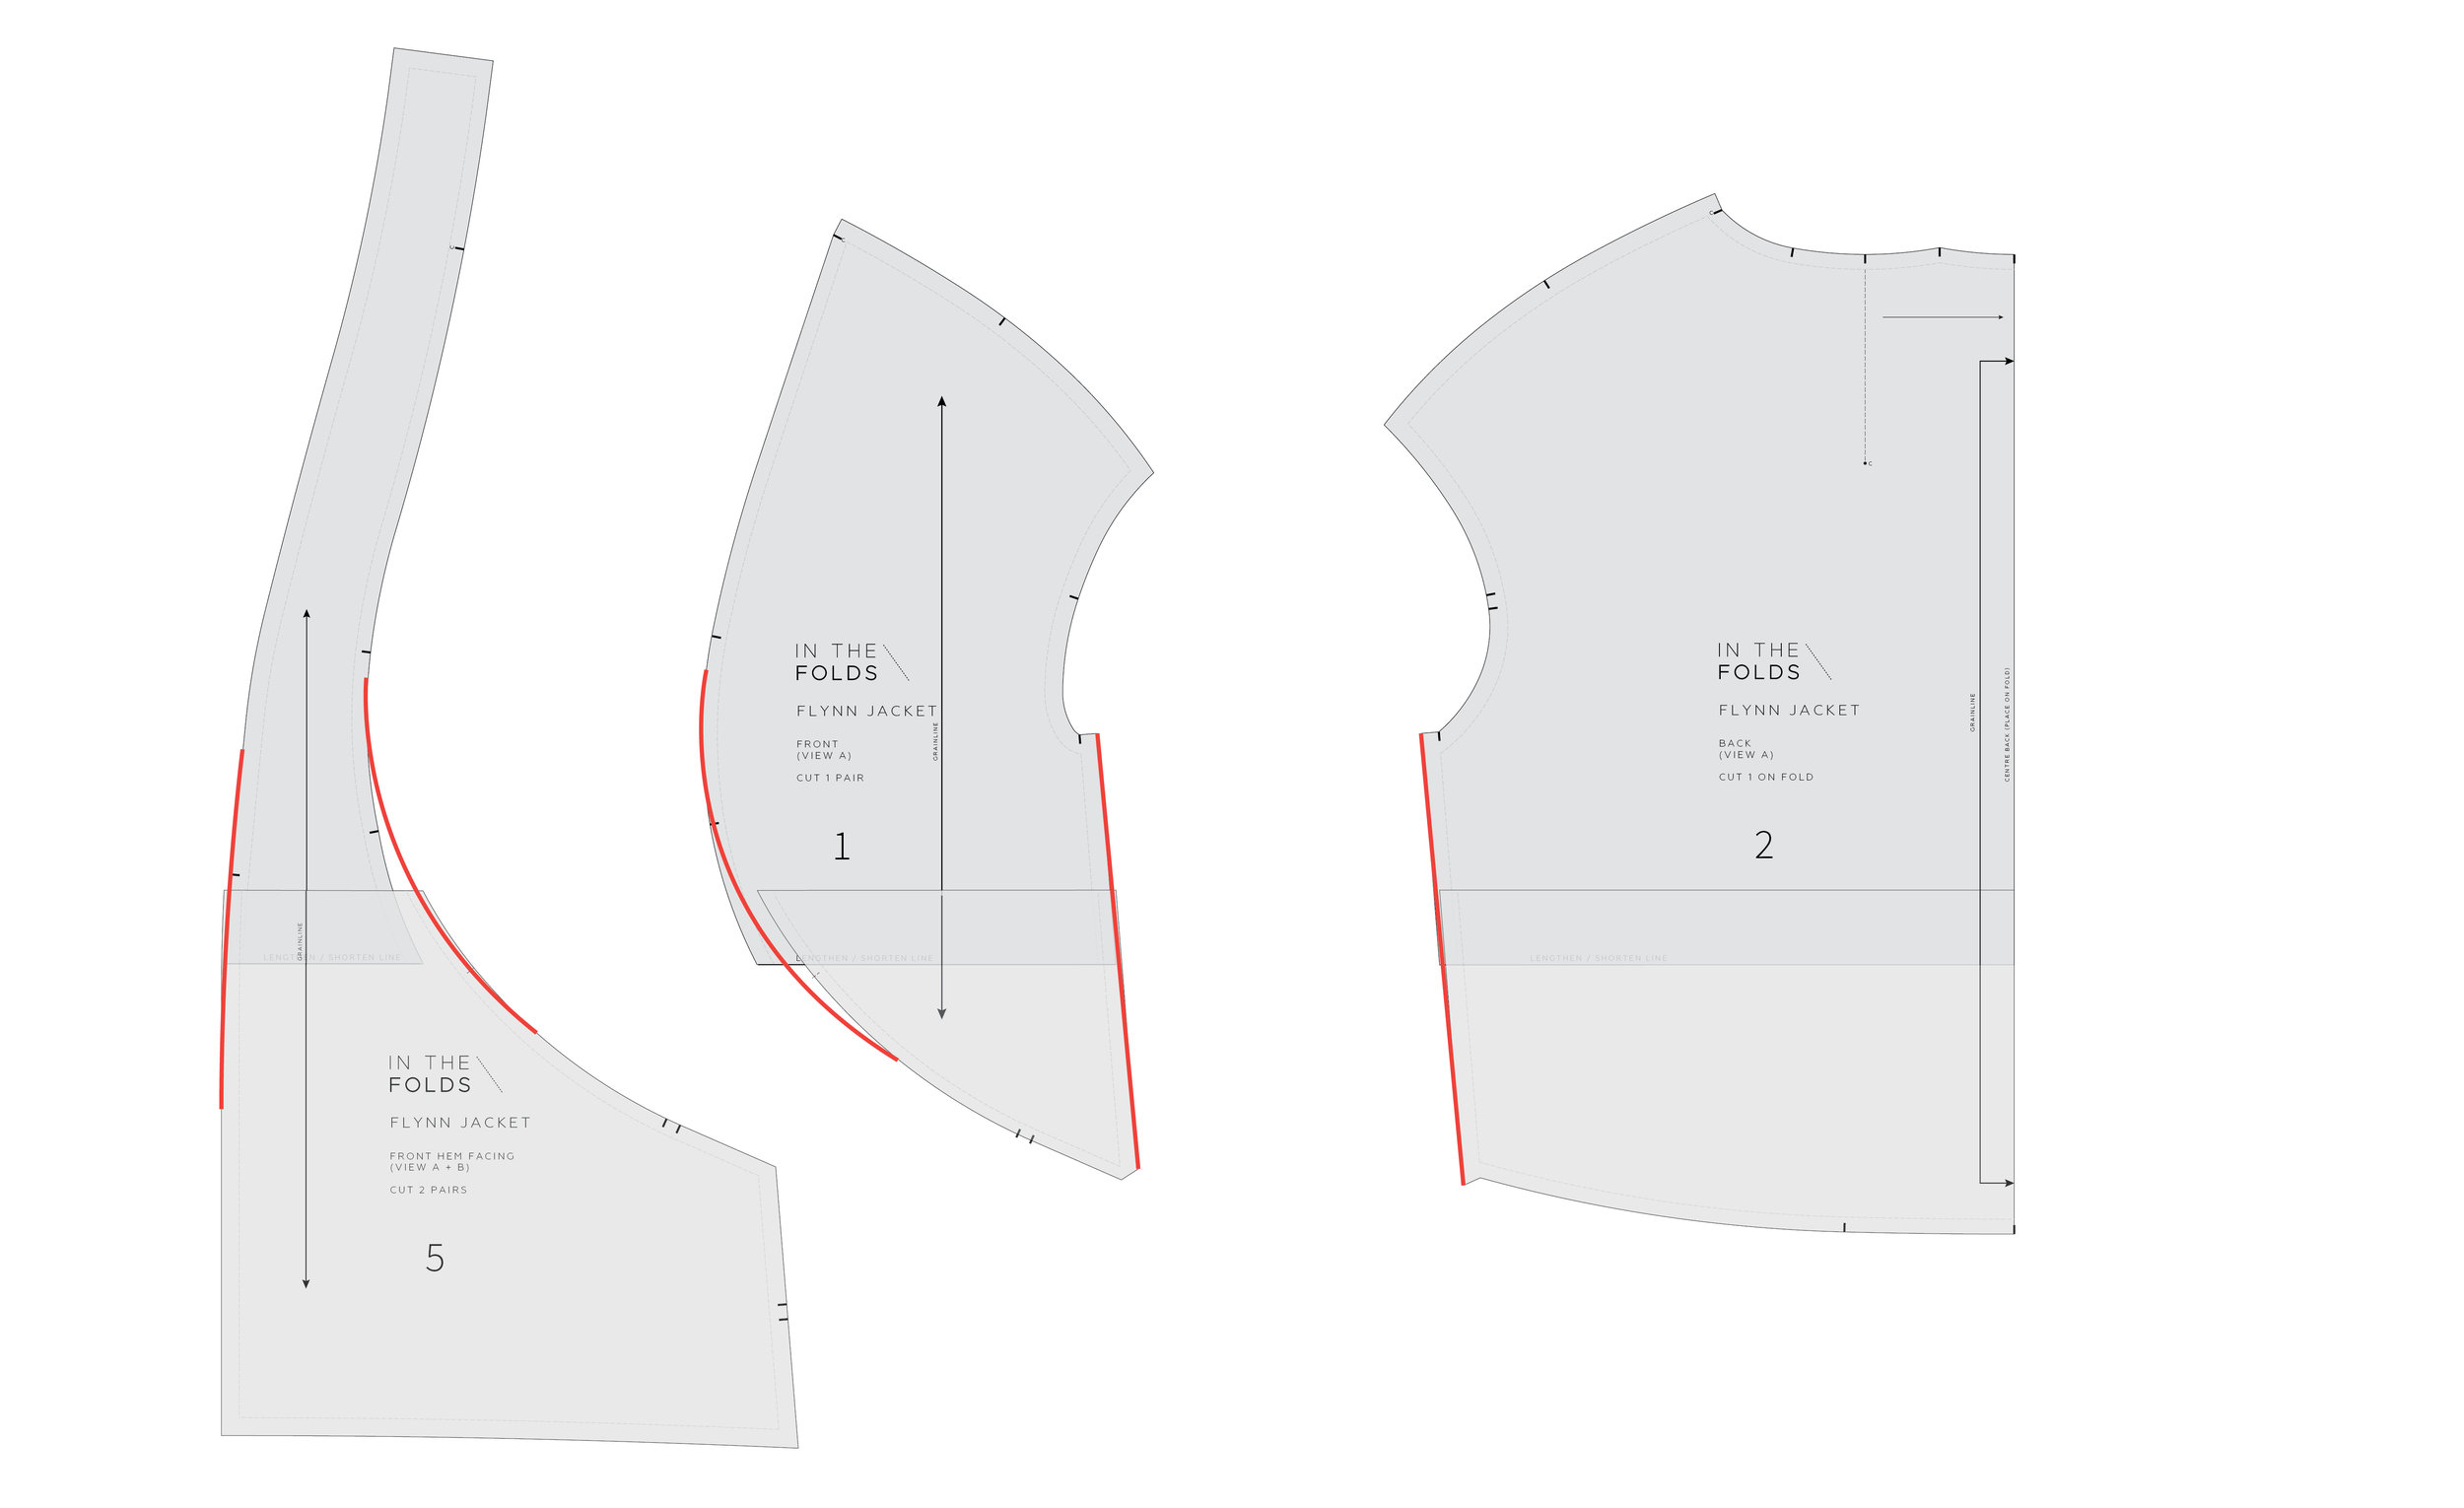
The pieces you will need for this adjustment are the FRONT HEM FACING [5], FRONT [1] and BACK [2] (or the corresponding pattern pieces from View B). You can use the actual pattern pieces, or trace a copy if you would prefer to keep the original pieces intact.

Step 2

LENGTHENING FLYNN-SMALL-01.jpg

You will need to work out how much length you would like to add to the pattern. You can do this by looking at your toile / muslin (for more details on making a toile / muslin look at this post from the Rushcutter sew-along), or holding the pattern pieces up to your body and getting an idea of where they will sit on your body.

If you would like to add any more than 7.5cm (3in), I’d suggest adding 5cm - 7.5cm (2in - 3in) to the mid-section of the pattern (where the LENGTHEN / SHORTEN lines are) and then adding the remainder to the hem facing (more on this in STEPS 5 + 6).

Also keep in mind that by lengthening the pattern, you will be moving the placement of the pockets down. If you are lengthening the pattern to change the jacket into a longer style, I would recommend adding more length (or all length) to the hem facing (rather than the mid-section), or moving the pocket placement so they don’t become too low.

A - Take the upper part of each pattern piece, and tape or glue a piece of paper to the lower section - with enough paper extending past the pattern to add your length extension. Leave some paper either side too.

B - Extend the grainline onto the attached paper and then mark a horizontal line on each piece of paper, measuring down from the cut line the distance equal to the amount of length you would like to add. In the example above, you can see the red line is 5cm (2in) below the cut line (and 5cm length will be added to the pattern in the example).

Step 3

LENGTHENING FLYNN-SMALL-02.jpg

A - Attach the lower part of each pattern piece to the added paper, lining up the cut edge with the line marked in the previous step. Use the grainline to ensure that you line the pieces up correctly.

B - Glue or tape in place.

Step 4

LENGTHENING FLYNN-SMALL-03.jpg

Re-draw the seam lines with smooth lines over the adjustment. You will notice that in some cases you will be adding a little bit on to create the line of best fit, while in other cases you will need to shave a bit off. This will even out as you go around the pattern.

When marking a line over the area that has been altered, there might be a large gap between the two sides of the line. In this case - split the difference by marking a point in the centre of the area and drawing the line across this point.

You can choose to trace the pattern on to fresh pattern paper or tape on small pieces of paper / masking tape where you need to fill a small gap to complete the seam line.

Cut off any excess paper that is outside of the new lines.

Check all seams are the correct length by "walking" the pattern pieces, as if you were sewing them together. For more details on how to do this, check out this tutorial.

Transfer / re-draw any notches that have been misplaced. Due to the shape of the pieces, some notches may not line up due to the different points the alteration was made. After checking that the seam is the correct length, transfer one notch to the other piece (and cross out the notch that is no longer in the correct position).

If you need to add more than 7.5cm (3in) and have opted to add some length to both the mid-section of the pattern and the hem facing, continue to STEP 5. Otherwise, you are ready to cut your fabric with your new altered pattern pieces!

Step 5

LENGTHENING FLYNN-SMALL-04.jpg

A - To add more length to the jacket, mark a horizontal line through the bottom section of the FRONT HEM FACING [5] and the BACK FACING [6]. Make sure the lines are perpendicular to the grainline. When making alterations like this, I try to stay away from notches when possible, so advise that you draw you horizontal line slightly above, or slightly below, the notches on the side of each piece.

B - Check the position of the grainline in relation to the horizontal line you just marked. If the grainline does not cut through the horizontal line, extend the grainline (as I have done on the FRONT [5] in the example). This will help you keep things straight when making the adjustment.

Cut through the horizontal line and stick a piece of scrap paper to the lower section of each pattern piece.

Step 6

LENGTHENING FLYNN-SMALL-05.jpg

A - Again, attach the lower part of each pattern piece to the added paper, lining up the cut edge with the line marked in the previous step. Use the grainline to ensure that you line the pieces up correctly.

B - Glue or tape in place.

C - Re-draw the sides that have been impacted and check that the notches still line up correctly.


And that’s it! You’re done!

During this series I will show you how to:

Flynn jacket : Shortening the pattern

SHORTEN FLYNN.jpg

As I have just released a new pattern (yay for the new Flynn jacket), I though it would be helpful to post a few tutorials about making alterations to the pattern.

If you’re shorter than 170cm (5'7") this tutorial might be a good one for you! All In the Folds patterns are drafted for this height, so you might need to shorten or lengthen my patterns if you are taller or shorter than this height (although it does sometimes come down to preference).

There are a couple of other reasons why you might also want to do this adjustment to the Flynn jacket:

  • You might be 170cm (5'7") but have a shorter torso and longer legs than the pattern was designed for

  • You would prefer more of a cropped style than the original design

The Flynn jacket is designed to finish at the top of the thighs (and just below your bum at the back). Due to the design of the hem band and curved front panel, you can’t just simply cut length off the bottom of the jacket pattern as it will change the proportions of the jacket. Instead, you need to take length out from the middle of the pattern pieces, so that the proportions remain intact, and today that is what I am going to show you how to do!

As is becoming quite common with my patterns, the Flynn jacket has some very unique panel lines. This means that making alterations to the pattern is slightly different to what you would need to do with a straight cut jacket. It’s not difficult at all, and the principle is the same, there is just a few extra steps you have to do!


GETTING STARTED

Step 1

SHORTENING FLYNN-01.jpg

The pieces you will need for this adjustment are the FRONT HEM FACING [5], FRONT [1] and BACK [2] (or the co-ordinating pattern pieces for View B). You can use the actual pattern pieces, or trace a copy if you would prefer to keep the original pieces intact.

Step 2

SHORTENING FLYNN-02.jpg

You will need to work out how much length you would like to remove from the pattern. You can do this by looking at your toile / muslin (for more details on making a toile / muslin look at this post from the Rushcutter sew-along), or holding the pattern pieces up to your body and getting an idea of where they will sit on your body.

If you would like to remove any more than 7.5cm (3in), I’d suggest taking 5cm - 7.5cm (2in - 3in) from the mid-section of the pattern (where the LENGTHEN / SHORTEN lines are) and then removing the remainder from the hem band (more on this in STEPS 5 + 6).

A - Cut through the 'LENGTHEN / SHORTEN' line on the FRONT HEM FACING [5], FRONT [1] and BACK [2].

B - Measuring up from the cut line, mark a horizontal line on each pattern piece, the distance of the amount of length you would like to remove. In the example, you can see the red line is 5cm (2in) above the cut line and the shaded section shows the amount of length that will be removed from the pattern piece.

Step 3

SHORTENING FLYNN-03.jpg

A - Move the lower part of each pattern piece up to the line marked in the previous step. Use the grainline to ensure that you line the pieces up correctly.

B - Glue or tape in place.

Step 4

SHORTENING FLYNN-04.jpg

Re-draw the seam lines with smooth lines over the adjustment. You will notice that in some cases you will be needing to add a little bit on to create the line of best fit, while in other cases you will need to shave a bit off. This will even out as you go around the pattern.

SHORTENING FLYNN-CLOSE-UP-04.jpg

When marking a line over the area that has been altered, there might be a large gap between the two sides of the line. In this case - split the difference by marking a point in the centre of the area and drawing the line across this point. You can choose to trace the pattern on to fresh pattern paper or tape on small pieces of paper / masking tape where you need to fill a small gap to complete the seam line.

Cut off any excess paper that is outside of the new lines.

Check all seams are the correct length by "walking" the pattern pieces, as if you were sewing them together. For more details on how to do this, check out this tutorial.

Transfer / re-draw any notches that have been misplaced. Due to the shape of the pieces, some notches may not line up due to the different points the alteration was made. After checking that the seam is the correct length, transfer one notch to the other piece (and cross out the notch that is no longer in the correct position).

If you need to remove more than 7.5cm (3in) and have opted to remove some length from both the mid-section of the pattern and the hem band, continue to STEP 5. Otherwise, you are ready to cut your fabric with your new altered pattern pieces!

Step 5

SHORTENING FLYNN-05-05.jpg

A - To remove more length from the jacket, mark a horizontal line through the bottom section of the FRONT HEM FACING [5] and the BACK FACING [6]. Make sure the lines are perpendicular to the grainline. When making alterations like this, I try to stay away from notches when possible, so advise that you draw the horizontal line slightly above, or slightly below, the notches on the side of each piece.

B - Check the position of the grainline in relation to the horizontal line you just marked. If the grainline does not cut through the horizontal line, extend the grainline (as I have done on the FRONT [5] in the example). This will help you keep things straight when making the adjustment.

Cut through the horizontal line in the same way you did in STEP 2.

Step 6

SHORTENING FLYNN-06-06.jpg

A - Again, measuring up from the cut line, mark a horizontal line on each pattern piece, the distance of the amount of length you would like to remove.

B - Move the lower part of each pattern piece up to the line marked. Use the grainline to ensure that you line the pieces up correctly.

C - Re-draw the sides that have been impacted and check that the notches still line up correctly.


And that’s it! Not too tricky, right?

In the following days I will show you how to:

Introducing the Flynn jacket!

INTRODUCING FLYNN.jpg

I am very excited to let you know that the Flynn jacket is here! As always, this pattern has been a long time in the works (I have been wearing one of my early samples for 2 years!!) and I am over the moon to be able to finally share it with you.

As I slowly add to the In the Folds pattern collection, it’s incredible to see how the pieces all work together. I don’t necessarily design new patterns thinking about collections and how everything will work together, but thankfully my aesthetic and style seems to be pretty consistent and each time I add a new piece to the collection I am thrilled to see how it fits in with the existing patterns. You will see the Flynn jacket paired with the Darlow pants and Collins top through this shoot, and see that they are a perfect match!

4M1A4508-Edit.jpg

The Flynn jacket is a loose-fitting jacket designed for woven fabrics. With two different styles, it is the perfect layering piece for autumn and winter (and maybe even spring).

One of the things I have struggled with most, when it comes to releasing my patterns, is releasing my patterns on time! I am chuffed to finally release a pattern at the perfect time of year (well at least for those of us down here in the southern hemisphere).

As it’s just cooling down here in Sydney, the Flynn jacket has now become one of my most worn pieces in my wardrobe again and I know I will be wearing it all winter long (just with a few extra layers underneath). As you can see though, it works equally well in something lighter (above sample was made in organic cotton linen) for a trans-seasonal piece.

4M1A3613-Edit.jpg

The Flynn jacket (View A) has a dropped shoulder and sleeve with a hem facing. It also features an inverted box-pleat in the back.

4M1A3323-Edit.jpg

The Flynn jacket (View B) is sleeveless and features armhole facings for a really beautiful finish (and a fun new technique for you to learn). It has been designed to be worn over long sleeve tops and dresses, although works equally well in warmer weather over a sleeveless top or t-shirt.

4M1A4085-Edit.jpg

View B has a closer fit than View A, due to its sleeveless design and flat back piece (no box pleat).

The details

4M1A3628-Edit.jpg

The Flynn jacket features a kimono-style collar, a high-low hem and large in-seam pockets. The sleeves on View A are designed to be worn either straight or folded back, for a more casual look.

The panel lines that wrap around the jacket to create the collar, make for a really fun and satisfying sew.

Who is the pattern for?

I have placed the Flynn jacket at a 2 on the In the Folds skill scale - which means that before starting this project you should feel quite confident with the basics and be ready for new challenges. I know the idea of making a jacket can be a little intimidating for advanced beginners or intermediate sewists, but the Flynn jacket is a great entry level jacket to sink your teeth into, as you don’t have to worry about lining and due to it’s oversized silhouette, it is easy to achieve a good fit.

4M1A3131-Edit.jpg
4M1A3098-Edit.jpg

On both views, all seams are finished with bias binding, for a beautiful and high-end finish. This means that not only will you end up with a beautifully finished jacket, you will also learn some new skills in the process!

4M1A3865-Edit.jpg

The Flynn jacket can be worn open, or closed discreetly with a hook and eye.

4M1A3584-Edit.jpg

What the testers said about this pattern:

4M1A3312-Edit.jpg

‘ I need hours to make any garment. But with yours, taking time is part of the task. You never mention how long this will take until completion and it just gives me a completely different feeling during the process. I enjoyed taking the time to make a flawless, beautiful jacket vest and could not be more proud of the perfect curves and impeccable insides. Stretching myself to make matching bias binding was really nice, too!’ - Julia

4M1A4534-Edit.jpg

‘The STYLE LINES knocked me out. I adore the swooping front piece with the enclosed large pockets. Very 20s-30s. I love the finishing with the bindings, but I am a former costumer, so neither of these points is surprising. Haha! Also - SO COMFY.’ - Myra

4M1A3535-Edit.jpg

‘Because of my fabric choice, the jacket is very structured and sculptural. I LOVE THAT. I absolutely love the binding (I like wearing blazers, and am a sucker for hong kong finished seams), especially when the jacket is left open, and the wind makes my binding peak out from the facing. Probably my favourite features are the big pockets and the style lines in the front… The instructions were so clear and well illustrated that even my non-sewing husband said he could make the garment himself.’ - Emilia

4M1A3905-Edit.jpg

For your reference, the model Marisabel wears a Size F.


Would you like to sew along with me?

I have recently started exploring the idea of running online sew-alongs as an opportunity for a group of us to work through a pattern together. Not only is it a great opportunity to set time aside to sew, but it is also a way to connect with other makers and learn from others.

A few months ago I ran my first online sew-along with the release of the Darlow pants. I loved getting the chance to get to know lots of different makers from all over the world and sew our Darlows together, so I have decided to do it again for the Flynn jacket.

4M1A3119-Edit.jpg

The sew-along will run in a Facebook group for 3 weeks from Friday May 24 - Friday June 14. This means you will have a few days to get the pattern printed, organise your fabric and read through the instructions, before we get started on Friday May 24.

What is an online sew-along?

Many different pattern companies run sew-alongs, so there is countless formats and ways this can be done. As mentioned, this is something I am currently experimenting with and working out what shape / format works best for me and my customers.

If you would like to take part, here are some things to note:

  • There are no formal lessons or classes. It is just a way for us to connect as a group and encourage and support each other to work through the same garment. You can take it as fast or slow as you like, and can spend as much (or as little) time in the Facebook group as you feel comfortable.

  • In the first week we’ll introduce ourselves and support each other to pick a size and make a toile. I will also do my best to connect people to others in the group with similar fitting concerns so we can work through our pattern adjustments together.

  • I will be sharing posts on my blog for alterations like shortening and lengthening and links to other resources that I think you might find helpful.

  • I will be in the group to offer feedback and advice and will encourage others to do the same. As we will all be in different time-zones, it’s nice to know that while I’m sleeping here in Sydney, someone in the northern hemisphere will be around to have a chat with for others in that part of the world!

  • There is no deadline. Although I will be encouraging makers to make the jacket in the three weeks specified - there is no problem if you can’t get it done. The reason I set a deadline is that I know some people like a little nudge like this that makes them accountable. It is also a realistic amount of time that I can dedicate to checking in on a group daily.

  • If you took part last time (for the Darlow pants sew-along), you will know we used Slack for the sew-along. As this is still a work in progress, I’m exploring options and seeing what the best way / format is to run these groups, so will be trying this with a Facebook group this time. I apologise to those of you who don’t use Facebook.

I hope you are as excited about the Flynn jacket pattern as I am!