
As I have just released a new pattern (yay for the new Flynn jacket), I though it would be helpful to post a few tutorials about making alterations to the pattern.
If you’re shorter than 170cm (5'7") this tutorial might be a good one for you! All In the Folds patterns are drafted for this height, so you might need to shorten or lengthen my patterns if you are taller or shorter than this height (although it does sometimes come down to preference).
There are a couple of other reasons why you might also want to do this adjustment to the Flynn jacket:
You might be 170cm (5'7") but have a shorter torso and longer legs than the pattern was designed for
You would prefer more of a cropped style than the original design
The Flynn jacket is designed to finish at the top of the thighs (and just below your bum at the back). Due to the design of the hem band and curved front panel, you can’t just simply cut length off the bottom of the jacket pattern as it will change the proportions of the jacket. Instead, you need to take length out from the middle of the pattern pieces, so that the proportions remain intact, and today that is what I am going to show you how to do!
As is becoming quite common with my patterns, the Flynn jacket has some very unique panel lines. This means that making alterations to the pattern is slightly different to what you would need to do with a straight cut jacket. It’s not difficult at all, and the principle is the same, there is just a few extra steps you have to do!
GETTING STARTED
Step 1

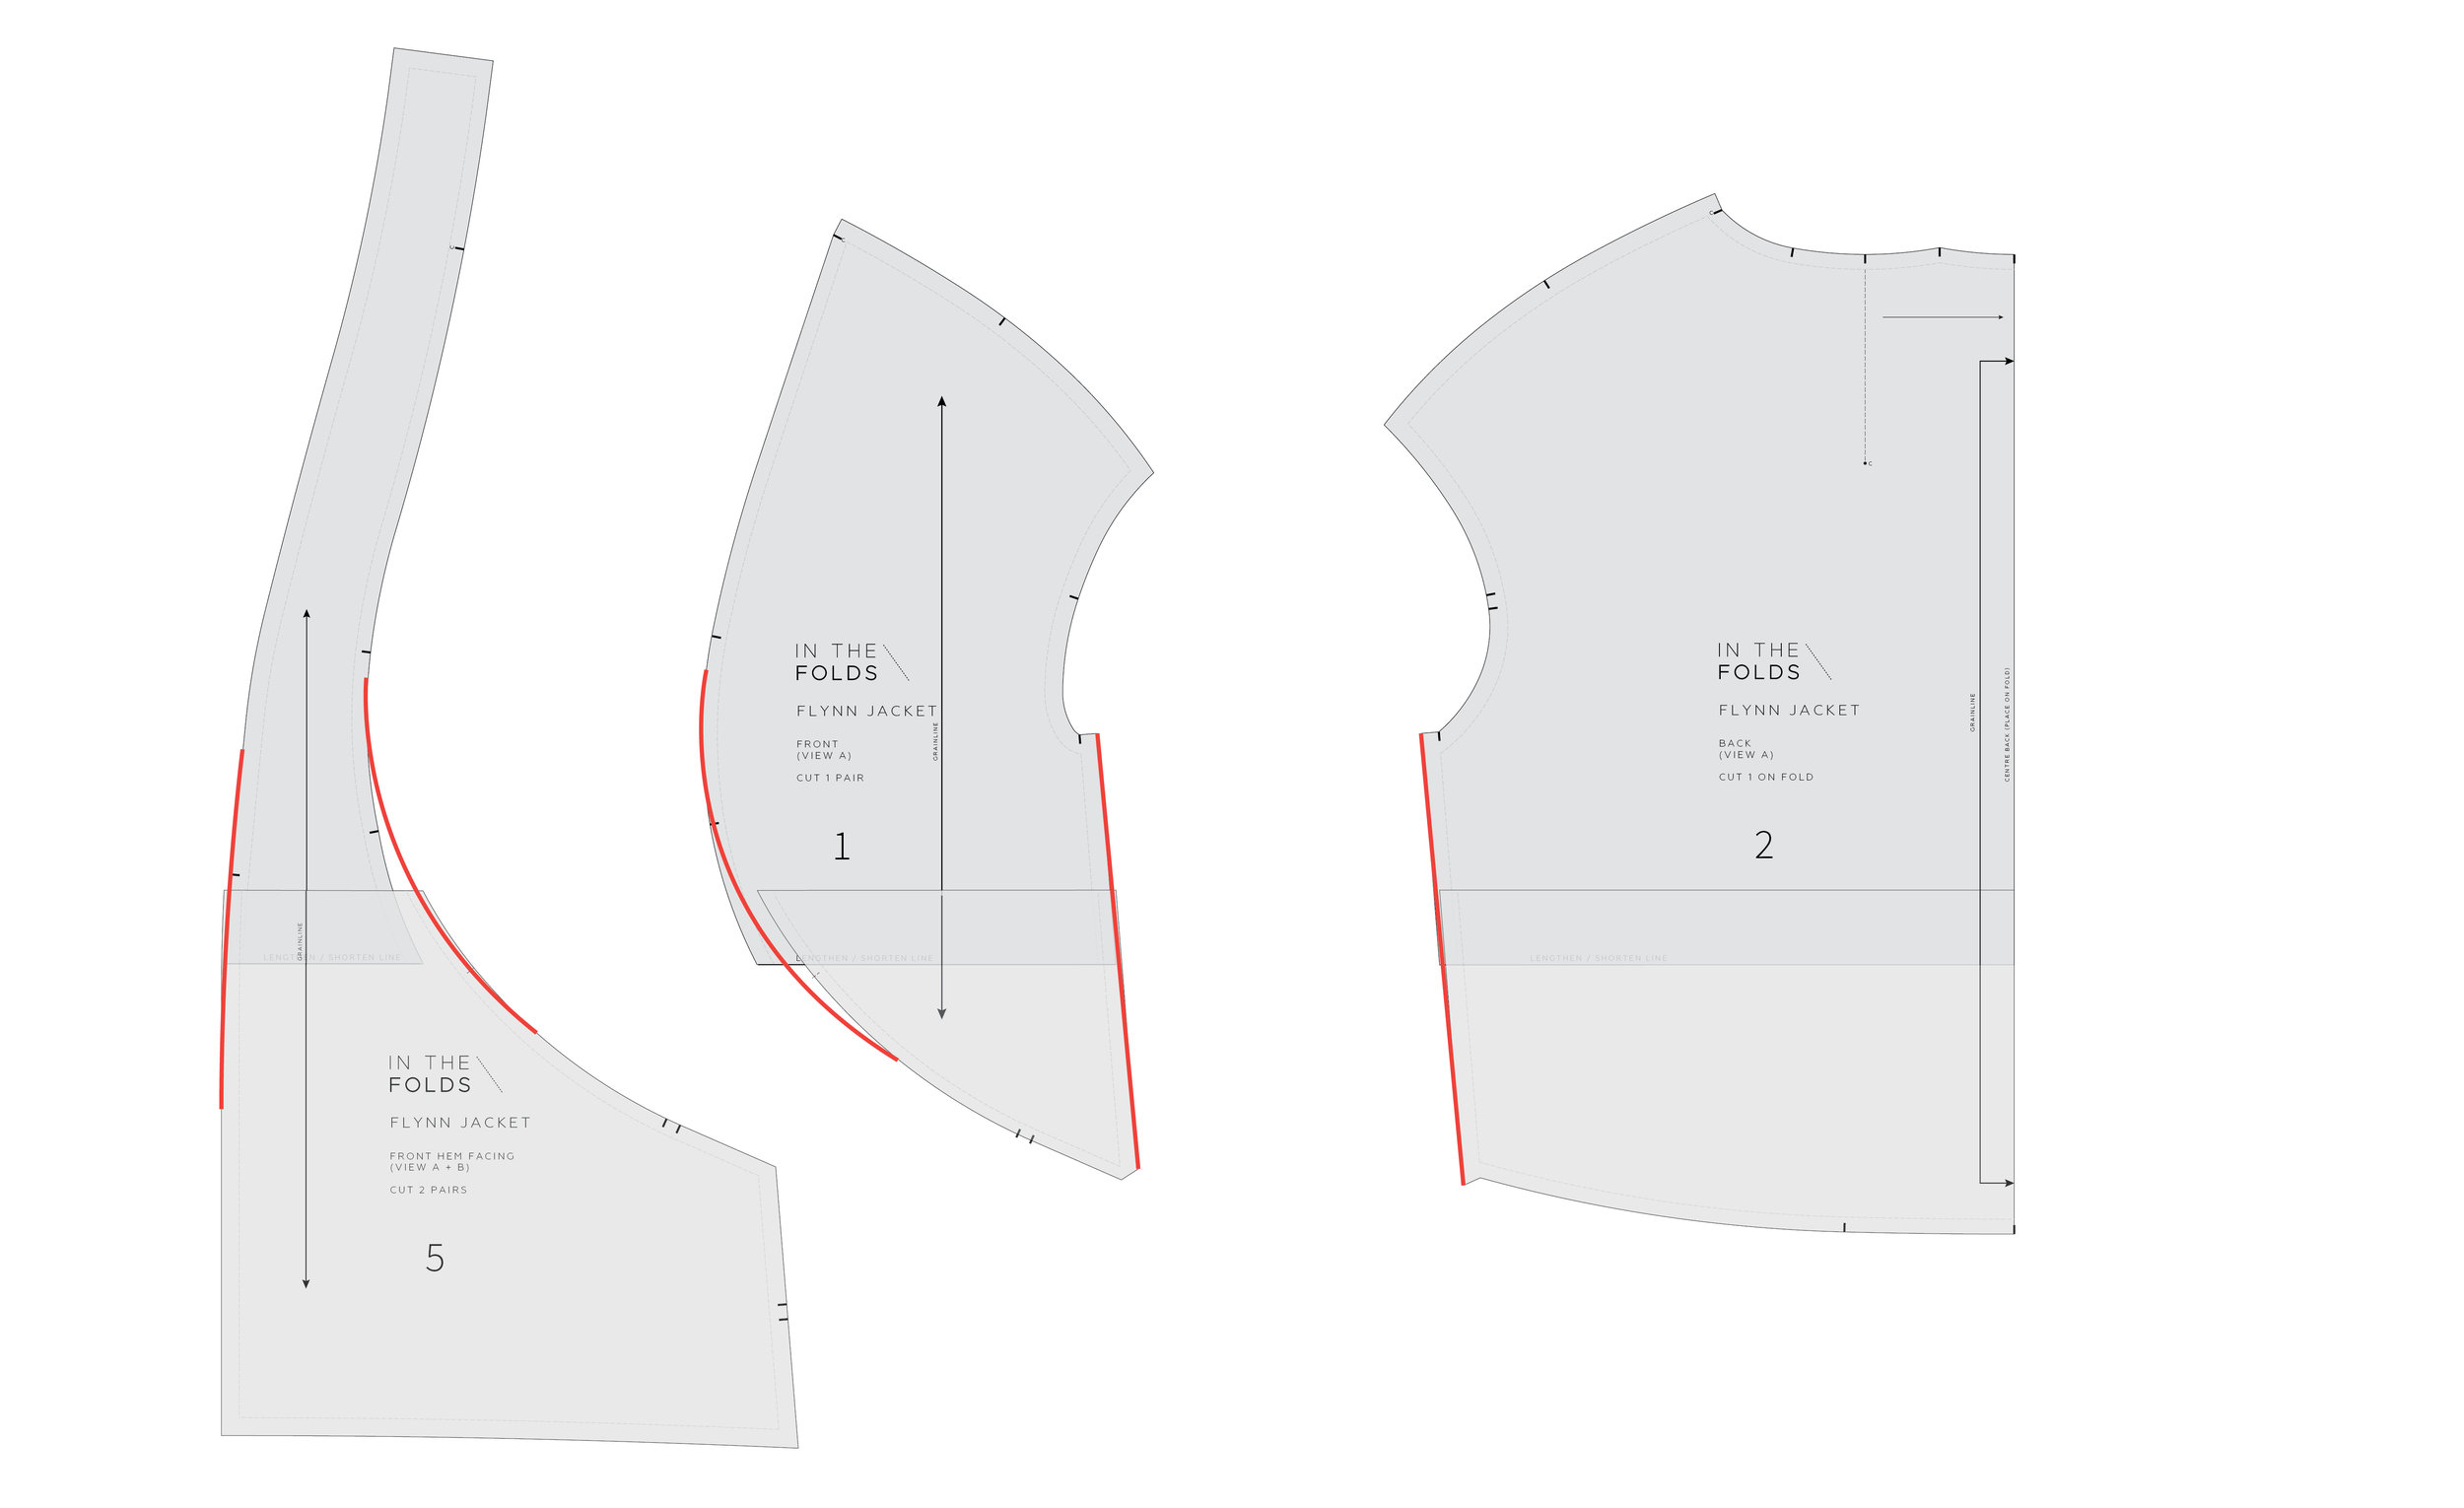
The pieces you will need for this adjustment are the FRONT HEM FACING [5], FRONT [1] and BACK [2] (or the co-ordinating pattern pieces for View B). You can use the actual pattern pieces, or trace a copy if you would prefer to keep the original pieces intact.
Step 2

You will need to work out how much length you would like to remove from the pattern. You can do this by looking at your toile / muslin (for more details on making a toile / muslin look at this post from the Rushcutter sew-along), or holding the pattern pieces up to your body and getting an idea of where they will sit on your body.
If you would like to remove any more than 7.5cm (3in), I’d suggest taking 5cm - 7.5cm (2in - 3in) from the mid-section of the pattern (where the LENGTHEN / SHORTEN lines are) and then removing the remainder from the hem band (more on this in STEPS 5 + 6).
A - Cut through the 'LENGTHEN / SHORTEN' line on the FRONT HEM FACING [5], FRONT [1] and BACK [2].
B - Measuring up from the cut line, mark a horizontal line on each pattern piece, the distance of the amount of length you would like to remove. In the example, you can see the red line is 5cm (2in) above the cut line and the shaded section shows the amount of length that will be removed from the pattern piece.
Step 3

A - Move the lower part of each pattern piece up to the line marked in the previous step. Use the grainline to ensure that you line the pieces up correctly.
B - Glue or tape in place.
Step 4
Re-draw the seam lines with smooth lines over the adjustment. You will notice that in some cases you will be needing to add a little bit on to create the line of best fit, while in other cases you will need to shave a bit off. This will even out as you go around the pattern.

When marking a line over the area that has been altered, there might be a large gap between the two sides of the line. In this case - split the difference by marking a point in the centre of the area and drawing the line across this point. You can choose to trace the pattern on to fresh pattern paper or tape on small pieces of paper / masking tape where you need to fill a small gap to complete the seam line.
Cut off any excess paper that is outside of the new lines.
Check all seams are the correct length by "walking" the pattern pieces, as if you were sewing them together. For more details on how to do this, check out this tutorial.
Transfer / re-draw any notches that have been misplaced. Due to the shape of the pieces, some notches may not line up due to the different points the alteration was made. After checking that the seam is the correct length, transfer one notch to the other piece (and cross out the notch that is no longer in the correct position).
If you need to remove more than 7.5cm (3in) and have opted to remove some length from both the mid-section of the pattern and the hem band, continue to STEP 5. Otherwise, you are ready to cut your fabric with your new altered pattern pieces!
Step 5

A - To remove more length from the jacket, mark a horizontal line through the bottom section of the FRONT HEM FACING [5] and the BACK FACING [6]. Make sure the lines are perpendicular to the grainline. When making alterations like this, I try to stay away from notches when possible, so advise that you draw the horizontal line slightly above, or slightly below, the notches on the side of each piece.
B - Check the position of the grainline in relation to the horizontal line you just marked. If the grainline does not cut through the horizontal line, extend the grainline (as I have done on the FRONT [5] in the example). This will help you keep things straight when making the adjustment.
Cut through the horizontal line in the same way you did in STEP 2.
Step 6

A - Again, measuring up from the cut line, mark a horizontal line on each pattern piece, the distance of the amount of length you would like to remove.
B - Move the lower part of each pattern piece up to the line marked. Use the grainline to ensure that you line the pieces up correctly.
C - Re-draw the sides that have been impacted and check that the notches still line up correctly.
And that’s it! Not too tricky, right?
In the following days I will show you how to:
Narrow / Broad shoulder adjustment
Remove the box pleat from the back piece on View A