THE Q & A SERIES
Three ways to add a closure to the Flynn jacket
Hi Emily,
I got a Flynn jacket pattern and am wondering if there are any ways to add buttons or a zip. Is that possible?
I love the jacket as is but at the same time I would love to close the front when it is cold.
Thank you :)
Manami
Hi Manami,
Great to hear you’d like to give the Flynn jacket a go.
We’re celebrating 12 months of Curated by ITF this month and are celebrating all things skill-building. Being able to alter and adapt patterns (check out all our sewing tutorials to help you do this here!) to better suit your needs is a fantastic skill to have and is something we love supporting our community to do in our Curated community.
You’ve got a few options for adding a closure to the Flynn jacket. You could add an open-ended zip (similar to the Hove jacket), buttons or a hook and eye.

The first thing that’s helpful is to understand the construction of the Flynn jacket. The front panel wraps around to connect at the centre back neck and creates the collar and the front panel opening. I’ve highlighted it in the photo above so you can see the shape. The front opening meets, but doesn’t overlap.
Before hacking a pattern (read our top tips here!) we suggest making the pattern in its original form. You may make it as a completed garment or just a toile - a test version of a garment. This blog post talks about why you should make toiles.
Having the garment in its original form is a great way to make design decisions, as you will have the garment to refer to and can try it on and use pins to mark points of interest. For example, in this case you could try on the jacket and decide how high up you would like the zip to go. This is more difficult to estimate on the flat pattern than a garment.
HOW TO ADD A ZIP CLOSURE TO THE FLYNN JACKET
You can use an open-ended zip to create a closure.
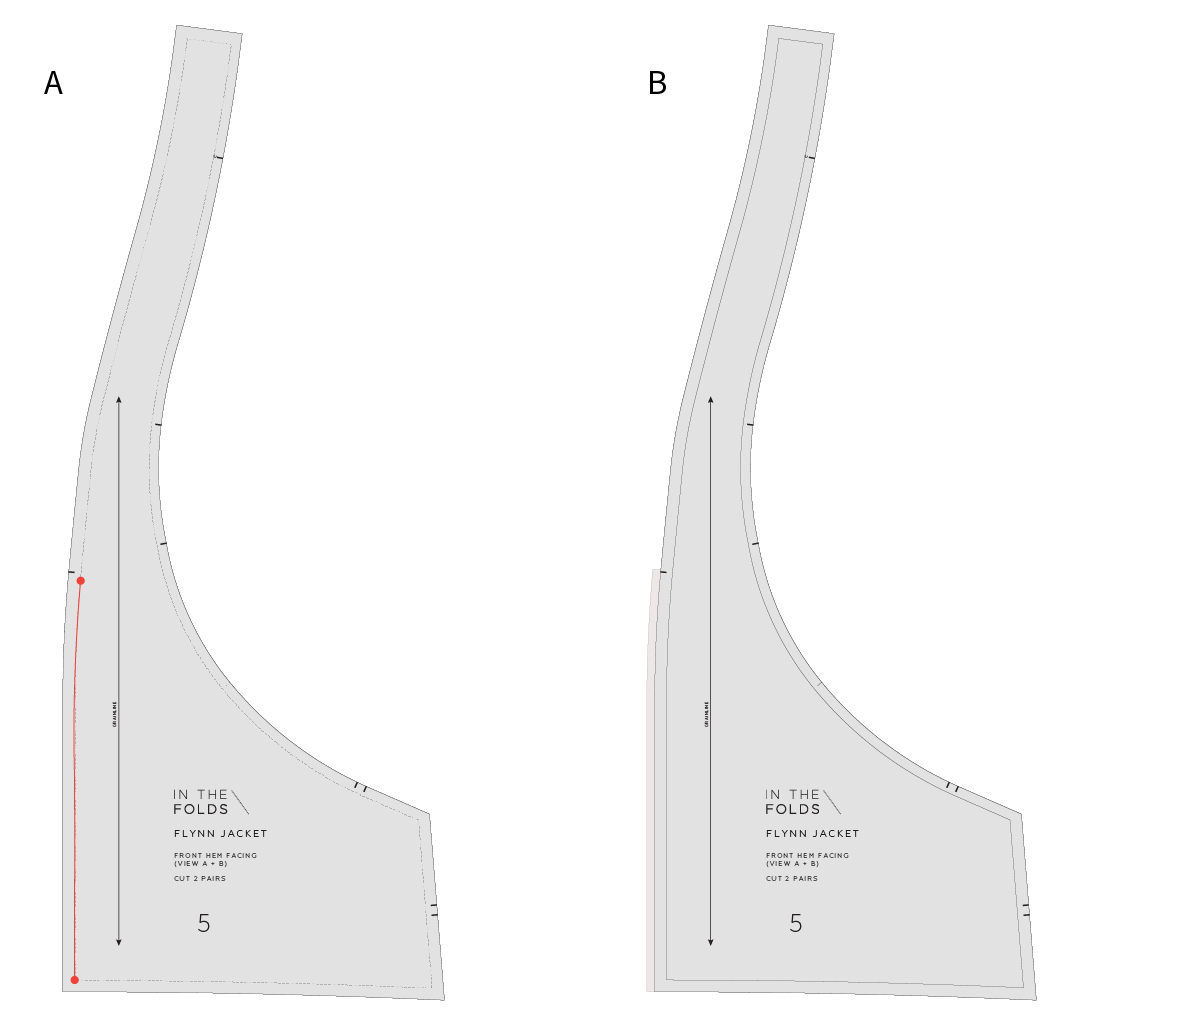
A First, mark the centre front opening on the pattern. You will want to place the zip in the straight section of the opening - which is roughly about the position of the centre notch on the pattern. From this point you can see that the seam starts changing shape, so you won't want a zip going too high up as it would distort the way the centre front hangs.
Measure from the stitch line at the hem up to the point where you’d like the zip to stop. Then look to see if you can get a zip this length. You may need to tweak the measurement (and notch position) a little to get it to line up with a standard zip measurement (unless you’d like to shorten a zip). Here in Australia, 35cm and 40cm open-ended zips are easy enough to come by and both could work well.
B The pattern has a 1.2cm (1/2in) seam allowance along the centre front edge. This is adequate for sewing a zip although it doesn't give you much room to play with. If you would prefer a little bit more room for installing the zip, we suggest extending the seam allowance in the area you will be adding the zip to 2cm (3/4in).
HOW TO ADD A BUTTON CLOSURE TO THE FLYNN JACKET

As mentioned at the beginning of this tutorial, the Flynn jacket front pieces meet at the centre front, but do not overlap. We have demonstrated this above (the overlap is just the seam allowance that won’t be there when the garment is sewn).
To create a button closure you will first need to create an overlap, as buttons and buttonholes need to be placed on the centre front of the garment.

Step 1
A Take a piece of pattern paper and tape it behind the centre front opening so you have some room to add the button extension.
Mark in your centre front line (the stitch line on the pattern piece) and extend it up.
Have a think about the size and position of the buttons you would like to use. This is when having the garment in its original form would be helpful as you can lay the buttons on the garment to get an idea of the scale. Alternatively, lay the buttons on the pattern piece. You’ll want to determine where your first button will go and the width of the buttons you plan to use.
B Mark a second line - measuring from the centre front, half the width of your buttons plus 1cm (3/8in). This will allow room for the button, and a little bit of space between the edge of the button and the edge of the opening.

Step 2
A Add seam allowance to the edge. We suggest 1cm (3/8in). We have a tutorial on adding seam allowance here.
B Join the bottom and top of the line back to the original pattern. You want the transition between the new section and the original pattern to be nice and smooth.

Step 3
A Consider what shape you would like the top of the opening to be. You may have it come to an angle as demonstrated in Step 2, or you may prefer a curve which is more in line with the original design.
B Once you have determined the shape, cut off any excess paper and mark button position on your pattern.
When sewing the garment we suggest adding a strip of fusing down the centre front opening to support the buttons and buttonholes.
HOW TO ADD A HOOK & EYE CLOSURE TO THE FLYNN JACKET
The other option is to sew a hook and eye on each side of the opening. This is what I've done on one of my Flynn jackets and it works really well because the jacket can be worn open without the hook and eye being seen, and when it’s closed it doesn’t change the design much. The only thing is that a bit more wind can get in compared to using a zip or buttons! So this is something to keep in mind.
Happy pattern hacking,
Emily
RESOURCES MENTIONED IN THIS ISSUE
The Flynn jacket pattern can be found here.
The Hove jacket pattern can be found here.
More information about our Curated by ITF sewing subscription can be found here.
Our sewing tutorials archive can be found here.
We talk about why you should make toiles in this blog post.
How to add seam allowance to a pattern - tutorial can be found here.
For more issues of the Q & A series, you can check out the archive here.
WHAT YOU’VE BEEN MAKING

Wide leg pants made by @bykylieshea

Rushcutter dress made by @proper_tension