THE Q & A SERIES
Using finished garment measurements to select your size
Hello,
I recently downloaded your wide leg pants from the Peppermint Magazine. Firstly, thank you for the free pattern. I think they are just perfect and I am looking forward to making them up.
I'm in the initial checking to see if I need to alter anything stage before I cut the fabric out and have a question about the designer ease you may have included in your pattern. I am a lovely pear shaped woman with large front and inner thighs so would love to make sure the pattern will have enough ease. I really hope you don't mind me asking. Are you able to tell me what designer ease you have drafted the pattern to have in the thigh and hip area? And also how far down the hip curve is the hip line in your pattern?
I apologise in advance if it's a question that I shouldn't ask you as the designer.
Thank you for any advice you can give.
Hi there,
I am pleased you are planning to make the Peppermint Wide leg pants pattern!
This is definitely something I can help with, and with the tips in this email, you should be able to know what to look for when selecting your size when working with new patterns.


What is ease?
To start, it's a good idea to understand what 'ease' means. In general, ease is the difference between the finished garment measurements and your actual body measurements. For woven garments, there will always be a certain amount of ease between the body measurements and the garment measurements. This is what allows us to move in woven clothes - to feel comfortable to sit, stand and move our arms and legs.
For fitted knit garments, there may be no difference between the body measurements and the garment measurements, or even negative ease. This is offset by the stretch in the fabric.
There are two types of ease when it comes to garment sewing. There is "wearing ease" which is the amount of ease needed to wear a garment comfortably. Even in very fitted garments, you need enough ease in the garment to move, sit down, lift your arms etc. This amount is different depending on the garment type, but later in this email I will show you how to find it.
The other type of ease to consider is "design ease." This is the ease that is used in the design to make the style, or look of the garment, but isn't necessarily required for the garment to fit correctly. For example, if you look at the photos of the wide leg pants above, the legs have been widened to make the shape of the pants. There is a certain amount of ease at the ankle / calf section. Only a small amount of that is required to get the pants on (fitting ease) while the rest is design ease to give it the wide leg shape.
How much ease is included in a pattern?

With In the Folds patterns, we always include two measurement charts in our instruction booklets. One gives you the body measurements (this is the same across all In the Folds patterns) and can be found here, while the other is the finished measurement chart, and changes between patterns.
The finished measurement chart is the measurements of the finished pattern pieces themselves, in specific locations, and can provide information about the amount of ease that has been included in the pattern.

Above, you can see the measurement charts included in the Peppermint Wide Leg pants pattern. To find the amount of ease in the pattern, you need to subtract the body measurements from the finished garment measurements.
For example, to find out how much ease is in the hip for a size D (highlighted), we subtract 99cm (39") from 104.5cm (41 1/8"), giving us a difference of 5.5cm (2 1/4"). We now know that the pattern has been designed to have 5.5cm (2 1/4") ease at the hip.
Remember, when selecting your size from a sizing chart, you don't need to select just one size. It is very common to have measurements that span across several sizes, and you can grade between pattern sizes to ensure you are getting the correct fit for your body.
Marking points of interest on the pattern
The next part of the question is regarding locating important guidelines on the pattern itself. This depends on the pattern, but I can help you locate it on the Wide leg pants pattern, and give you some tips that could help you find it on other patterns.

Marking waistline
To get started, we will be finding the waistline on the pattern. From the photos of the garment on a model, you can see that the top of the waistband sits on the waist.
As the garment has a waistband, to mark where our waistline is on the pattern (and then mark the hip line in a moment), I have placed the waistband piece on the pants front, as if the two pieces have been sewn together. This means that we must remove the seam allowance by placing stitch line on stitch line. Hold in place with a pattern weight or pin.
The waistline can now be indicated on the stitch line at the top of the waistband.

Marking hip line
The vertical distance between the waist line and the hip line will depend on the pattern you are using and what height it was drafted for. In general, the hip level is normally 20cm - 22cm (8-9in) below waist level.
On In the Folds patterns this distance is 21cm (8 1/4in). This can be marked by measuring down from the waistline and marking a horizontal line.
If you don't know how far down the hip line is, you can look for clues on the pattern. For example, some patterns will have the hip line indicated with a notch on the side seam.
Another way to find it is to find where the opening is. Generally, an opening will normally finish at around the hip level, as we need a garment to open up enough that it can fit over our hips, which is often the widest part of our body. In the pants example, you can see that the fly finishes at the drill hole on the centre front crotch and the hip line is just below.

Transfer hip line to back
Now that we have the hip line marked on the front of the pants, we can transfer it to the back. To do this, you need to line up the pieces at the side seam as if they have been sewn. Again, this means lining up stitch line on stitch line.
As you can't line up the side seam from the top, due to the pocket opening, the simplest way to do this is to line up the pieces at the hem and walk the seam until you reach the hem line.
Extend the hip line over to the back pattern piece.
If your pattern didn't include finished garment measurements, you could then measure the length of this line to determine the finished hip width. Remember to always disregard the seam allowance when measuring finished garment measurements.

Find thigh measurement
You can then work out where the fullest part of your thigh is in relation to the pattern. I suggest doing this by tying some elastic around your hips and then tying a piece around the fullest part of your thigh. You can then measure the vertical distance between these two points.
On my body, the fullest part of my thigh is 12cm (4 3/4in) below my hip. I marked this on the pattern pieces in the same way I marked the hip line.
I then measured from one side of the line to the other to work out the difference between the pattern measurement and my body measurement. The pattern at this point measures 67cm (26 3/8in), while my actual thigh at this point measures 63cm (24 3/4in). This means there would be 4cm (1 1/2in) ease at this point.
To check if this feels like a comfortable amount of ease for you, you can hold a tape measure around your thigh at this length. Move it up and down, squat, sit and walk. If it doesn't dig in or feel tight, you should not have a problem with this amount of ease. If it does feel tight, you may need to grade up to a larger pattern size through the leg of the pattern to allow more room for your thighs.
Other things to consider
This tutorial hasn't discussed height, so please also keep this in mind. If you are not the height this pattern was originally drafted for (i.e. 170cm (5'7") then you may need to alter the length of the pattern before checking the width of these guidelines. Adding length doesn't always refer to just adding length to the legs, you may need to add or remove length between the waist line and hip line, depending on your body proportions.
Make a toile
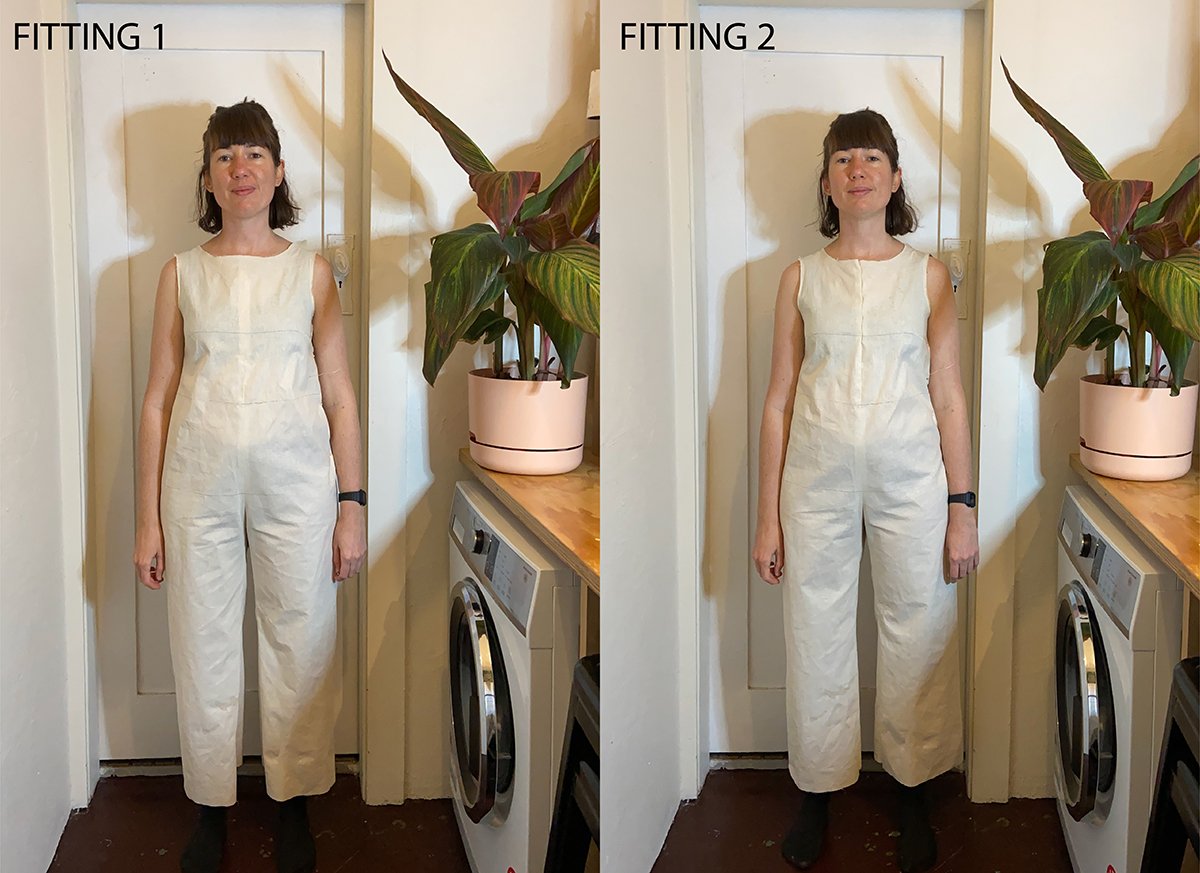
I am a strong believer in making a toile (some of you might know it as a muslin). Although taking your measurements gives you a really good idea of where to start with selecting a size / making adjustments, nothing beats what you can learn from making a toile. Even though I have been sewing since I was a child, I never make a garment without first making a toile (yes, even for a sack dress!). It means that by the time I get to cutting the "proper" fabric, I can relax and enjoy the process - knowing that the garment I finish with will (most likely) be something that I will love to wear.
Above you can see my toile for my Neale jumpsuit that I shared in our Mighty Networks group. When it came to sewing the real thing, I was feeling confident that it would turn out how I wanted it to.
For guidance on making a toile, check out this post.
More resources
If fitting is something you would like to know more about, you may be interested in having a read of this Q&A post from our archive.
We also discuss fitting a lot in the Curated by ITF online community. We covered a lot about measuring a pattern and comparing this to your body in Issue 1 of Curated by In the Folds with the Neale jumpsuit pattern and Fit Kit. If you sign-up to Issue 2 of Curated, you will have a chance to purchase Issue 1, if this information sounds appealing to you. In our online group, we help troubleshoot, provide guidance and tutorials to give makers confidence on both the sewing and fitting journey. If you are interested in joining us, you can find more details here.
I hope you feel confident to get started on your Peppermint Wide leg pants, now that you know exactly how to select the right size for your measurements.
Happy sewing,
Emily
resources mentioned in this issue
The Pattern Wide Leg pants pattern can be found here.
In the Folds sizing chart can be found here.
Grading between pattern sizes. Tutorial can be found here.
Checking seams. Tutorial can be found here.
How to (and why) make a toile. Tutorial can be found here.
Selecting the correct size. Tutorial can be found here.
Curated by In the Folds - monthly project and supportive community group. Details can be found here.
For more issues of the Q & A series, you can check out the archive here.
What you’ve been making

Neale jumpsuit made by @shuaychong

Peppermint wrap top made by @loulaandstitch

Barkly skirt made by @ghyslaine.x

Collins top made by @katyyypowell


