THE Q & A SERIES
Tips for cutting pockets
Hi there,
I'm just in the process of laying out the Barkly Skirt pattern (View A) onto my lovely woollen fabric and find that I'm a bit short. Is there a way I can make the pocket pouch (piece 5) out of some of the main fabric say a third, and the rest out of a lighter fabric the same as I am using for piece 4?
Thanks!
- Keri,
Williamstown, Australia
Hi Keri,
I am pleased to hear you are making the Barkly skirt! A woollen Barkly sounds like a perfect winter staple.
You can definitely do what you're suggesting to reduce the amount of fabric you need.
Cut pocket facings in an alternate fabric

To get started, I'd suggest cutting the POCKET FACING [4] from an alternate fabric. This piece will not be seen on the outside of the garment, so is a great one to substitute if you've got limited fabric. In the illustration above I have shown you the piece I am referring to and where it goes in the finished skirt. I have made the front panels transparent so you can see it.

Even if you did enough enough fabric, I often cut pocket facings from an alternate fabric. It's a good way to minimise bulk. I suggest using a fabric that is a similar colour to the main fabric, so it doesn't draw attention when you have your hand in the pocket (unless you want to draw attention with a fun pop of colour!)
Create a pocket shield
As for piece number 5 (the pocket bag), what I suggest you do is sew the pocket in the way that jeans pockets are often done. This creates a "shield" - a piece that can be cut from the main fabric (in this case, wool) that can be attached to an alternate (often lighter weight) fabric. In jeans you will see a pocket shield made from denim attached to a lightweight pocket bag. This minimises bulk in the pocket and gives the illusion that the pocket is cut completely from denim.

Step 1
Place POCKET BAG [5] pattern piece on POCKET FACING [4] - lining up the edges and notches.
Draw in the shape of the shield piece (this will be cut from the main fabric). You want the pocket shield to extend down further than the pocket opening so that when it's sewn in place, you don't see the seam. If you can't see the pocket opening line from the POCKET FACING [4], try putting the pieces up to a window so that you can see through to the piece underneath.
For the Barkly skirt, I'd suggest that the POCKET SHIELD edge be about 4cm (1 1/2in) from the slanted edge of POCKET FACING [4] - as this will allow for the pocket shield to extend 3cm (1 1/4in) past the pocket opening when the pocket is assembled.
You could make the line parallel to the edge on the POCKET FACING [4], but I prefer the curve so that there is more length in the top section of the shield. This is because the top section of the pocket is more likely to open and show the POCKET FACING [4] rather than the lower part. This is up to you though as I know your fabric is limited.
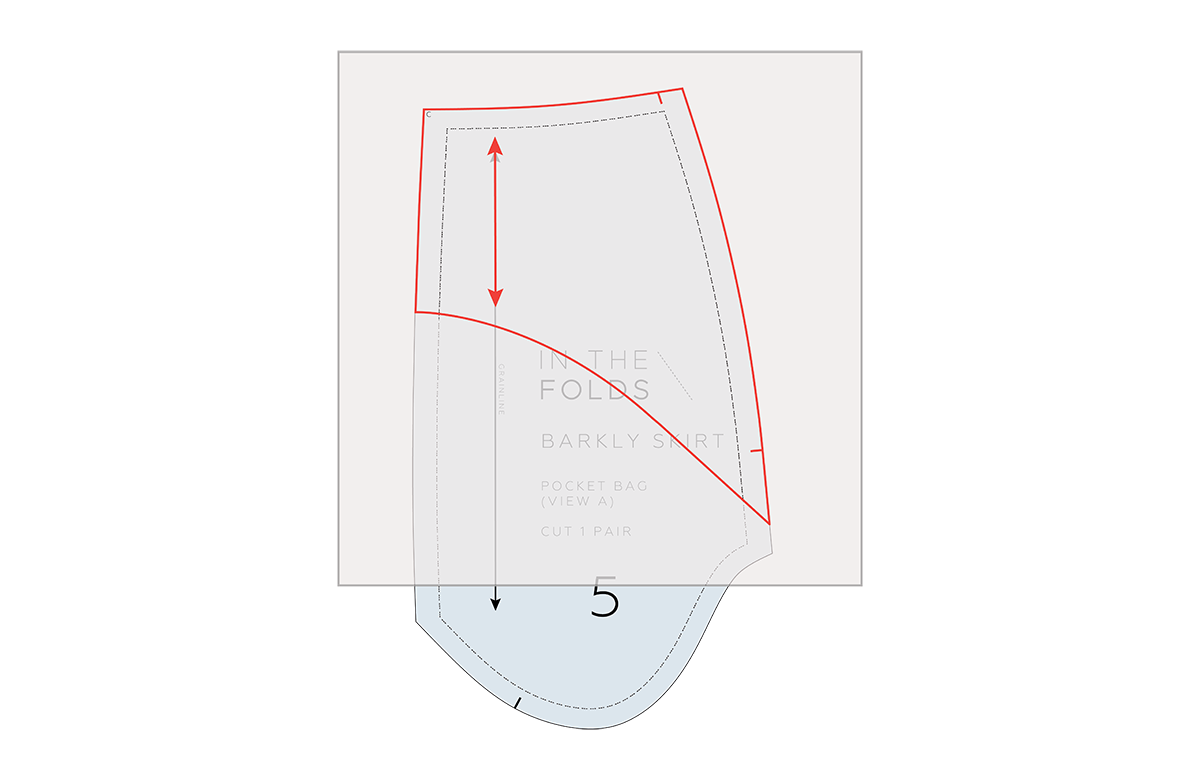
Step 2
Trace the POCKET SHIELD onto some pattern paper. This means tracing the top edge and the sides of the POCKET BAG [5] down to the POCKET SHIELD edge marked in Step 1. When tracing a pattern piece, remember to always transfer the grainline and notches. Cut POCKET SHIELD piece from your main fabric (in this case, the wool). Cut the POCKET BAG [5] from the fabric you are using for the POCKET FACING [4].

Step 3
Overlock / serge bottom edge of the POCKET SHIELD piece. If your fabric isn't too thick or bulky, you could consider adding seam allowance to this edge on the pattern piece (before cutting from fabric) and turning the raw edge under and top stitching, if you don't have an overlocker / serger.

Step 4
Pin POCKET SHIELD to POCKET BAG [5] (wrong side of POCKET SHIELD to right side of POCKET BAG [5]) and stitch close to the edge to keep the two pieces together. This line of stitching will be hidden in the seam once you assemble the pocket. You can now treat this as if it just one piece of fabric.

When the pocket is assembled, you won't be able to see the overlapping fabric. As you can see in the illustration, I have made the POCKET FACING [4] transparent so you can see how the pieces work together.

I hope this cuts down the amount of fabric you need! If you are still coming up short, you could consider cutting one set of waistband pieces in an alternate fabric, as well as the hem facing pieces.
Happy sewing,
Emily
resources mentioned in this issue
Barkly skirt pattern can be found here.
For more issues of the Q & A series, you can check out the archive here.
What you’ve been making

Barkly skirt made by @janice.makes

Barkly skirt made by @astrid_beckmann

Barkly skirt made by @huenmade

Barkly skirt made by @sewingwithkate