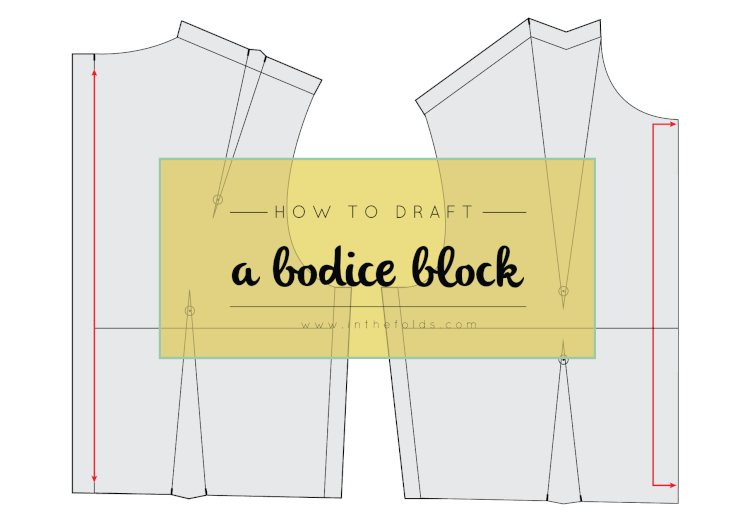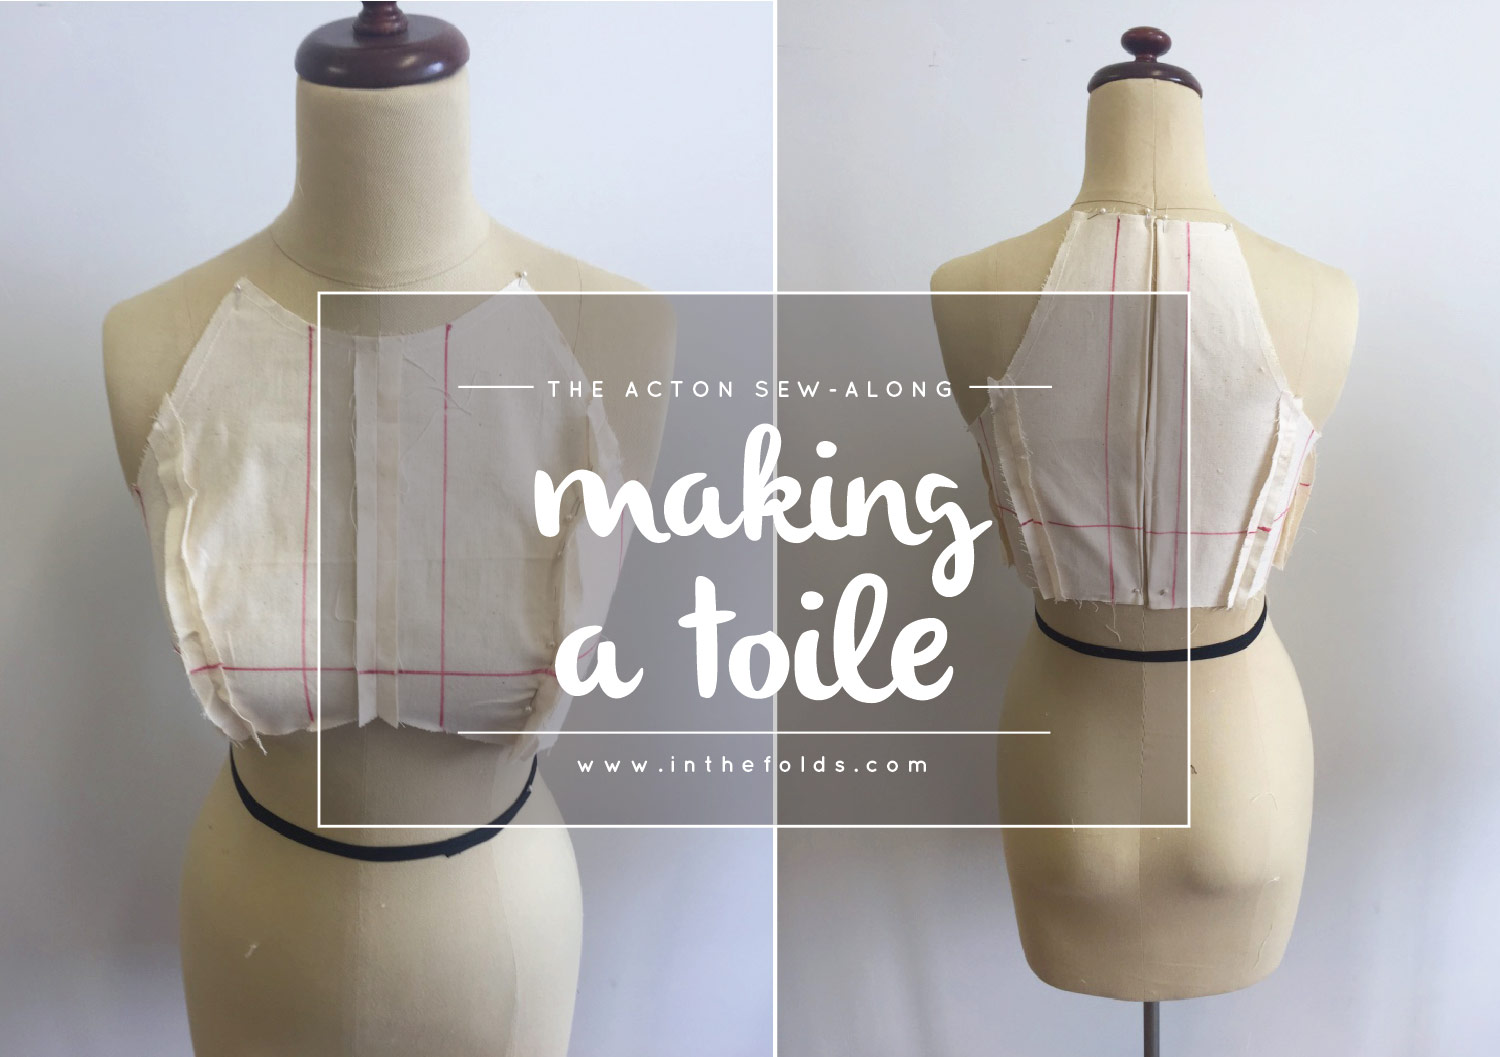
Welcome back to the Acton sew-along! Now that we've taken our measurements and worked out what size (or sizes) matches our measurements the closest, it is time to make a toile!
WHAT IS A TOILE?
A toile (also known as a ‘muslin’) is basically a draft version of a garment. A toile is normally made from a cheaper fabric, so that you can test the fit of a particular garment before cutting into your real (and normally more expensive) fabric.
It is best to choose a fabric to toile in, that is similar to what you plan to make the actual garment in. If you are using a lovely sandwashed silk, then you will need something with a similar handle and drape as the silk, so you can get a good idea of what the final garment will look like. Making a winter coat? Choose something with a similar thickness and drape. For the Acton, it is designed to be used with 'drapey' fabrics, but to get a good idea of the fit of the bodice, I would use something stiffer than suggested - such as calico or cotton.
WHY SHOULD I TOILE?

We all come in different shapes and sizes, and although I may have the same measurements as the girl next to me, this does not at all mean we have the same body shape. Some of us may have a sway back, forward sitting shoulders (that’s me!), narrow shoulders, longer torso etc. By making a toile, you can quickly see if any adjustment needs to be made. As you sew more garments for yourself, you will get better at knowing what to look for, as you will often notice the same fitting problem across the board. You may think that In the Folds patterns would fit me straight out of the packet. They don't! My patterns are drafted to fit a "standard" (is there such thing?) size 10 fit model, which means that before making something from one of my patterns, I must make a few alterations too... So I am right here with you!
HOW DO I MAKE A TOILE?
After choosing your size, printing the pattern, and making any alterations that are standard to you (such as an FBA or SBA), make up the garment in your chosen toiling fabric. You don’t have to add facings, collars or pockets etc when making a toile. I never bother with buttonholes or zips either, I just pin the opening closed when it’s on. For the Acton, if you're short of time, you can get away with just toiling and fitting the bodice.
You just want to check the overall fit of the garment, so you will only need the main pattern pieces (in the case of the Acton, you just need to cut the bodice pieces, not the lining). There is no need to even finish the seams!
To Start

Cut out your bodice pieces in your chose size. Remove the seam allowance from the neckline and armholes, as well as the waistline seam. This will help you get an accurate idea of the fit, without getting confused by the seams that have not been finished.
For loose fitting garments, that have enough ease to fit a wide range of shapes (such as The Rushcutter) you can go right ahead and cut out your toile and get sewing, but for fitted garments like the Acton, it is best to mark some guidelines on your pieces first. This will really help when it comes to fitting the bodice and working out what changes need to be made.
Mark guidelines on your pattern pieces
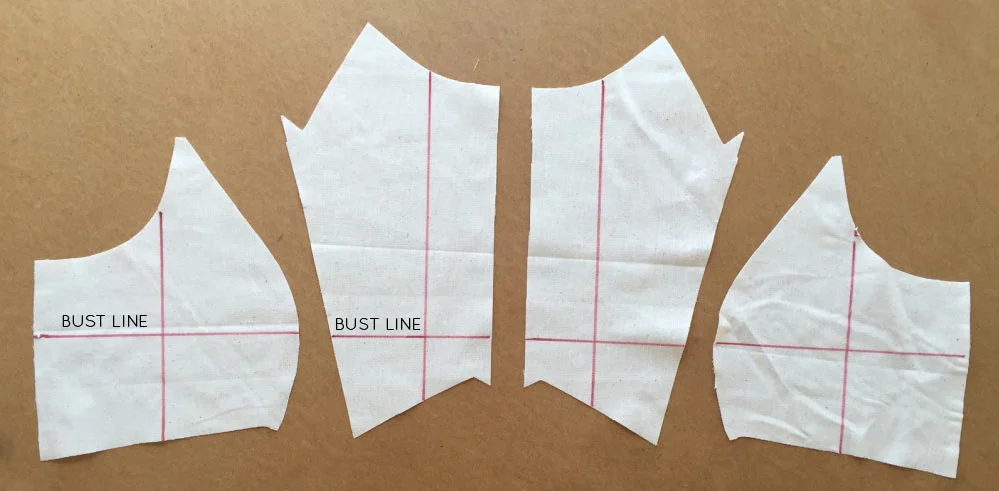
Take your pair of SIDE FRONT BODICE pieces and draw a horizontal line through the fullest part of the bust. Transfer this line onto the CENTRE FRONT BODICE too (at the same level).
Draw a vertical line through each piece too. This doesn't have to be exact - these lines will just act as reference points when you are fitting. They will help you tell if the bodice is sitting as it should.
It can be a good idea to try a toile on inside out, so transfer these guidelines onto the wrong side of the fabric too.
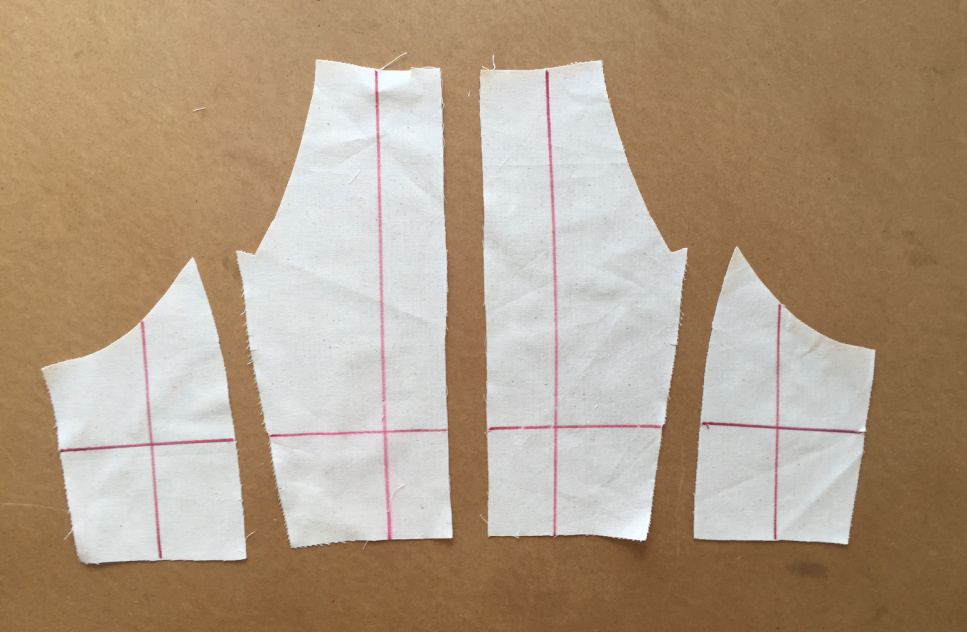
Do the same for the CENTRE BACK BODICE and SIDE BACK BODICE pieces.
Sew the toile
Sew the bodice together, according to the instructions in the pattern (leaving the centre back seam open). When sewing, consider using a long stitch length, so that you can quickly and easily unpick any seams that need to be altered. You can also use a contrasting thread to make it even easier to see your stitches (and remove them if necessary).
Press all seams open before stay-stitching around the top edge of the bodice (neckline and armholes) - this will prevent the toile from stretching while you are fitting it. Press the centre back seam allowances in by 2cm - these creases will help you pin the bodice closed in the correct place.
WHAT’S NEXT?
Tie a piece of elastic (or similar) around your natural waist. This will act as a reference point for your bodice so that you are able to check the bodice length, as well as act as a guideline to check that the bodice sits correctly.

Line up the bust line on the bodice with your actual bust line (the line that runs through the fullest part of your bust - or across your bust apex / nipples), and get pinned into the bodice (up the centre back seam) with the bodice inside out. It is a really good idea to have a friend around to help you with the fitting. It can be a little tricky if you're on your own! If you are on your own, try turning the bodice around so that the centre back is at the front and pin the back seam closed before twisting it around the right way.
As the bodice doesn't have straps yet, it can be helpful to try the bodice on with the fitted jersey top on underneath. This way you can pin the bodice to the top if it's not staying up on its own!
Get in front of the mirror and take a look.
Fitting is a process, one change will effect another part of the toile, and so on and so forth - so it is important to do your fitting in a methodical way. When working on a full garment, work from the top down - fitting the bust, the waist and then the hips.
Check the side seam
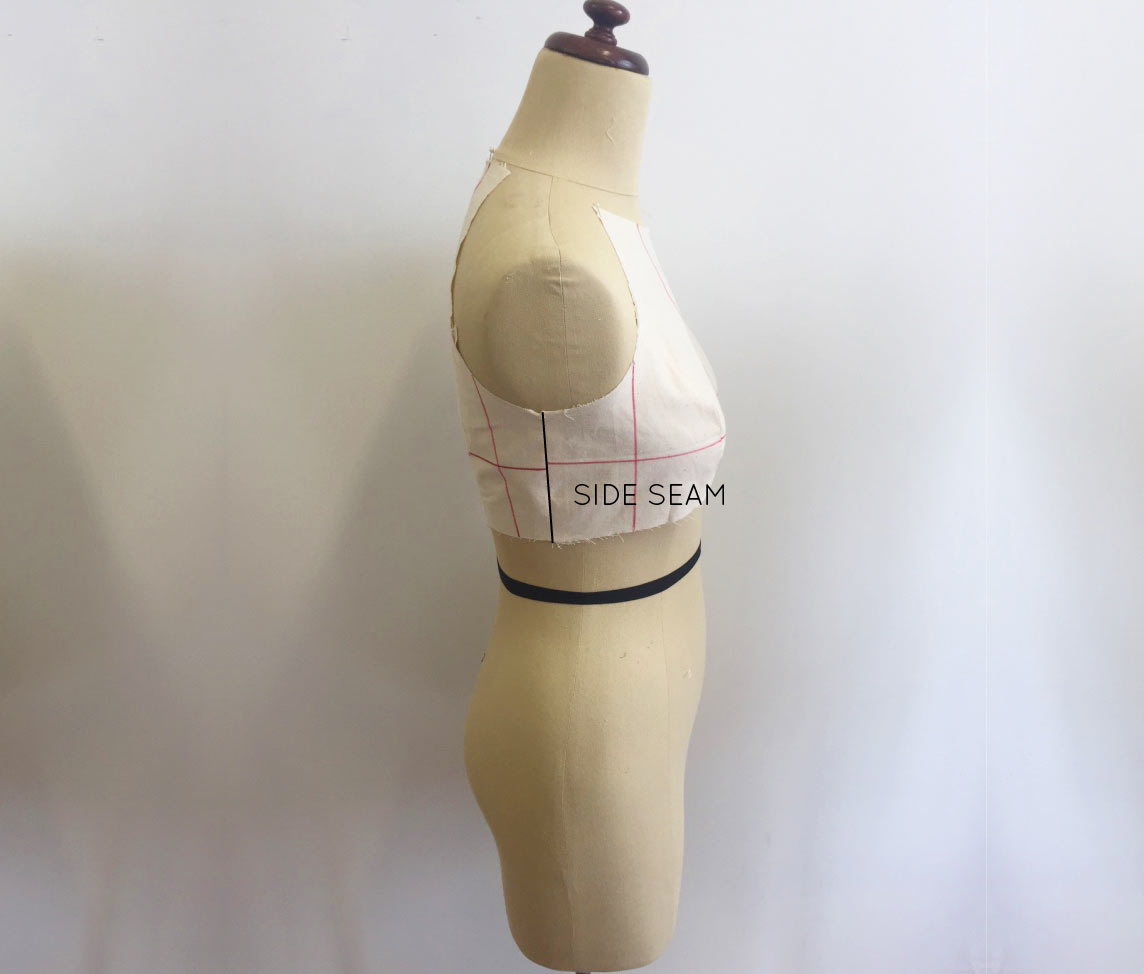
First things first, check the side seam. Is it sitting perpendicular to the elastic you have around your waist? If it is being pulled forward, it could be a sign that you need to do a FBA.
Check the bust
Check the overall fit of the bust. The Acton is designed to be quite fitted (there is only 2cm / 1" ease at the bust).
If the bust is too small...

A : If the bodice feels as if it's pulling across the bust (or you can't even get the bodice closed at the centre back), unpick the princess panels from the bust line up, and then the bust line down - releasing the fabric - but not unpicking the whole seam. Make sure you do this to both sides so you can get a correct gauge of the fit with the extra width added.
B : Measure how much your princess panels are opening up at the bust line. Measure the opening on both sides. If they are not the same, add them together and divide by 2 (to find the average), so that you add the correct amount when you do your Full Bust Adjustment (tutorial coming soon). Take note of this number, so that you can use it when doing your FBA.
If the bust is too big...

A : If you have the opposite problem, and the bust area is too big, carefully pin down the princess seams, removing the excess. Do this on both princess seams, being careful to remove an even amount from each side.
B & C : Take a pen or marker and draw the new panel line on both sides of the princess panel by following the pins.
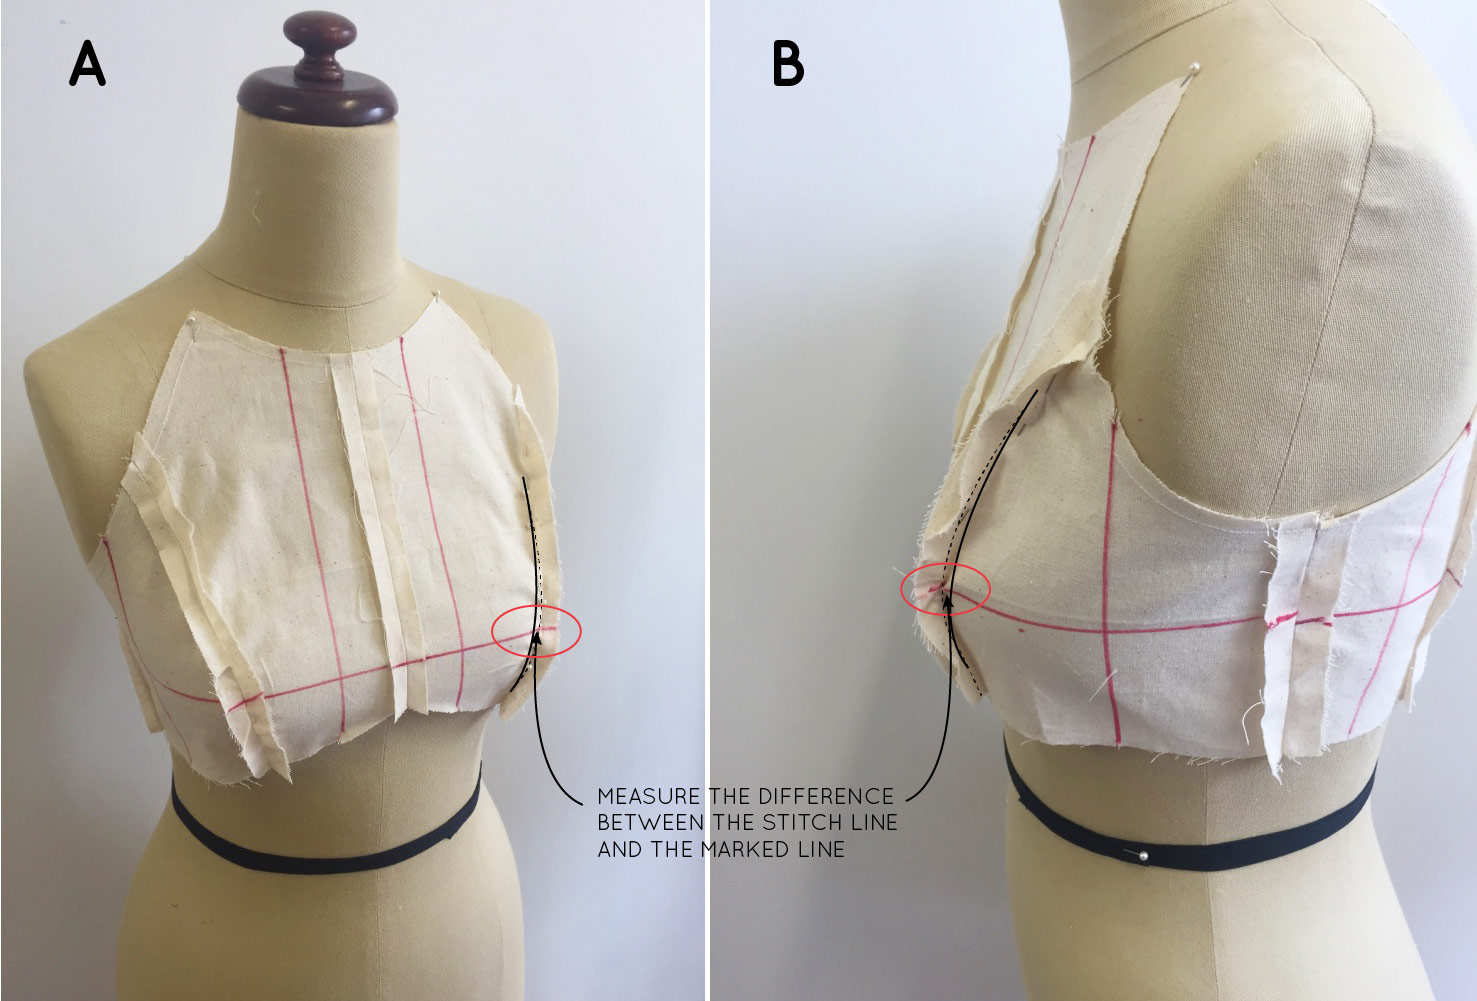
A : On the bust line, on the CENTRE FRONT BODICE, measure the difference between the original stitch line and the marked line, take note of the measurement. Repeat for the other princess panel.
B : On the bust line, on the SIDE FRONT BODICE, measure the difference between the original stitch line and the marked line, take note of the measurement. Repeat for the other princess panel.
Add up these four measurements to find the total you need to remove from the bodice when you do a Small Bust Adjustment.
Check the bodice length below the bust
Once the bust is sorted, it is time to check the length of the bodice.
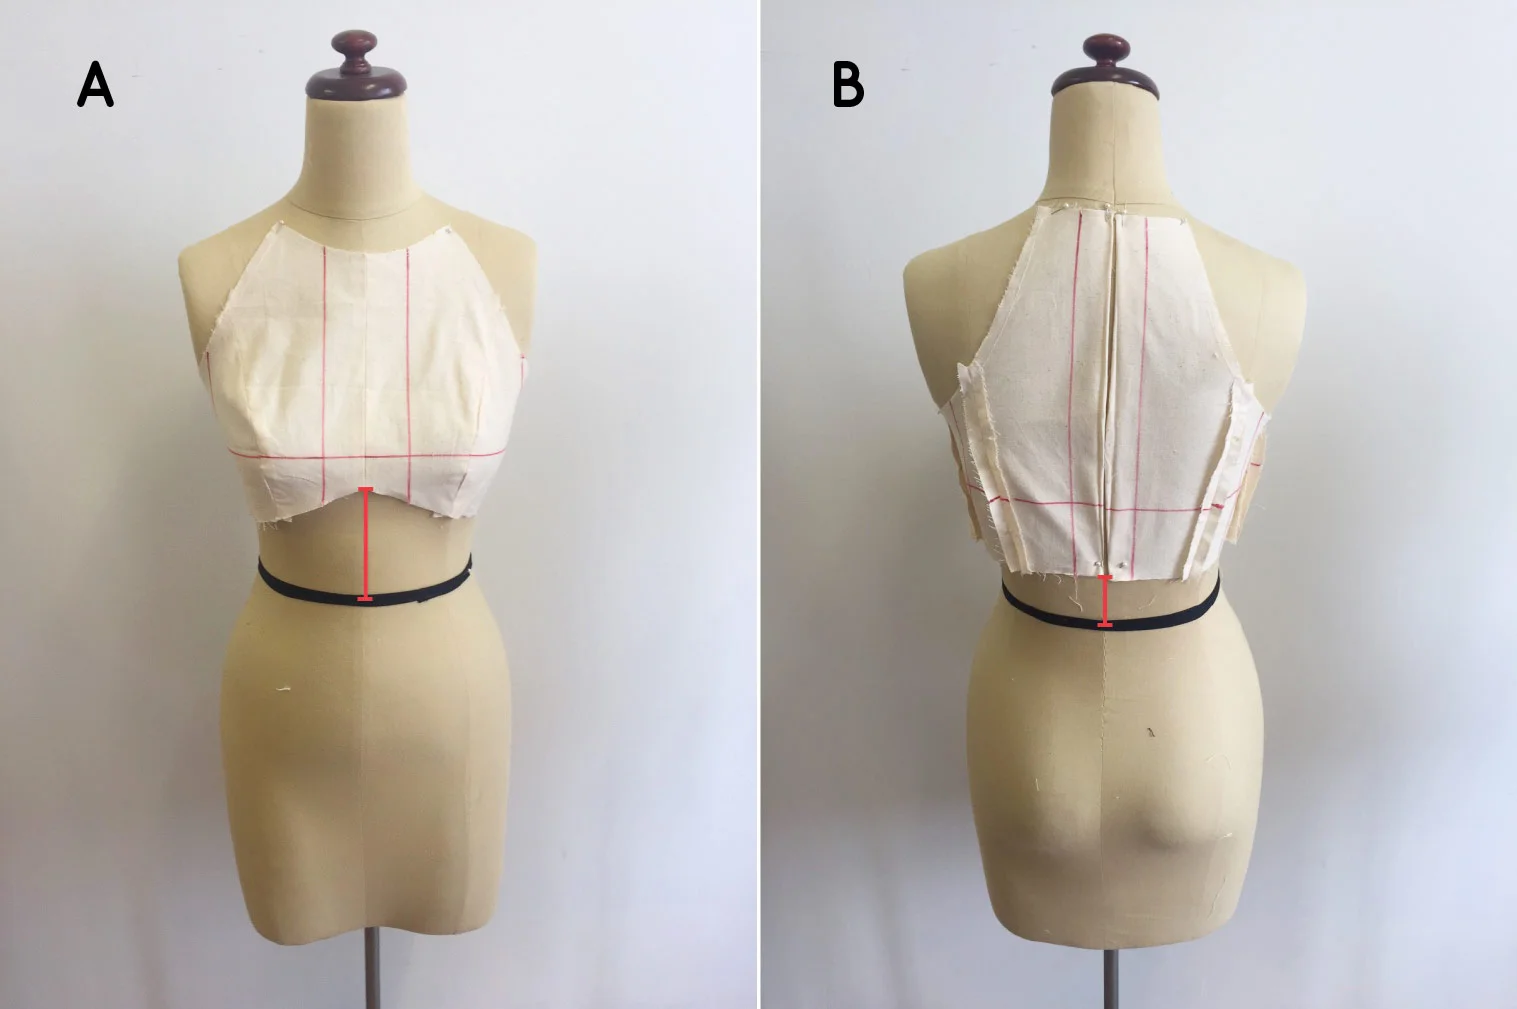
A : Measure down from the bottom edge of the bodice at the centre front seam to your waist. The bodice was designed to sit roughly 12cm above the natural waist. Take note if your bodice sits above or below the 12cm mark. In a later tutorial I will show you how to add / remove length to the bodice if your bodice is too long or too short.
B : Measure down from the bottom edge of the bodice at the centre back seam to your waist. The bodice was designed to sit roughly 5cm above the natural waist at the back. Take note if your bodice sits above or below the 5cm mark.
Check the bodice length above the bust
You may notice that your bodice is sitting in the right place in relation to the waist, but there may be too much (or too little) fabric above the bustline.

I have two dressforms with very similar measurements, you will notice that in photograph B the bodice sits much closer to the neckline than in photograph A. This shows that the dressforms have different proportions above the bustline only (as the bodice sits 12cm above the natural waist on both).
Work out where the problem is, do you need to remove length above the armhole? Or is the armhole sitting too close to the armpit too? (if this is the case you will need to remove length from the side seam across the whole bodice)
Remove length above the bust
The best way to really work out the fit issues you have in a toile is to start cutting into your fabric and making changes. This way you can get a real idea of the changes as you make them, and hopefully save yourself from making too many toiles!
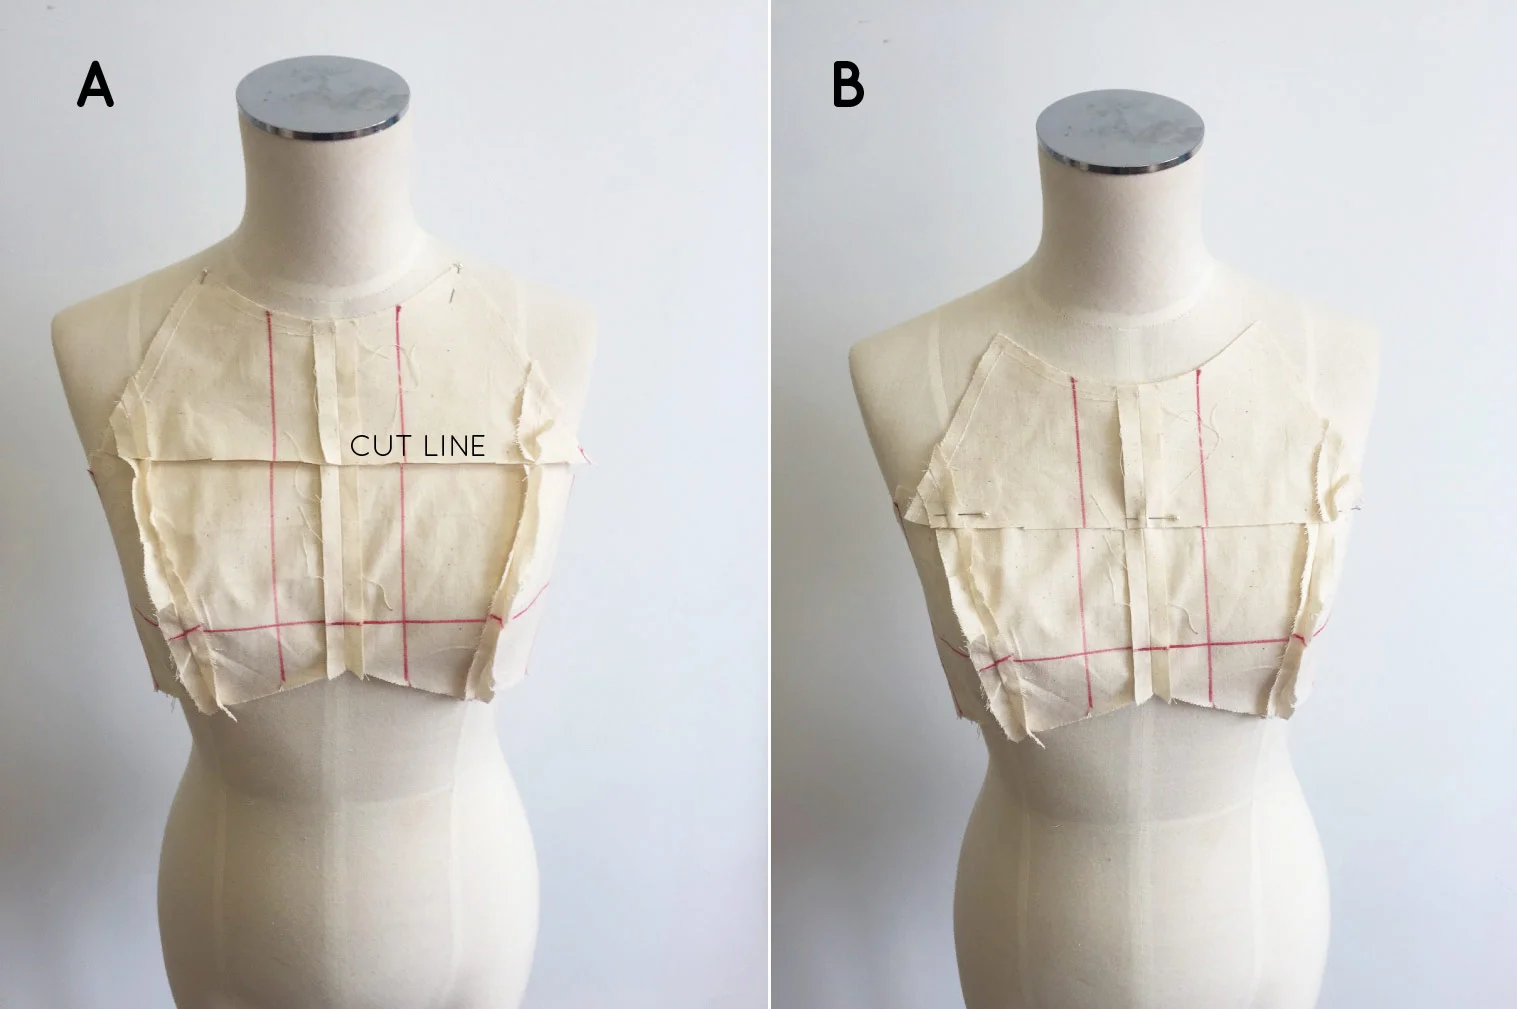
A : Cut through the bodice at the point that has too much length - this may be above the armhole, below the armhole but above the bust line, or below the bust line.*
B : Move the detached piece down until it is sitting in the correct position. Pin in place and measure how much length has been removed.
*You may need to add length in more than one place
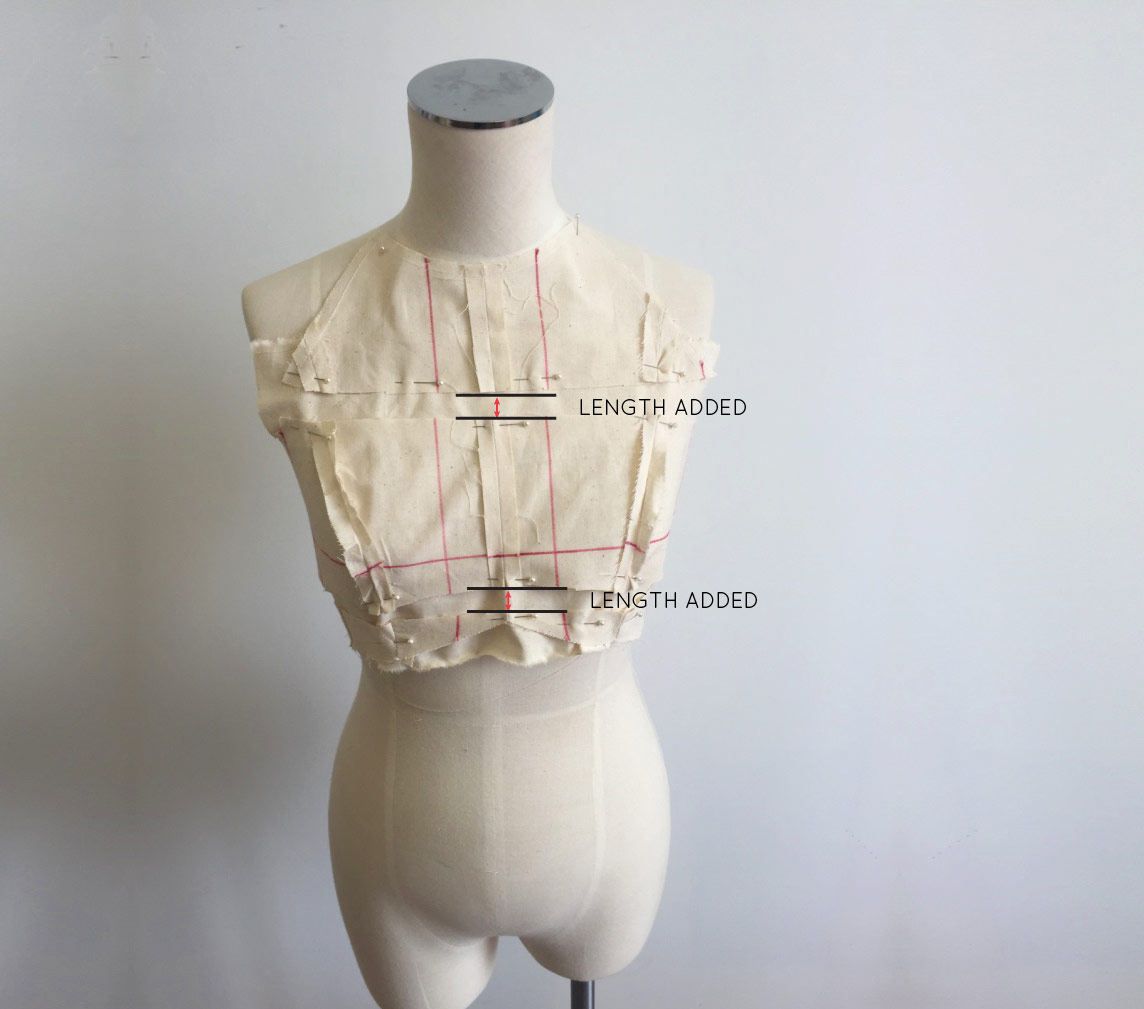
Add length above the bust

A : Cut through the bodice at the point that is too short - this may be above the armhole, below the armhole but above the bust line, or below the bust line. (Again, length may be needed in multiple spots).
B : Take a strip of scrap fabric and pin to the lower portion of the bodice. Move the detached piece up until it is sitting in the correct position. Pin in place and measure how much length has been added.
Repeat the process of cutting and opening (or cutting and closing) to add / remove the length from the places it is needed. If you want to get a really good idea of how the new bodice is fitting, you can stitch the strips of fabric in place on the machine, before trying on the bodice again.
Add the straps

Once you have the bodice right, use thin straps of fabric (or bias binding or tape - whatever you have around) to make two "straps" (this will save you sewing up straps) and pin in place. Getting the right strap length is crucial to getting a good fit with the Acton. Make sure your straps allow the bodice to sit comfortably, and the peak of the bodice (the bust guideline) remains on the peak of your bust. Take note of the strap length so you have it for when you are making the real thing.
What's next?
If this fitting has revealed that you have lots of changes to make to the pattern, make the changes and make another toile. It is always good to check the fit of a pattern after making significant changes.
And don't worry, I won't leave you hanging now that you know what pattern alterations need to be made!
In the coming days I have the following tutorials lined up for you:
January 12 and 13 : Lengthening the bodice
January 16 and 17 : Shortening the bodice
January 18 : Full bust adjustment (FBA)
January 19 : Small bust adjustment (SBA)
January 20 : Grading between sizes