behind the scenes

BEHIND THE SCENES OF THE ORMOND CHORE COAT

When it comes to fashion, the old saying “There’s nothing new under the sun” definitely applies. What was once in fashion usually gets its time again - for better, and sadly, worse! And while we’ve been seeing chore coats getting their moment in the ‘fashion’ sun again of late, to us chore coats have never really gone out. 

There’s a couple reasons for this, so we thought it would be great to talk about the history of the chore coat, and then Leanne will share why she loves her Ormond chore coat so much.

What you may not know about the chore coat, and why it hasn’t ever gone out of fashion 

Reason 1: Designed with purpose

The chore coat is an iconic piece of workwear with humble beginnings, and traces its roots back to the French countryside of the 19th century. Originally designed for labourers, this garment was an essential part of everyday attire for farmers and railroad workers alike. Featuring practical pockets tailored to hold tools and other necessities, it became an indispensable part of the working man's wardrobe. 

Reason 2: Designed for versatility

Crafted from sturdy, durable fabrics, the chore coat was designed to withstand the rigours of manual labour, but its boxy silhouette and fabric choice made it a versatile piece that was suitable for wear in a variety of weather conditions. 

As you can see, this outerwear garment was more than just clothing - it was a tool in itself, tailored to the needs of those who wore it.

And THIS is exactly why we think it has never really gone out of fashion.

Over time, this piece of workwear, with its timeless design and functionality, transcended its initial audience and found its way into the wardrobes of people from all walks of life, occupations and gender. It’s the perfect example of why garments that are designed with purpose and function in mind tend to stick around, and don’t become subject to fashion cycles.

(There’s some great chore coat reads if you’re interested in diving deeper into the history. We recommend these posts - Carhartt, The Times and Heddels.)

Leanne shares her denim Ormond chore coat

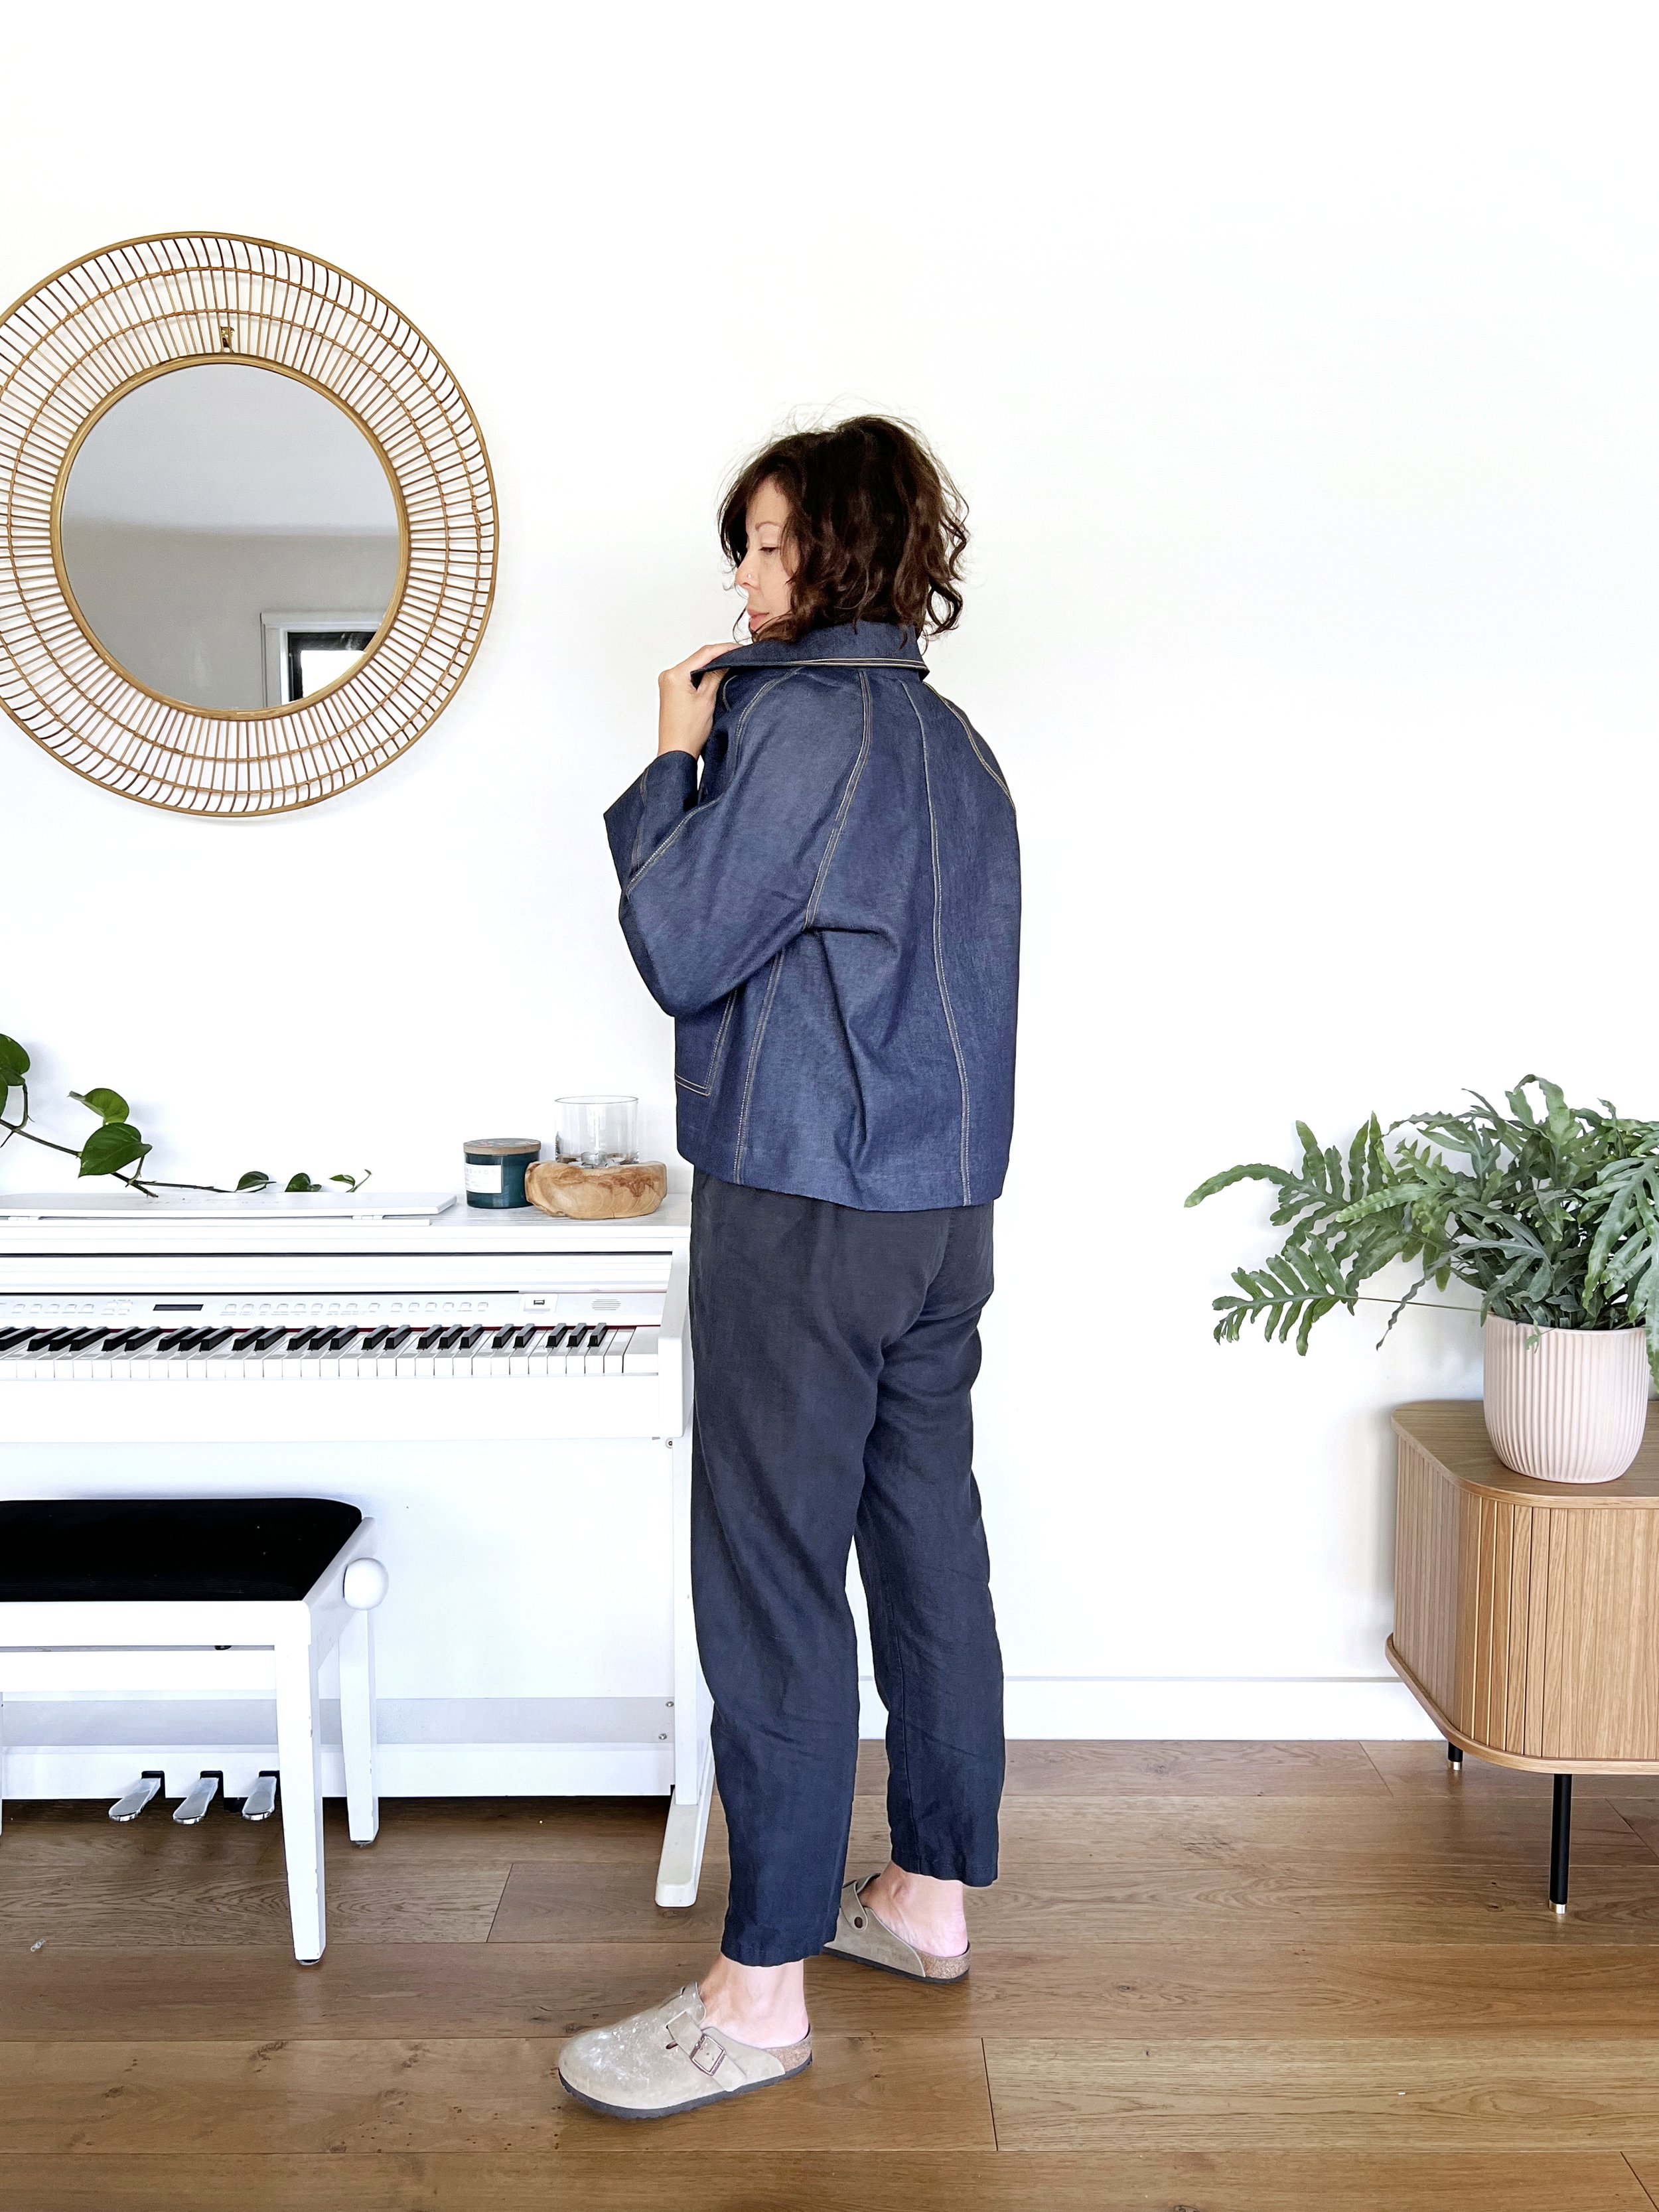
The Ormond chore coat is hands down my favourite ITF make to date! I have worn the coat on repeat since finishing it. 

I used a midnight indigo denim (from Spotlight) and classic golden contrast topstitching. This was my first time using an official topstitching thread: it's thicker and more substantial than regular thread, and stands out beautifully against the dark background. I used Guterman top-stitching thread in colour #412, and a matching regular thread for the bobbin.

My measurements put me between a size D and E in ITF patterns and I decided on a size E for my coat, as I like a relaxed and boxy fit in this particular style garment.


build your sewing skills with a
curated by itf membership


I am obsessed with raglan sleeves and love the way the contrast topstitching really highlights these design lines. I opted for bronze buttons (also from Spotlight) and am really happy with the result. Sometimes you can't go past a classic choice, it just works!

I love how the Ormond Coat looks with the sleeves rolled up for a more casual look and for my next coat I might add a couple of centimetres.

I love to wear this coat fully buttoned or undone, sleeves up or down - testament to a well balanced design!

The Ormond chore coat has become an absolute staple in my wardrobe, and I have a feeling I’m going to love it to bits for many years to come.

We can't wait to see your Ormond versions too! If you share them on Instagram, be sure to tag your photos with #ormondcoat so we can see!


WHAT YOU’VE BEEN MAKING…

TAKE A PEEK INSIDE EMILY'S SEWING SPACE

Inside Emily's sewing space

When we’re organising our own sewing space it can be helpful to see how others set their areas up. It gives us inspiration and ideas, and often triggers creative solutions for storage problems we might be facing. (That’s why we’ve all got so many Pinterest boards, after all! *wink wink*)

We thought you might like to see how Emily has set up her new(ish) sewing studio. Even though it’s where she operates her business from and you may be sewing for pleasure, a limited budget means that she has had to be creative with her approach. And we can all relate to that, right!?

Come with us as we take a peek inside Emily’s sewing studio!

tell us about your sewing space

I have a studio in a large, creative space with over 20 other artists and creatives. I enjoy having other creative people around to have lunch and a chat with. Running a small business can be lonely, so working in a space like this is a nice way to make sure I don’t go a whole day without talking to anyone!

My studio is a good size, with big windows down one end that make the space lovely and bright.

I have set up the space so it can be multi-use as there a lots of different parts to my business. I need a comfortable computer set-up as I spend most of my working hours at a computer; sewing space with notions and tools within easy reach; as well as a large patternmaking and cutting table.

Storage is also really important as I have lots of fabric for sampling and paper patterns to store.


Join Curated by ITF - find your new community!

If you're looking to be supported, motivated and inspired through your sewing journey our Curated by ITF subscription might be just what you're looking for.

As well as a monthly sewing project, you’ll gain access to our private member platform where you can receive feedback and advice from the ITF team and other experienced makers, participate in sew-alongs and make sewing besties all over the world!


WHAT’S IMPORTANT FOR YOU IN A SEWING SPACE?

It’s really important for me to be well organised so I can find what I need quickly and easily.

I’ve always loved the idea of designing spaces to maximise comfort and efficiency so things just work without you having to think too much about it. For me, this means having my most frequently used tools out on the table and having patternmaking paper within easy reach.

I find a pegboard the easiest way to see exactly where everything is, rather than rummaging through a drawer.

For a sewing space to be functional I want as few hurdles as possible in my way, so tidying up at the end of each day or sewing/cutting session is high priority!

ANY TIPS FOR MAXIMISING SPACE?

Yes! Here you go:

  • Hang patterns on a clothes rack. When I didn’t have a studio space I used to hang them in my wardrobe! It’s a great way to keep patterns flat, with the added bonus of being easy to flick through whenever I’m looking for a particular pattern. Using specifications sheets (like the one included in our Curated by ITF Organise Your Stash issue) attached to the front makes it even easier to keep track of what’s in my pattern stash.

  • Take advantage of vertical space. Using wall shelves is a great way to create extra storage space without making a room feel cluttered. It also means things are within easy reach and there is less bending down and rummaging through messy drawers!

  • Have a little bin, thread catcher or even just a bowl on your sewing table at all times. Having somewhere to throw all those threads and fabric trimmings is a game changer! When I started doing this I couldn’t believe how much I was collecting each day. Before this it all just ended up on the floor, which meant I had to vacuum after every sewing session.

  • Keep the fabric stash to a minimum. This one is easier said than done, I know! We all love to buy the pretty fabric, but it’s something I’m always striving for. I like to only buy fabric when I have a specific project in mind. Due to the nature of my business I do need to have some fabric on hand, but I am careful to make sure it’s practical and likely to be used. I love hunting for pre-loved fabric in local charity shops, so sometimes this rule is difficult to stick to!

Happy organising!


WHAT YOU’VE BEEN MAKING…

THREE PATTERNS TO HELP ORGANISE YOUR SEWING SPACE

Do you love the start of a new year as much as I do?

I love to reflect on the year that's passed, but there's nothing like the feeling of refreshing and opportunity a new beginning brings. And I particularly love the excitement of making ambitious creative plans for the months ahead!

Both Emily and I recently changed studios spaces and we have seen firsthand how impactful a sewing space can be on our motivation and ability to sew, which has inspired this month's Curated by ITF project, Organise Your Space.

THREE LITTLE PATTERNS THAT MAKE A BIG DIFFERENCE

When you're setting up or rejigging a sewing space it's easy to get distracted by the BIG things - tables, chairs, shelves and the like. But as we set up our new sewings spaces last year we realised how impactful the little things can be and that we really shouldn't discount them.

That's why we included three sewing room accessory patterns with this month’s Curated by ITF Issue. If you don't have the time or the money (or even the inclination!) to make big changes to your sewing space, these three little patterns will have you feeling just a wee bit more organised in just a short amount of time and with very little financial investment. In fact, they’ll even help you use up some of those fabric scraps we KNOW you’ve got lying around!

the sewing accessories you need (and want!)

One thing we’ve noticed is that makers will often use what’s at hand as a temporary measure to meet a need. Tinned food for pattern weights, clip-seal bags for pattern storage. You know what we’re talking about, right?

And while it’s perfectly acceptable to make-do like this, we’ve found that there will inevitably come a time when you’ve eaten all the tinned tomatoes or the clip-seal bag gets a hole in it… So we wanted to create some alternatives to those items we’re ‘temporarily’ (forever) using.

Our beautiful Project bag replaces crumpled plastic wallets and clip-seal bags.

Our cute Pattern weights replace tins of chopped tomatoes (or lentils or corn or tuna).

Our Overlocker Thread catcher replaces … well… scooping up all those scraps from the floor!


Did you know, you can actually join Curated by ITF just for the community?!

If you're looking to be supported, motivated and inspired through your sewing journey, but don't want the monthly projects, then our Curated by ITF Supporter tier might be just what you're looking for. You'll receive feedback and advice from other experienced makers and make sewing besties all over the world!


our design process

When we’re designing new projects, we start with a general idea of what we want the issue to be about, then we sit down together and decide the specific content that will be included. Emily and I chat through our thoughts and bounce ideas off each other until we’re happy with what to include.

For this month’s Issue, we had been separately thinking about what we wanted from a project bag, and when we started talking about it we realised our ideas were really aligned! We both wanted it to:

  • Be big enough to fit all of our projects in. 30 x 45cm had worked well for both of our current solutions.

  • Have a pocket to hold printed instructions. 

  • Have a flap opening fastened by Velcro.

  • Have a clear pocket to label what’s inside.

  • Include a hanger tab for easy storage.

Then we spoke about different things we needed in our sewing space and came up with the pattern weights and thread catcher ideas.

As you know, we have a big focus on skill-building in Curated by ITF so we wanted to make sure that these patterns also provided us with an opportunity to learn something new, or practice and hone some skills we already have.

Even though these patterns might look simple, they will definitely help you continue to grow in your sewing practice. Specifically, we cover:

  • Sewing tricky corners. We've got lots of top tips to get a perfect corner. Our overlocker thread catcher is a great time to put this to use!

  • Sewing velcro. Something that’s not commonly used in garment clothing.

  • Sewing patch pockets.

  • Bagging out (sewing something and turning it inside out).

  • Hand-stitching to finish patterns (useful for sewing accessories and linings).

SMALL CHANGES, BIG DIFFERENCE

Sometimes a few small changes to your space can really refresh it and make you want to get back sewing, and that’s our intention with these three little (but very impactful and functional) sewing accessory patterns.

No matter how big or small your space, you can maximise it by getting clever with storage solutions like our Project bag.

We hope they help you help your future-self by setting up your sewing space so it’s easy to get started sewing next time.

Happy sewing,

Alys


Digital garment design with the Gibson Loungewear pattern

Recently, the way I design garments has changed.

When I studied garment design at university we used a very hands-on approach. We drew designs by hand on paper. We played with fabric to see how they translated. It was literally design, toile and repeat... until we were happy with the outcome. 

While design software has been around for a while I never felt like the results compared to what I could create by hand. Many of them have a HUGE learning curve, along with an enormous upfront cost, which just isn't feasible for a small business.

But over the last couple of years software like Clo3d has entered the market, providing a good option for small businesses like mine (as well as students and other makers). I dabbled in it here and there, but didn't take it seriously at first. My established processes for design were effective and comfortable for me. Plus, I felt I was too busy with the day-to-day running of In the Folds to try and fit another thing in.

Garment Design: Learning a new way

When a Clo3d teaching opportunity came up at the university I work at, it seemed like the perfect opportunity. And, I decided it was probably a good idea to keep my skills current!

Since teaching 1st and 3rd year subjects on Clo this year I have gained a lot of confidence using it and I've realised it's a fantastic way of working.

As I mentioned above, before using Clo3d my process involved a loose draft of a pattern and then testing, toiling and patternmaking over and over until I was happy with a design. Needless to say, it was a time and resource-consuming process! 

Clo3d speeds up my process considerably and minimises the amount of resources I use, which is fantastic from a sustainability perspective - something that's very important to me. I can now do a lot of the experimentation in Clo, and have a much more resolved design by the time I get to sewing a sample and trying it on a fit model.

I can also quickly and easily test out a range of iterations - something I didn't do as much of previously because it meant redrafting a garment and making a number of new toiles to check what a design idea looked like.

The gibson LOUNGEWEAR design process

Unless you've worked in a design studio you may not have had the opportunity to see how a garment pattern is created, so I thought I'd share the process I followed to create the Gibson Loungewear design. 

Alys and I also recently chatted about the inspiration behind the design, which you can watch here.

Step 1

Using Clo3d I started with a basic raglan dress shape.

I then used the cut and spread technique to add volume to the neckline. (The purple lines show where the pattern has been cut and spread.)

This is what Clo3d gave us...

It always takes a bit of trial and error to work out how much volume you want to add to a pattern, and this will also depend on the recommended fabric.

If you’re using a thick or heavy fabric, you don’t need as much volume to make an impact, whereas if you are using lightweight fabrics, it will take a lot more fabric to give you a gathered effect. Being able to test this out digitally is a huge game-changer, as you can add some volume - check it and then add more or less, depending on the outcome. This is not the case when doing it by hand - it's not so easy to add or remove volume to a toile to check how it's going to look.


Did you know, you can actually join Curated by ITF just for the community?!

If you're looking to be supported, motivated and inspired through your sewing journey, but don't want the monthly projects, then our Curated by ITF Supporter tier might be just what you're looking for. You'll receive feedback and advice from other experienced makers and make sewing besties all over the world!


I then started having a play with different iterations and began to think about a sleeveless version.

As you can see, it doesn’t look great! This is why I love being able to test things out in Clo, rather than drafting a pattern, cutting from fabric and toiling.

I am mindful that some things will look better in the flesh than they do digitally and I have a suspicion that this would have worked better made in real fabric. But it got me thinking about our customers. I know a lot of them prefer a sleeve, so thought it best to go back to the sleeve option and continue playing with that.

It was at this point that I felt happy enough with the draft to print it out and start playing with the real thing.

And eventually we came up with the Gibson Loungewear set as it is today!

I really love the hands-on element of designing and making patterns and I definitely don’t want to lose that.

But using Clo3d gets me to a point where I know that the first toile will be fairly solid. I can now cut out the stage that normally uses the most paper and fabric, saving me time and money. Two important resources small businesses never have enough of!

Have you had a chance to play in Clo3d? If so, I'd love for you to share your thoughts with me!

Happy designing,

Emily


Thank you to our models and testers!

Thank you to our amazing sample makers & models @lovemade.handmade and @the.hemline.eclectic.


Introducing Saki - Sew-along photographer and all-round awesome maker!

Today's post is a little bit different and a little bit special! You may have seen that late last year I put a post on the blog looking for an illustrator and photographer to help with my workload. A number of people applied for both positions and I was lucky enough to find an illustrator to help me with the illustrations for my pattern instructions, who I have now been working with for over six months (and you would have seen her work if you have used any of my recent patterns).

I found someone that I thought could take the sew-along photographs, but when it fell through soon after, I balked. I just couldn't get my head around how I would be able to pass this job onto someone else. It all just became too overwhelming to cope with. I accepted that I'd just have to keep doing it myself (and maybe just find someone to assist me).

Anyway, somehow in the months that followed (and a bit of time and space to think about it), I started working out how I could get someone to work on this part of the process remotely, and Saki came to mind instantly. She had sent me an amazing application for the job and it was a no-brainer (and had dropped a very funny fact about herself that you will learn in the interview, that meant she was unforgettable). I reached out to her and thankfully she was still keen to give it a go! We jumped on Skype and had a chat about it all and then after ironing out a few details we were ready to get started - her in Germany and me here in Sydney (how amazing is the internet, right?). What I liked about our exchange from the beginning was that we were both open and honest about where we were and our thoughts on the process. I haven't used too many freelancers and definitely have lots to learn, and although Saki has done a lot of freelance work, this particular type of job was new to her too. We nutted everything out together, from how we would price the job, to the timeline, to what size the finished files would be. I think it is a little scary working with someone you have never met before on something so important, but I think we both felt safe knowing we were part of the same community, and in a way that community acts as a bit of a safety net. 

Saki took a whole collection of beautiful photos of her assembling both versions of the Collins Top, so that I could create the sew-along for the pattern. I couldn't believe how much of a burden was lifted off my shoulders having someone else be responsible for this aspect (I really don't enjoy taking photos and have no skills whatsoever!) and I know that Saki really enjoyed doing it, so it really was a win-win situation!

In today's post, just before the sewing posts in the sew-along begin (and you get to admire her beautiful work), I thought it would be nice to introduce Saki on the blog (although a lot of you might already know her from her great blog and instagram account) with a little Q & A style post.

I hope you enjoy reading it as much as I did!


Could you please tell me a little bit about yourself.

sakijane_-3.jpg

Absolutely! My name is Saki, I was born in Tokyo but have spent most of my life in Portland, Oregon. I currently live half-time in Portland and half-time in a tiny town in the wine valley of Germany with my partner, John. I speak two languages fluently (unfortunately, neither of which are German) and am slowly (s l o w l y) working on a third and fourth. I love to travel, meet new people, and have been to four continents.

Can you tell me 3 interesting facts about yourself?

1) When I’m in Portland, I mostly work freelance as a hand model for the social media accounts of a few international companies. While I have to be discreet about dropping names, I think it’s safe to say that if you follow the social media accounts of a major coffee company, internet search engine, or sportswear company, you have probably seen my hands. The experience has given me some truly useful insight into product photography, lighting, and styling. 

2) I tend to say YES to opportunities I believe in, even if they’re not fully fledged ideas or I’m not fully skilled enough yet to accomplish it. Sometimes, of course, Future Self isn’t always the happiest with Past Self’s overconfidence, but in the end, I always land on my feet. When Emily asked me to shoot the Collins Top Sew-Along, I gave her a resounding yes, with the caveat that I’m going to have to learn some things as I go along. I’m so glad we both embraced this opportunity, and I can’t wait to do it again for her next pattern!

3) I used to have a black thumb to the point of killing succulents, but I was somehow able to keep my cat, Oliver, alive (and healthy!). It dawned on me one day that if I treat my plants like I treat my pets, they may also live longer than a few weeks. I now check in with my plants near-daily, checking for new growth, pests, or watering, and I listen to them when they show me their needs and read up on specific species. It might sound tedious, but it’s a ten minute task that brings me great joy, and now I can’t imagine what my life would be like without plants.

How did you start sewing?

My mom used to quilt entirely by hand and taught me how when I was six. I helped her trace and cut pieces, and then we started a short-lived Sewing Club with the neighborhood girls where we made tiny quilts for our dolls. After my friends’ interests died down, my mom and I moved on to creating an entire wardrobe for my favorite doll, complete with a Kimono, Christmas gown, and onesie pajamas. A decade later, I taught myself how to use her decades-neglected sewing machine, and nowadays I give her mini lessons on how to sew with a machine.

Here’s an obligatory nose-picking-naked-baby photo of me on my hand-sewn baby blanket made by my mom.

What are you working on right now?

I’m working on catching up on my blog! I have a handful of photographed but unwritten garments to work into blog posts, but it’s always just more fun to start daydreaming of the next sewing project. For example, I picked up some African Wax Print while in Morocco, and I can’t decide on which of the many things I want to make out of it. A two-piece set? A shirt dress? A summer dress? Who knows!

What is your favourite type of garment to sew?

Hmm… good question. Honestly, I’m in a phase where I’m shifting my sewing priorities, so it’s hard to answer this question. A year ago, I would have said dresses and gowns because I’m a person who will find any excuse to dress up. But I can’t sew a gown a week and steadily contribute to a Me Made Wardrobe, so now I guess my favorite type of garment to sew is whatever my next inspired project is.

I know that you have an amazing eye for detail when it comes to beautiful finishes on your me-mades. What is your favourite seam finish or technique for getting a really beautiful finish?

This is a surprisingly tough question, but I think I’m going to have to go with visible and contrasting bias binding. I love how adding homemade bias tape gives garments a bit of a quilterly quality, and when in all other ways it’s hard to tell whether your garment is RTW, it’s a detail that confirms it’s bespoke-ness. 

What garment in your me-made wardrobe are you most proud of and why?

Also a tough question. It could be a number of garments for a variety of reasons, but for the sake of being succinct, let’s go with the Collins Top. I’m not someone who has TnT patterns and the most I usually sew a pattern is once, but I’ve now made the Collins Top three times, which is a lifetime record for me. 

Do you have any favourite things to watch or listen to while you are sewing?

To be quite honest, I’m a pretty boring seamstress. I’m so horrible at multi-tasking that I can’t watch TV, listen to music or podcasts, drink wine or hold a conversation while I sew. But on the off-chance my brain is functioning enough to do it, I enjoy listening to Rachel’s Maker Style podcast or watching some pretty trashy reality tv (Hello Bachelorette and Catfish).

What would be your number one tip for beginners learning to sew?

Just do it! I know, cheesy, right? But you won’t learn how to put in that invisible zip without having put in an invisible zip. You won’t learn how to sew silk charmeuse without cutting into your silk charmeuse. You won’t get faster at hand stitching without sometimes setting yourself up in front of the tv for a Stranger Things marathon and hand-finishing a few meters of bias binding. Of course it’ll look wonky the first several times, but we ALL go through a phase of wonky construction, and we ALL still make rookie mistakes; my most common rookie mistake is cutting into the wrong side of the seam allowance for flat felled seams.

You take some beautiful photos for your blog. What would be some tips you would give others about how to get beautiful and interesting photos of their me-mades for their blogs?

Thank you! I know it’s not within the budget for many people but I think it needs to be said; a decent camera and lens does wonders for photos. It doesn’t have to be pro-level, but anything that gives you manual options and can shoot RAW has the potential to improve your photos.

Outside of that, my main technical tips are: 

  • Use as much natural light as possible, and in conjunction, check your white balance. Artificial light tends to run yellow or blue and it’s much harder to adjust that afterward on every photo than to just get it right from the get-go. 
  • Set your camera up before handing it off to your photographer friend. I lean on Aperture Priority mode a lot (for indoors, around 2.4f and outdoors 1.8f), which lets me keep depth of field and light levels somewhat consistent and lets the photographer basically just push a button.
  • Shoot in RAW if you have access to a photo processor like Lightroom. Shooting in jpeg pretty much halves the breadth of information stored within a photo and limits your ability to edit the photo later. 

On another note, when I’m in Germany, I have John be my enthusiastically inexperienced photographer, and I’m (obviously) my own enthusiastically inexperienced model. Even with my best friend behind the camera, I’m still as awkward as humanly possible, and it’s not uncommon for us to take literally 200+ photos for a single blog post and come out with loads of derp-faced photos and less than twenty that are worth posting. 

It’s ultimately a numbers game… the more you take, the more that have to come out useable, right? We build it in to whatever we’re doing that day, like going for a walk through the vineyards or visiting a castle ruin or museum (John calls the background low-hanging fruit), so it’s not so much a chore or obligation as a fun thing we do together. And in the end, I’m just lucky to have the most supportive partner who can laugh with me when I make silly poses. 

If you had the time and resources to have an unlimited number of hobbies, what other things would you like to try out and why?

Oh man, can I just say EVERYTHING? Of course, I love everything and anything that involves fibers and fiber arts. I love to cook, and thankfully I have to eat every day, so I have a built-in excuse to play in the kitchen all the time. At the risk of sounding particularly Portlandian, I’m most inspired by foraging and food preservation experiments; drying, fermentation, pickling, curing, smoking, et al. Also, I used to hike and take landscape photographs weekly and feel that it takes too much energy now, but I’d do it again if I lived forever.

I also just started dabbling in 3d printing, with my first project being the curtain rod bracket shown above. And John just got a laser cutter, so when I sit down at my computer to write a blog post or photo processing, I’m always so tempted to open up a CAD program and start fiddling with all the things that can be done with lasers! There are some limitations as far as laser cutting fabric goes (it’s especially important to know the full fiber content), but I’m excited to start playing with that too.

Thanks so much for having me, Emily! It’s been a pleasure working with you!


And there we have it! I hope you enjoyed this post and learning more about Saki. You can learn more about our collaboration (and her beautiful Collins Tops) over on her blog.

Stay tuned for her sew-along photos coming over the next few days.

See all the posts in the Collins Top Sew-along.


You may also like:

Talking about: Planning and goal setting

talking_about_planning_goals_inthefolds

If you have been following along with me lately you may remember that I have been talking about my desire to be little more open about the struggles as well as the little victories of my day-to-day life as a very new small business owner. Since getting all your lovely responses on the topic, I have been busting to get started, as I feel there is a huge amount of value in this exercise. For me, it will provide an opportunity to consolidate my thoughts and ideas on a topic, keeping a record of it for the future (when I will most probably read over it and cringe), and hopefully for you it will provide inspiration and food for thought - or hopefully, some encouragement for your journey. 


Planning + goal setting for 2016

As it's the very beginning of a new year (okay, okay, three weeks in... where did the time go?), I have been thinking a lot about planning and setting goals for 2016 - as I am sure many of you have been doing too. I think it's only natural to see the end of one year and the looming of another as a time to reflect and make some changes - in the hope of being happier, healthier, more productive etc. in the new year. But what I have finally accepted is that these changes will not happen over night and all big changes are about commitment, dedication and making these changes into a habit or ritual.


On my way to burn out

A little back story. If you saw me on December 22nd last year, you would have seen a pretty haggard excuse for a person. I was most probably hunched over my sewing machine or computer (or maybe even both by that stage ... There was a moment when I'd become so overwhelmed by my to-do list that I had my sewing machine set up in front of my computer, and would jump between the two) and had given up on wearing make-up or anything apart from jersey sacks, or even washing my hair. Not good. Obviously. On this particular day I spoke to a friend about how exhausted I was, how little time I had to do anything for myself (including exercise, grocery shopping, seeing friends or even washing said hair) and how burned out I was feeling. I loved my little business, but it was literally taking over my life. Yet I was persistent that I was just going to work through the holiday period, convincing myself (and no one else) that I would feel better in the new year if I just kept soldiering on and knocking things of my ever growing to-do list.

After I said it out loud, I realised how stupid it sounded. Did I think some magical New Years Fairy was going to come and sprinkle fairy dust on my head and I was going to wake up, somehow recovered from one of the biggest, scariest, craziest, most challenging years of my life, and be ready to do it all over again?

The answer is no.

No matter how much I love doing what I do every day, I have learned that, there are times that it is more beneficial to my business (and probably yours too) to step back and take a rest. This probably seems very obvious to a lot of you, but this was quite a realisation to me. Coming to the end of year, and reflecting on the awful state I was in, emotionally and physically, I realised that I was going to have to make some huge changes in my life if I wanted to create a business and a lifestyle that would be sustainable, and wouldn't have me totally washed up before I turn 28. And before any of these changes could take place, I needed to take a good long rest. I took a week off work, in which I spent my time catching up on sleep, friends and TV series. Utter bliss. Suddenly it didn't seem so daunting to wash my hair or write that email that I had been avoiding replying to. If you follow me on Instagram, you may even know that I even found the capacity to iron every garment in my wardrobe (yep. Seriously. And I mean EVERYTHING, as I had not ironed in six months!)

So after a much needed break, I was finally in a fit enough state to start looking forward again. Just in time for New Years eve!


New years resolutions

I always have new years resolutions, although for the life of me, I cannot remember one I have ever set, and therefore no idea if I have ever accomplished one of my goals. I guess I just thought everyone had flakey goals and setting them was more about having something to talk about over the new year period - and then forgetting them by the end of January. I must admit, this year was no different. I set some really flakey goals.

Sitting on the beach with an esky full of picnic food and drinks, a friend asked me what my resolutions were for 2016. I answered, 'To have a happier and healthier year than 2015." When I asked him what his resolution was, he told me he wanted to do an Iron Man. Bang. The moment when I realised how tangible his goal was compared to mine. At the end of 2016 he will know whether or not he has achieved his goal, with a straightforward yes or no. Me? Even if I remembered my Flaky Goal, how would I measure it? Do a happiness pie chart? A health graph? I don't think so. This is the moment I remembered what I had learned on the small business short course I did in 2015 and it was time to actually use it.


Goals need to be S.M.A.R.T

SMARTgoals_inthefolds

Goals need to be smart as well as S.M.A.R.T : Specific, Measurable, Actionable, Relevant and Timely. This means that instead of my Flaky Goal, 'I want to have a happier and healthier year,' I would need to consider a goal such as, 'I will schedule in at least one weekly dinner with a friend which will help me feel happier and more connected to those around me,' or 'I will go swimming twice a week to work on my fitness.' 


Breaking goals down

Although the S.M.A.R.T method does really help when creating the right goals (I now have a list of goals for 2016 that I will be able to reflect on at the end of the year - and they are written down this time so that I don't forget them!) I do find big goals to be very daunting. Particularly when it is really difficult to predict what will happen in the future - which is definitely the case when you have your own business.

This is when breaking down a goal into smaller pieces makes the world of difference. When I say I want to release a pattern by x date, I instantly get butterflies in my stomach, thinking about the sheer amount of work that needs to be put in to create a pattern. Suddenly the goal no longer feels achievable and I begin to stress, rather than just getting started. 

By simply breaking the goal down into steps, I have realised that the Big Scary Goal becomes much more tangible, and also allows me to work out where to start.

For example, for this goal of releasing a pattern, what is involved? First, I need to come up with the design, make the initial pattern, make a sample and fit the pattern on a fit model. I then need to continue sampling and fitting until I am happy with the pattern. Once that is done I need to scan the paper pattern into the computer and digitise it using Illustrator. When I have done that, I next need to grade the pattern to my size range, take photographs for the instructions, write the instructions and test the pattern. I need to consolidate the testing feedback, create the listing and then finally release the pattern.

Although there is a lot to do, suddenly it doesn't seem so daunting. With this list, I have a much better chance of scheduling the right amount of time for the project and setting an achievable deadline, and knowing exactly where I need to start. It also allows me to plan things in advance. I should be fitting by 'Week X', do I have a fit model organised? I should be ready to take photographs of the process by 'Week Y', do I have fabric on hand, or will I need to purchase something? Having things pencilled in, means I can avoid stressful last minute runs to the shops, and wasting days not knowing what to work on. 

I really like the Goal Pyramid by Matthew Michaelwicz, which provides a simple, yet very visual way of breaking down goals into smaller milestones. 


Celebrate the victories

By having smaller goals, that lead to a larger goal, there are many more chances to sit back and reflect. Am I on track? What do I need to do this week, or even just today, to achieve this goal? As well as a chance for little celebrations along the way.  I don't want to have to wait until the end of the year to give myself a pat on the back for all the hard work I have done - and this means stepping back and celebrating the small achievements that will contribute to the success in the big goal. My celebrations aren't anything extravagant, but they are a time in which I allow myself a chance to say 'Well done! Go you!' A moment to sit back and feel very proud of what I have achieved. For example, a couple of weeks ago, I sold my fiftieth Rushcutter dress, and to celebrate I danced on my bed (the 50th pattern was sold while I was asleep). It is a lonely business, having a small business, so instead of seeking a high-five or a pat on the back from others, I have really had to learn to celebrate my own achievements in my own little ways. 


To-do lists vs scheduling

As I mentioned, this time of year is a very obvious time to be having thoughts about goal setting and planning, which means I have been running into great pieces of advice, suggestions and blogs everywhere I turn. While somewhere in BlogLand, I came across a link to this article about millionaire's not using to-do lists, and it really encouraged a light bulb moment for me.

I have not been able to function for the last six months without my to-do list, but then, when it gets to the end of the day and I have once again not managed to get everything crossed off the list, I feel like crap. Like really crap. What I had been overlooking is that a to-do list has no concept of time or priority. Basically, I just write down everything I can think of in the order I think of them, and then work my way through (normally leaving the most painful and time consuming tasks till last) until it is time to leave work (or was time to leave work three hours ago). This advice, to schedule things in a planner is very obvious, but has already really changed the way I work through the day, and the way I feel at the end of it. By scheduling tasks into a planner that is broken up into the hours of the day, I suddenly need to be realisitic about the time a task will take, and therefore don't end up with a list of things that could never be completed in a single day.

I still have my to-do list (as it's a really great way to get everything out of my head to make room for others - as apparently we can only hold 4 things in our head at any one time!) but once I have written my list, it doesn't stop there. I take the list and work through it - scheduling in each task and allowing a realistic amount of time to complete it. If, for some reason, something doesn't get done on a particular day, I reschedule it. Allowing nothing to be left behind - and preventing those moments when I wake up in the middle of the night, realising I have forgotten to do something. This is a great episode of the Note to Self podcast, about the science behind getting organised, if you would like to hear more. 

I am currently trying out the Passion Planner, and so far it seems to be doing the trick. I love that it has a section for 'Today's Focus' as well as a 'Weekly Focus,' which is a constant reminder that I need to accomplish the small milestones in the hope of one day achieving the Big Scary Goal. A great reminder to just keep putting one foot in front of the other, and to night get caught up in the end game. 


The importance of rituals

I find setting goals as a great way to give me the motivation and focus I need to get through the day-to-day grind of running a business. But this year, particularly after reading this article from Seamwork Magazine, and then binge reading Sarah Starr's amazing blog. I have been thinking a lot more about the importance of rituals and how I can bring some new rituals into my routine. I am not talking about massive changes, just small things that will add to the overall experience.

One of the first things I thought about was how much time I have been spending on my phone, and how unhappy that makes me. Particularly in the evenings, I want to get better at putting my phone down and focusing on something outside of my work (as my phone is becoming more and more associated with work as this journey goes on - when an email comes through I think I have to deal with it then and there, whether I'm still in my towel after taking a shower, or already in bed), which has lead me to going to the library to borrow books and reading before I go to bed, instead of scrolling endlessly through my Instagram feed. I find this much more relaxing, as the online space tends to stimulate me much more than a book, and I end up flooding my brain with more and more ideas, instead of focusing on winding down.

Although not as enjoyable, I have created a ritual out of grocery shopping. By scheduling it in my planner at the same time each week, I no longer see it as a chore, or something that can be sacrificed if I am too busy. It needs to be done as it is important that I have access to quality food at home, so that when I'm tired or busy I don't end up skipping a meal or eating junk.


Accountability meetings

One final ritual that has become a highlight of my week, is my accountability meeting. When I first agreed to meet with two of the women I met on my short small business course, it just seemed like an interesting thing to try out. The shock of going from working amongst other people to working on my own day in and day out, had not yet hit, so the need for human interaction was not there. A month or so in, I realised how important it was for me to meet with these women each week. It gave me a chance to get out of the studio, see people and also truly connect to women who were on a very similar journey to me, feeling accountable to someone apart from myself.

I am so early on in this journey, but still looking back, I can see how naive I was to what it would really be like. I hadn't realised how much a journey like this is also a journey into who you are as a person, what you really want and the kind of life you are trying to create (but I will save all that for another day), and that it really helps to have understanding and supportive people around you - who you can share your doubts, fears and little victories with. Someone who knows you and your business is only a phone call away, and there is something in that which is very reassuring. And with the deadline of a meeting, there is a sense of needing to get things done on time. My meetings are very relaxed, which has been great, but I have been doing a little research this week on how we could go about creating a structure for our meetings (after half an hour free time to catch up, of course) so that is something I will continue thinking about this year. 


What about you?

As I think I have now made clear, I am no expert on this topic. It is just something I have been thinking a lot about, and reading a lot about, in the hopes that I will find a process that works for me - allowing me to get more done, with less stress.

I'd love to know how you manage your days, and if you think there's anything else I should be trying to make sure that 2016 is happier, and more productive, than 2015 (the Flaky Goal strikes again!)


You may also like:

Talking about : Transparency - The Response

Happy New Year! I hope you had a lovely holiday period and had a chance to relax. I had a lovely Christmas with my family, and then enjoyed some much needed down time. Lots of reading and movie watching! Now it's back to the studio to get the ball rolling for 2016, which I find very exciting, as I have a lot planned for this year. 

In one of my last posts of the year, I discussed my desire to be more transparent in my business - showing more of what goes on behind the scenes, in the hope of potentially enlightening or inspiring others who are interested in this journey. I asked what you thought, and was so pleased with the response! 

Here are some of the responses, which I thought I would include as they may help you too, if you are on a similar journey, or a thinking about similar things to me! 

quote_1.gif

I think these will become great go-to quotes if I am ever in doubt!