Are you joining me for #makersforfashrev?

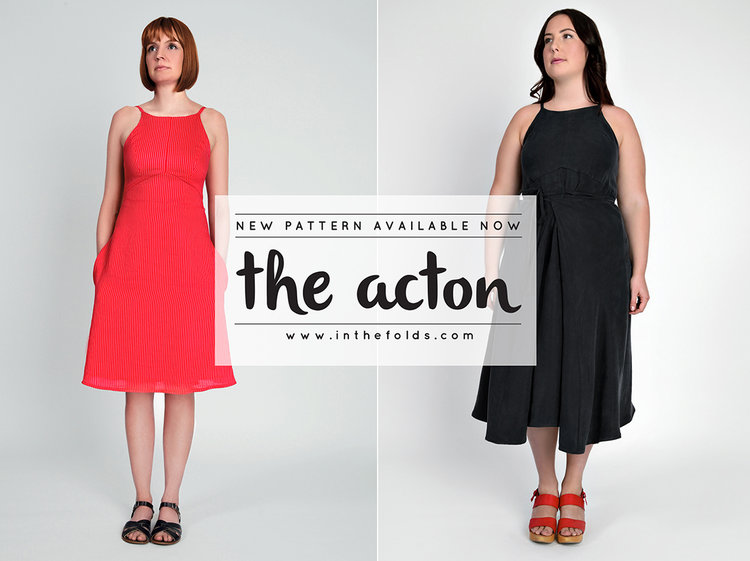
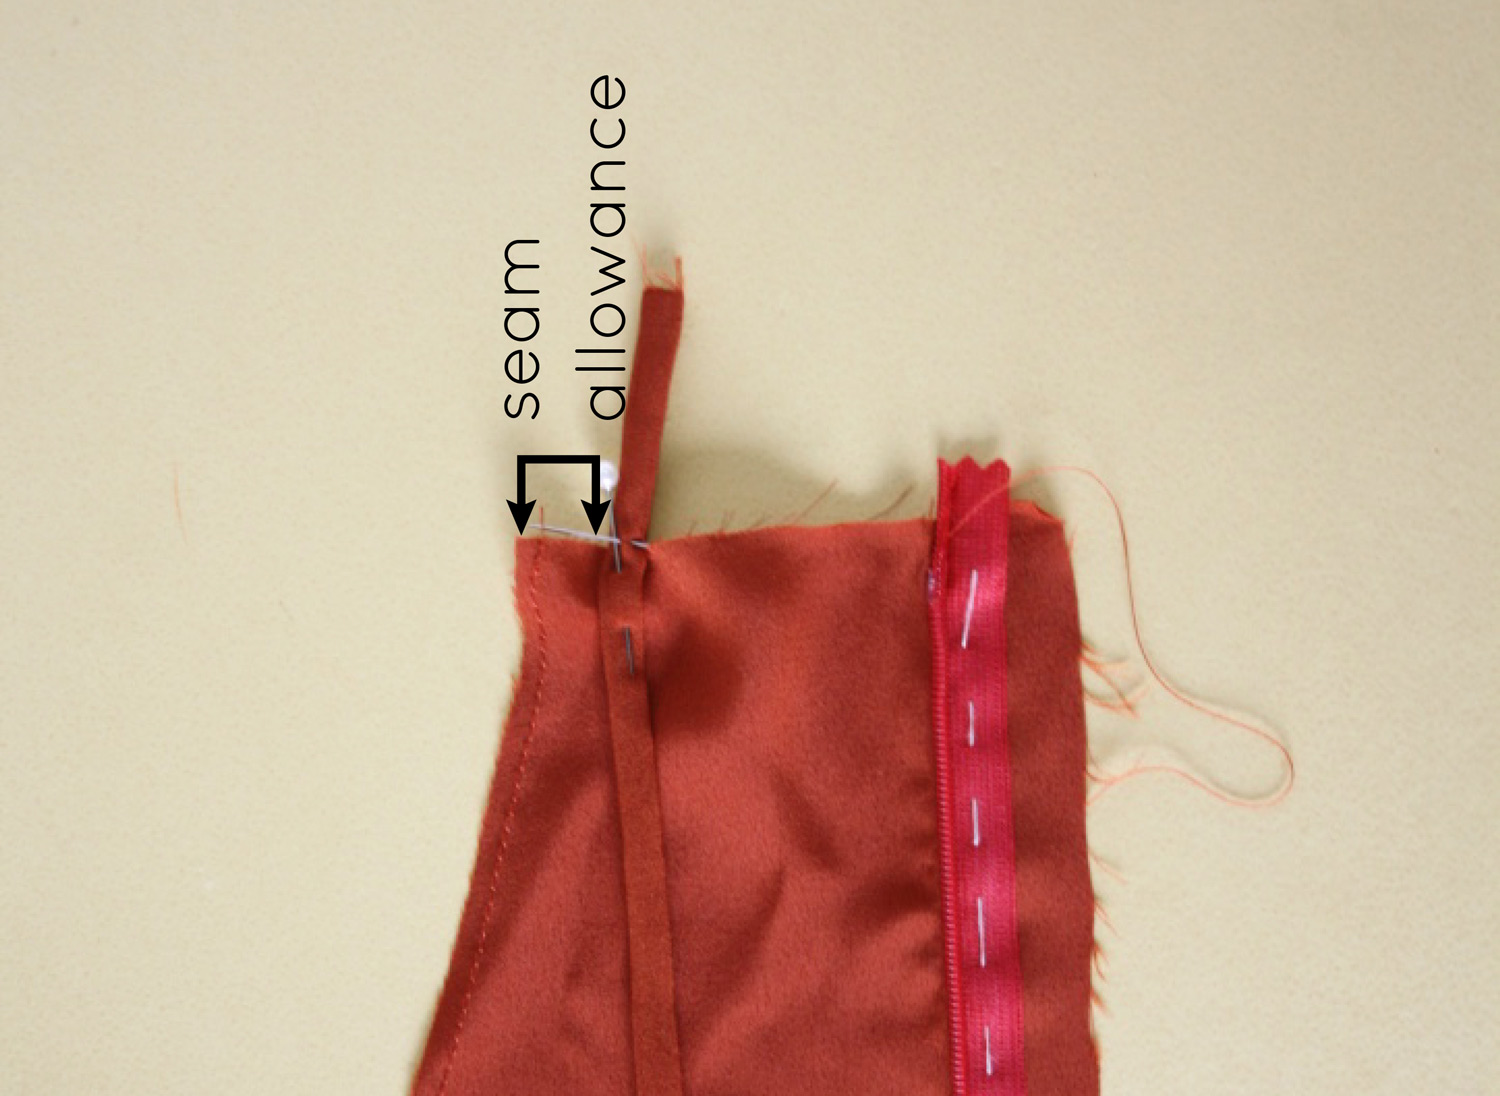
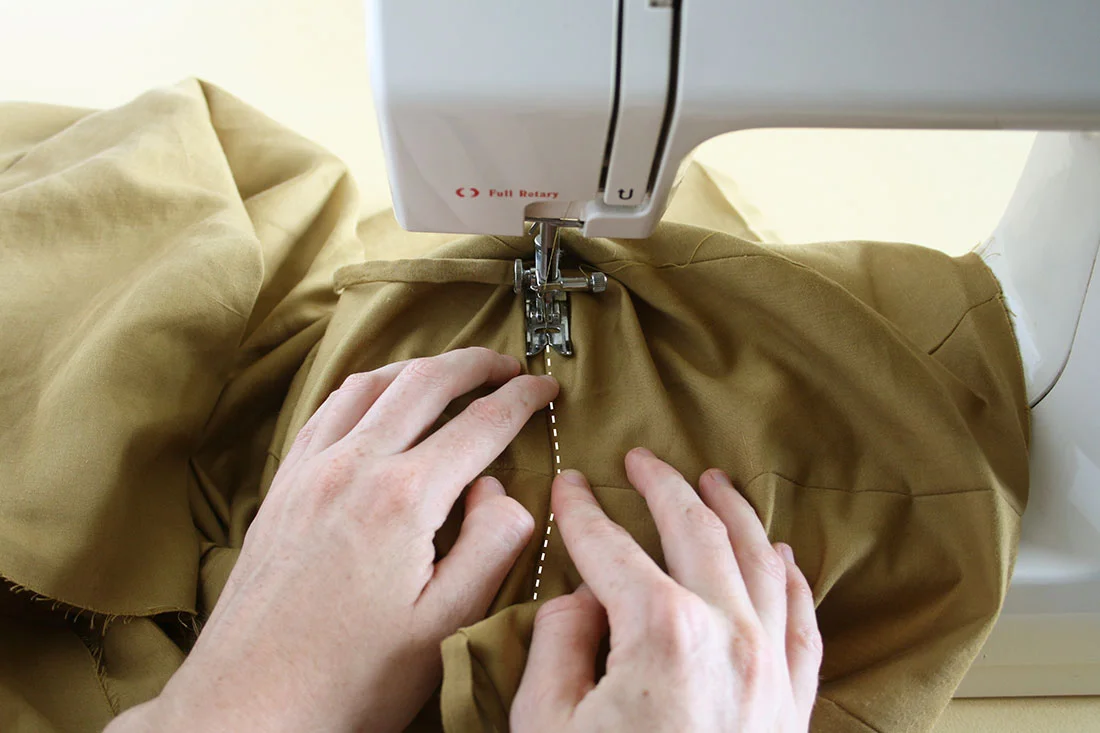
Last year I had all these grand ideas for what I wanted to do for Fashion Revolution Week. As is the case with a lot of my grand plans, I realised that I had left it too late and there was far too much to do for me to get it happening in time. So I went for second best (or what I thought was second best at the time) and decided to run a little Instagram photo challenge. I have seen a lot of them run very successfully, and I knew it was a good way to spread the word and raise the profile of an issue, so I quickly made some daily prompts and put it on Instagram with the hashtag '#makersforfashrev' to let people know what it was all about.

Oh boy was I surprised when people started sharing it and putting the hands up to take part too! Suddenly it wasn't just me, but countless makers from all around the world, jumping on board to spread the word. As of today there are 1 378 posts with the hashtag. I was thrilled to see others thought it was an important issue to discuss too. 

I still love the idea of hosting some kind of event for Fashion Revolution (maybe next year), but I also  appreciate the incredible power of the internet. From my little studio here in Sydney I can spread the word about Fashion Revolution far further than I could by hosting a class or an event, and for now, that's exactly what I plan to do!

What is Fashion Revolution?

So if you are new around these parts, or have not come across the Fashion Revolution movement, you can check out my blog post from last year to get an overview of what it's all about.  

In short, what it's about is asking 'Who Made My clothes?' It is about questioning working conditions, work practices and the overall impact the fashion industry has on people and planet.

The reason I thought it was important for makers to get on board spreading the word about this issue is that we are the ones making our own clothes. We appreciate the time it takes to make clothing and the skill required to do so. Why should the garments handmade by us be valued, appreciated and worth more than the garments handmade in a factory in a third world country? They shouldn't be. All clothing is made by hand and this needs to be remembered and never devalued or discredited. 

We have the power to spread the word amongst our friends, and communities, to promote and acknowledge that clothes are valuable and use valuable resources to create them. We should love them, take care of them and nurture them. We should keep them out of landfill at all costs. We should also question the working conditions of those who make them for us.

#MAKERSFORFASHREV

To promote this amazing movement amongst the making community online I have decided to host another photo challenge on Instagram for the week of Fashion Revolution (24-30 April). Although some of us may not buy our clothing from retailers, there is still a lot we can do to encourage change, and I would love if you help me spread the word (and maybe even encourage more people to start making their own clothes).

WOULD YOU LIKE TO JOIN ME?

Each day during Fashion Revolution Week, I will post a prompt on Instagram to promote thoughts, discussion and inspiration related to a particular aspect of the revolution. If you would like to play along, simply use the hashtag #makersforfashrev, as well as the official Fashion Revolution hashtags - #FashRev and #whomademyclothes - this way we will all be able to find each other. I'll choose my favourites each day and do a little round-up! You can find me on Instagram @inthefolds.

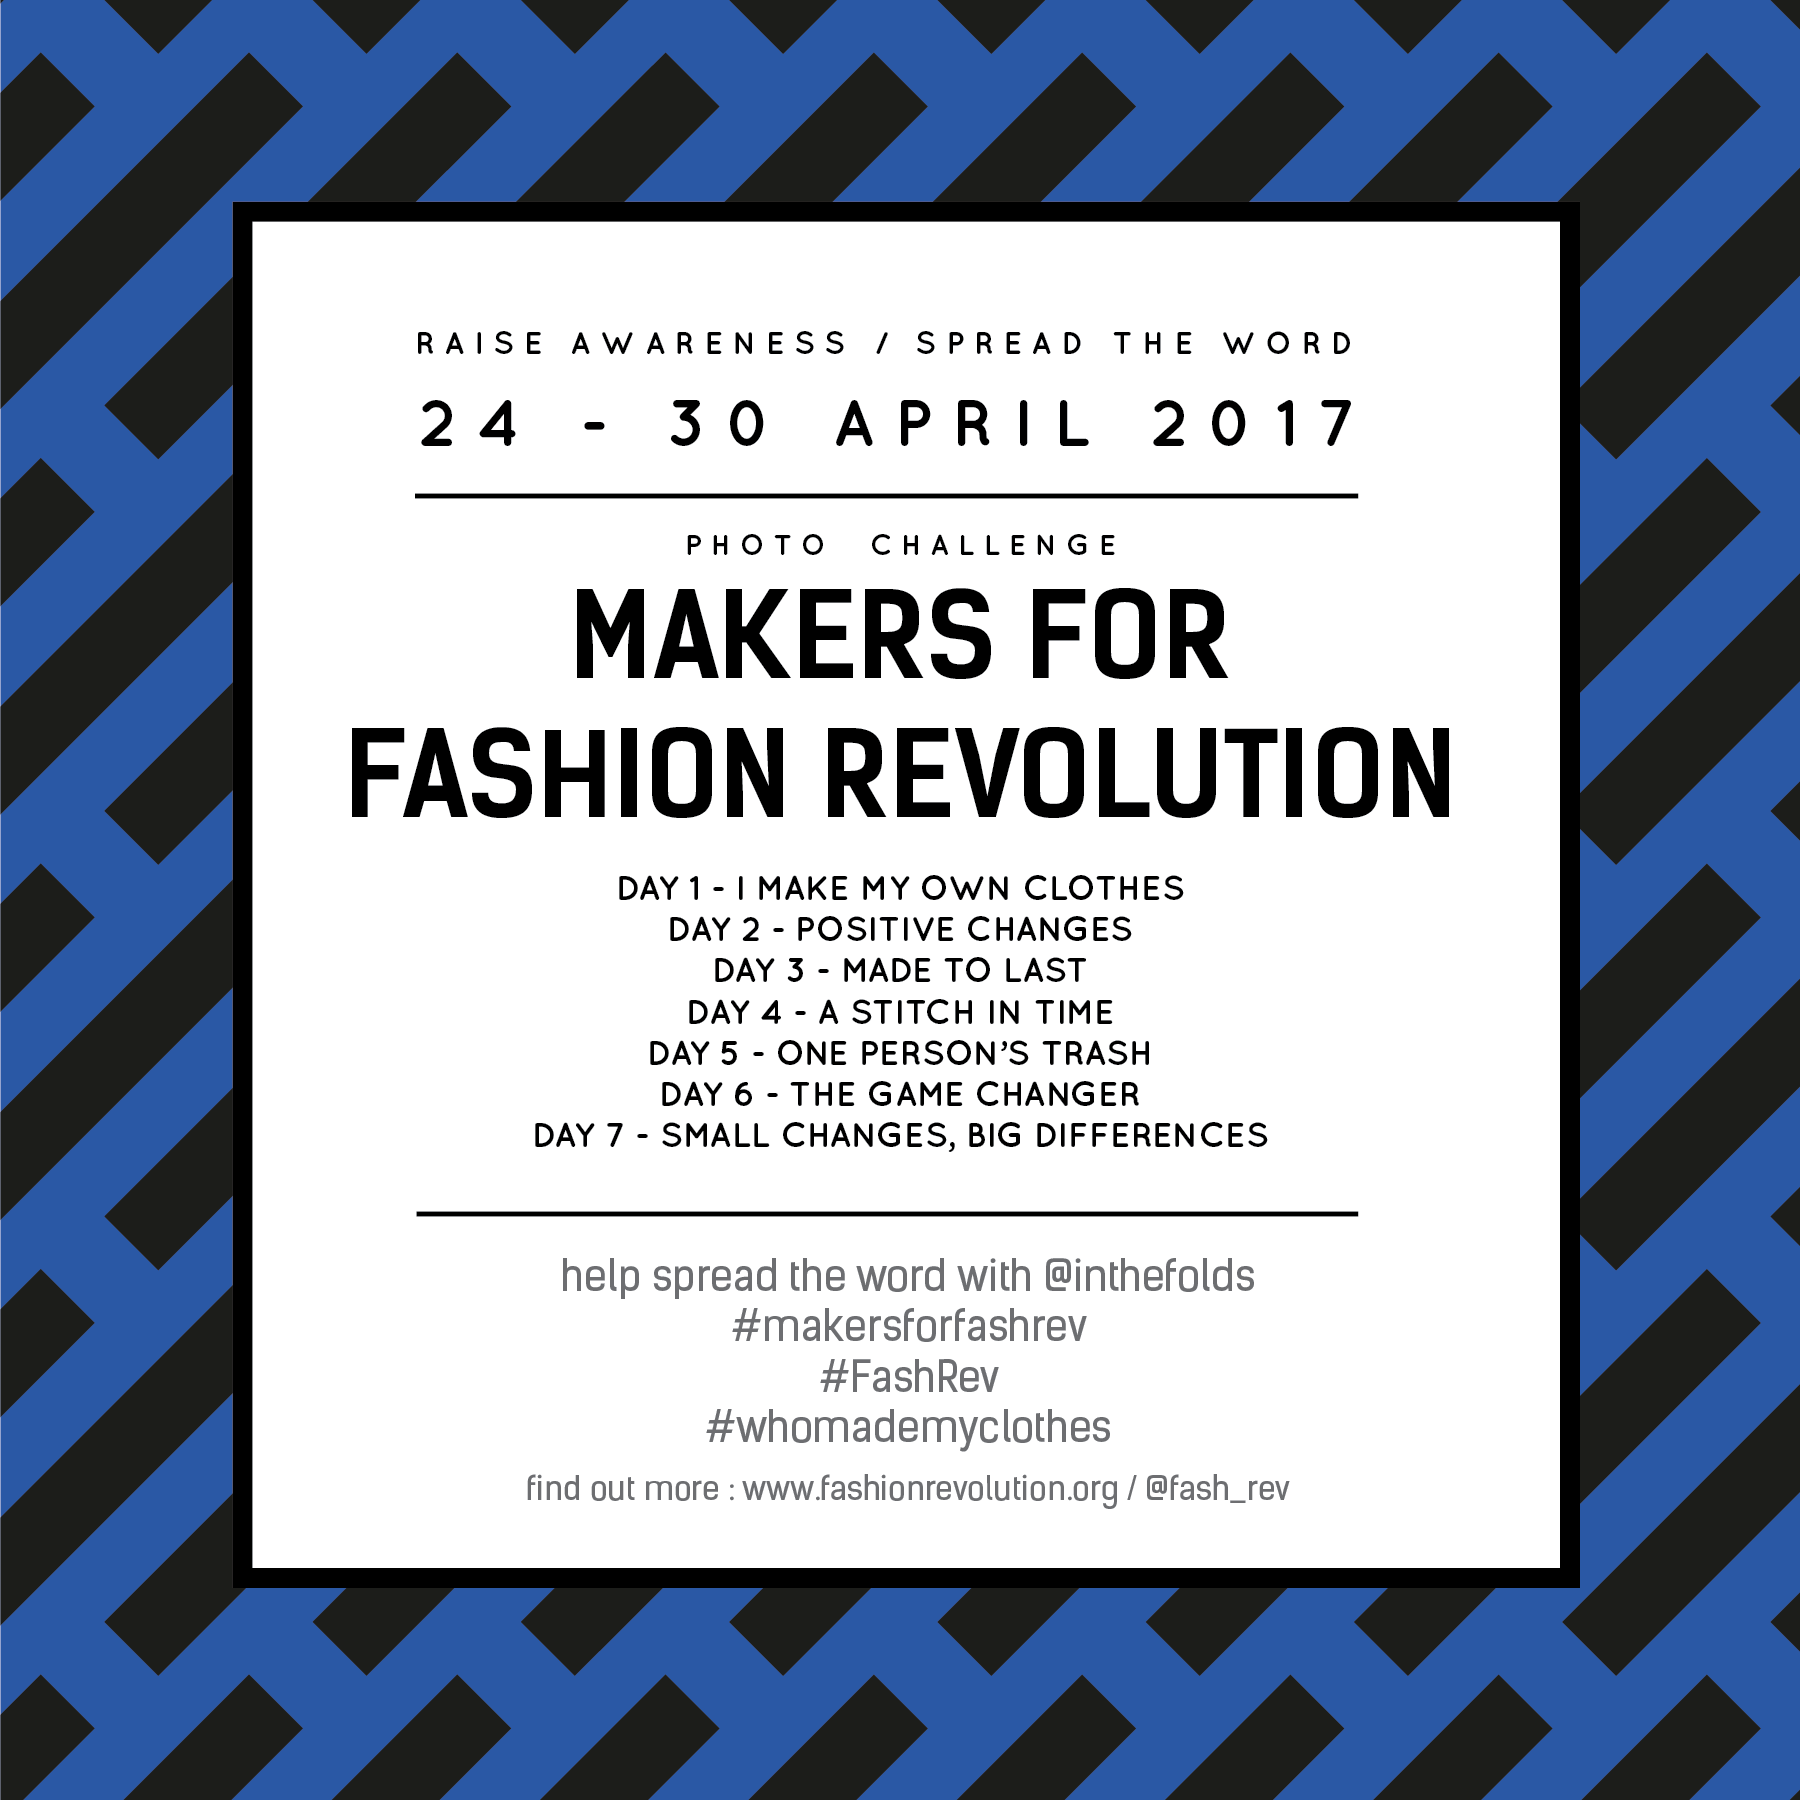
If you would like to let the world know you are taking part you can post the image above on your blog, Instagram or Facebook page. The further we spread the word, the better!

WHAT CAN WE DO AS MAKERS TO INFLUENCE CHANGE?

  • Slow down! Do you really need all those clothes? Take your time to make one beautiful garment instead of five hurried makes. Spend extra time by working on beautiful finishes or decorative techniques. Use your making time to upskill rather than fill your wardrobe with more and more.
  • Make for others when you have enough in your wardrobe.
  • Use sustainable materials to create products.
  • Teach others your skills. Encourage others to make their own clothes.
  • Work out ways to reduce waste (this could be in relation to your studio / office space, the packaging you use to wrap or post your products, etc.)
  • Recycle whenever possible
  • Consider using second hand whenever you can (I use second hand fabric for the majority of what I sew)
  • Make plans. Don't buy things impulsively. Take the time to think about it and work out if you actually need it. 
  • Sew from your stash.
  • Go to clothing and fabric swaps.
  • Ask your suppliers and manufacturers about their labour practices.
  • If you have your business, consider manufacturing locally.
  • Be disruptive and embrace change.

YOU MAY ALSO LIKE:

New pattern : Introducing the Collins Top

I am so excited to be here telling you all that my new pattern is here! Meet the Collins Top -  a loose-fitting trapeze-shaped top designed for woven fabrics. 

The Collins top is It is A-line in shape, perfect for hot summer days. It features a round neck, panel lines, a high-low hem and a centre-back opening, with a button and loop closure.

Due to its length, the Collins Top is the perfect top to pair with skirts or trousers that sit on or above the natural waist.

As always, this pattern is available in 10 sizes, from bust 76cm (30in) - 131cm (51.5in).

What I am most excited about when it comes to the Collins Top is that I designed this pattern specifically for beginners. Okay, I know, I know, there are a lot of pattern pieces and panel lines (I really can't help myself, can I?), but I believe that if you have mastered sewing a straight seam and a curved seam, you can make the Collins. Also, due to the loose nature of the top, there are not too many fitting issues to worry about (possibly just a full bust adjustment), which makes it even more beginner friendly! And, although I designed it specifically for beginners, it does not mean that you more seasoned stitchers won't enjoy it too. It is a really fun pattern to sew up, and lots of room to play! 

View A

The Collins top (view A) has a three-piece raglan sleeve with some extra volume, which creates a fun and interesting shape. Due to the nature of a raglan sleeve, there is no sleeve setting in required (it is all done flat), so it comes together really quickly and easily. 

The neckline is finished with bias binding.

As you can see in this sample, this pattern leaves a lot of room for playing with stripes (or colour blocking), which really highlights the panel lines in the design. As I knew this was something a lot of you would get excited about, I created a little template that you can download for free and experiment with your ideas of colour blocking and stripe direction, before cutting into your fabric. Download it now. 

View B

The Collins top (view B) is sleeveless and the neckline and armholes are finished with an all-in-one facing for a really clean and professional finish. 

The Collins top is compatible with a range of different fabrics. Your choice of fabric will dictate the silhouette you achieve. Consider using light to mid-weight fabrics such as: linen, linen blends, cotton, gauze or chambray. For a softer silhouette, consider sateen, silk (crepe de chine or habotai) or viscose (rayon). These two versions were made from cotton, so I can't wait to share all the tester versions next week, so you can see the range of silhouettes you can achieve with this pattern!

Learn more about the pattern and grab your copy here. 

What do you think? I'd love to hear your thoughts about the new member of the In the Folds pattern family


You may also like:

Talking about : Accepting slow and embracing my creative process

As I celebrate finally making it to the week in which I will release my new pattern - the Collins Top, I can't help but become a little reflective, thinking about the process, the lessons learned, the challenges overcome and the skills gained. If you asked me a year and a half ago, when I started In the Folds, where I would be now, I would have told you that I would have had a truckload of patterns in my Pattern Shop by now. Oh how naive I was! And thankfully I was that naive. If I knew how much time, blood, sweat and tears would go into creating just three sewing patterns, I probably would have run the other way. Thankfully, all I had for a reference were the amazing women in the indie sewing scene that are producing patterns, and they seemed to be able to churn out 4-6 patterns per year, so why couldn't I? 

Well there is many a reason that I have learned (and finally accepted) that at this moment, it is just not in my power to do so. And the main reason is not that I'm a one-woman show (although I am), or that drafting a pattern and creating the instructions takes a really long time (although it does). The reason is that I like to let my thoughts and ideas percolate. I like to work on things in a way that allows my ideas to do their time in my brain, dancing in and out of my thoughts, coming back in different shapes and forms, until eventually they feel right. I can't make important decisions on the spot, and I have decided to stop putting pressure on myself to do so. I have learned that I create my best work when I give it the time it needs to breathe, and without doing so, I don't think I would be pushing myself to my creative limits. I have learned over time that my best ideas come when I am not looking for them, or forcing them, or expecting them. They come when I'm going for a walk, or driving my car, going to sleep, or talking to friends. They surprise me, and exhilarate me and remind me why I started this journey in the first place. 

I want to create patterns that are beautiful, thoughtful and surprising to makers. Patterns that are timeless, and are relevant year after year. And that is my mission. That's what gets me up each morning and what goes around and around in my mind when I'm working on one of the tedious parts of the process (I am looking at you cutting plans and yardage requirements!) It's what allows me to work on the same pattern for months on end, never giving up, even when the stress of it does seem too much. It's what makes me choose to hold a pattern back if I know it can be improved. It's what makes me illustrate an entire pattern after I have already completed and tested the pattern with photographs (the shift from photos to illustrations happened weeks before I was planning to release the Acton). It's what makes me re-test a pattern when I know the fit could be better. 

I recently did a customer survey (thank you again to all of those who took the time to do it) and many people asked what takes me so long to produce a pattern, and I realised that I rarely talk about my creative process. So today I start. I will aim to talk more openly about the way in which I work and how a sewing pattern is created. I can definitely not speak for everyone, but my process is one I know inside and out, and I would love to share it! 


You may also like:

New pattern in collaboration with Peppermint Magazine : The pleated skirt

I am excited to let you all know that I have just released another pattern in collaboration with Peppermint Magazine! It's a pleated skirt, which features stitched down knife pleats, slanted pockets (that are deep enough to keep your hands nice and snug and your belongings nice and safe), shaped waistband, invisible zip and a hem facing.

I must say, this is my favourite of all the patterns so far. I didn't think I was one to wear this kind of style / silhouette, but once the sample was made up, I really didn't want to give it away! The fabric I used was a beautiful linen / cotton blend from The Drapery (a lovely little fabric retailer based in South Australia, with a great online store), which made it even harder to part with.

It's a little hard to see all the details with the busy print, so here is the technical drawing, to give you a better idea of what's involved. I have rated it as an advanced beginner pattern, as it's quite a straight-forward sew, with only your waist to fit!

You can download the pattern for free from the Peppermint Magazine website. As a bonus, for the first time I have also made the pattern available in A0 format for copy shop printing, as I know how much you all like that feature!

While you're on the Peppermint Magazine website, you may also want to check out the other patterns I have made for the magazine over the past 12 months. I made the Beach Cover-up pattern for summer, the Peplum Top pattern in spring (which has been a favourite for many) and the Sweater Dress pattern last winter. All patterns are available for free!

Get the Pleated Skirt pattern now


You may also like:

Talking about : A new job, a little less time, a survey (and a giveaway!)

I recently started a new part-time job, which unfortunately means a bit less time in the studio for me. It has been a difficult adjustment to make over the past few weeks, but thankfully now the fog seems to be lifting, and there does seem to be enough room in my brain, and room in my day to balance my business and my job (and even my relationship and friendships on good days too!)

While adjusting to my new schedule, I have been thinking about how I should be spending my time. As time is now more limited than it was before, I already find myself constantly asking myself "Is this a priority?" or "Is this really how I should be spending the 4 hours I have at the studio today?" (Some good definitely comes out of being pushed for time!) This has got me questioning what kinds of blog posts I should be writing, what patterns I should be producing, and overall what types of content I should be creating for the people who buy my patterns and visit my blog. I have been ruminating over this for a couple of weeks now, and then it occurred to me, why don't I just ask? It's all well and good for me to sit here bending my brain trying to put myself in your shoes, but at the end of the day, I am not the one reading my blog, or using my patterns, you are!

I have created a survey with some questions about what you would like to see from In the Folds in the future and what I could be doing better (among other things) and I would love if you could spare some time to take it. I must warn you, it's not a quick two-minute survey. I tried to avoid multiple choice when I could, as although it makes it much faster to look at the data, I'm not really into sticking people in four separate boxes and then calling it a day! I really want to get a true idea of who you are, why you sew and what you are looking for, so that I can create content that will actually benefit this community of ours. It takes a really long time to create a tutorial and even more to create a pattern, so I may as well check-in to see that it's something that is actually needed in the world before taking the time to create it.

To show my appreciation for your time, by doing the survey you can enter a draw to win your choice of pattern from my online shop. I know I don't have a huge amount of patterns available at this stage, so if you are lucky enough to win and you already own both my patterns, then you can save the credit for a future pattern release. Prizes will be drawn in 14 days from today (i.e. 13 March 2017, 9am AEST), so get the survey done before then to be in with a chance! 

I also realised that it wasn't fair for me to ask you you take the time to sit down and answer these questions, and for me not to do the same. So I took the survey too! You can receive my responses to the survey as an email if you like. Just enter your email address when prompted in the survey (don't worry, your email address will be used for nothing spammy, just for you to hear my answers!) and it will come straight to your inbox. 

To help me make In the Folds even better, please click the button below.

Thank you so much for taking the time to help me create content that will be interesting, useful and beneficial to this community!


You may also like:

The Acton : A little pocket pattern hack

I made a new Acton dress lately (photos to come eventually... when I finally psyche myself up to get in front of the camera) and while I have been wearing it, there has been a little thing that I think I will change next time I make an Acton. I'd love to extend the pocket pieces so that they can be stitched to the dress waist seam and then always stay in the front of the dress (sometimes they like to flip towards the back skirt). This was something I thought about when developing the pattern, but because there isn't one set place where people like their pockets (as we are all different height) I worried it would make it more challenging for people, if they felt an adjustment needed to be made. 

acton_pocket_hack_intro.gif

So today, I thought I'd show you how to extend the pocket pieces. This tutorial is for you if you have found your optimum pocket position, and now just want to prevent the pockets from moving around when you're wearing your Acton. This tutorial could also be adapted to other patterns too. You could do this for any skirt or dress pattern that has a waistband or waist seam. 

Getting started

To start, take the SKIRT FRONT pattern piece (view A) as well as the original in-seam pocket piece. No alteration will be made to these pattern pieces, so using the originals is fine.

Place the pocket piece on top of the skirt piece, in the position it will be sewn. Use the notches as a guide. If the original pocket placement is too high or too low for you, move to a more comfortable position. 

Creating the new pattern piece

acton_pocket_hack_3.gif

Take a small piece of pattern paper and place it over your pocket (make sure it extends up to the top of the pattern piece, as this is the area we will be extending on the pocket). It really helps if your paper is transparent enough to see the pieces underneath. If it's not, consider using a light box or taping your pieces to a window. If you are worried about your pocket piece moving, you can tape it in place on the skirt.

Trace the bottom edge of the pocket bag. This will remain the same as the original for the new pattern piece. Stop tracing at (approximately) the point where the curve of the pocket edge turns back towards the side seam. 

Now, draw a straight line up to the waistline from the point on the curve where you stopped tracing. I would suggest that the point on the waistline should be about 6-7cm (2 - 3") from the side seam (measuring from the stitch line, not the cut edge), but this is up to you.

Trace along the side seam of the skirt, between the bottom of the pocket bag and the waist - transferring this line onto your new pocket piece. Then trace along the waist seam until you reach the edge of the pocket. 

Transfer pattern information

acton_pocket_hack_7.gif

Transfer pattern information onto the new pattern piece. This includes labelling the pattern piece, cutting instructions (cut 2 pairs) and the grainline (which should be parallel to the centre front). For more details on pattern markings, check out this tutorial

Transfer notches

Add notches to your new pattern piece. Start by transferring the relevant notches from the original pattern pieces. This includes the side seam notch and one of the balance points on the edge of the pocket. For more information about notches (and why they really help you when assembling garments), check out this tutorial

A few more notches will be needed, apart from the original ones. Place one notch on the side seam of the pocket, where the original pocket started (this notch will match the notch on the side seam of the skirt). Add two more notches on the curve of the pocket. These notches will act as balance points so that you can match the two pocket pieces together correctly when you are up to that point. 

And there you have it. A new pocket piece! 

Sewing your pocket

1. After you have sewn your front and back skirt pieces together (along with the pocket) - in line with the original instructions (sew-along post here), sew a line of stitching down the side of the pockets on each side to prevent the pocket being open from the waist seam down. 

2. When assembling your Acton with the new pocket piece, be sure to stay stitch the top edge of the pocket onto the front waistline before you join the bodice to the skirt. This will keep the pocket in place as well as help you get a really nice finish (as it means everything will be tucked nicely into the bodice lining). 


You may also like:

Notes on : Notching patterns

notching_sewing_patterns_1

During the Acton sew-along, I showed you a range of different alterations you may need to make to your Acton dress pattern.

As I was creating the tutorials, I realised that I probably should provide some information on how to notch patterns correctly. Sometimes, when making alterations to patterns, you may displace a notch or two, so today I will show you how to re-mark notches, as well as add notches to your own patterns (if you are drafting from scratch).

Just in case you have no idea what I'm talking about, I thought I'd start by letting you know what a notch is, and then how to use them. 

What is a notch?

notching_sewing_patterns_2

A notch is a small cut in the fabric (or a triangle on some commercial patterns) that help guide you while you are sewing. They are used to indicate seam allowance, dart arms, the location of design details, such as pleats, tucks, gathers, hems and pockets, or indicate key points on the pattern (like the centre front or centre back). Notches are also used to indicate balance points (points on your pattern that help you sew the right pieces together, as well as help you when you are sewing long or curved seams).

Why use notches?

If you are drafting your own patterns, you will be wanting to add notches to your patterns to make it easier to assemble the garment. If you are clever about where you put them, having well placed notches can help you assemble a pattern without instructions (which is handy if you are drafting your own patterns, as you won't have any!). Notches will help you know which piece is the front or back, what seam allowance is required and if there are any special design details such as pleats.

If you are designing patterns for other people, I think it is even more important for you to take the time to notch patterns correctly. I know the way I notch my patterns is an aspect that people really like about my patterns. They act as little markers along the way that let you know you are putting the garment together correctly. I remember one of the women that tested the Rushuctter pattern for me said she felt that each time she reached a notch, she felt like it was a little tick to let her know she was going well. As designers, it's not just about making patterns that help sewists make beautiful clothing. It's also about making a pattern that creates an enjoyable and memorable making experience, and I believe that attention to detail is a great way to do this.

Where should I place the notches?

I thought it would make the most sense if I showed you one of my patterns and where each notch was placed, and why, and then you can apply this method to your own patterns. It really is very simple if you just add your notches in a methodical way. The pattern I am using for the example is the Peplum Top that I made in collaboration with Peppermint Magazine, that can be downloaded for free here

Indicate seam allowance

notching_sewing_patterns_3

Start by using notches to indicate seam allowances. This is really helpful if you are using various seam allowances (which you should - find out more about seam allowances here) and struggle to remember what seam allowance is applicable where. Use a notch to indicate each seam allowance on your pattern. You will see in the example that I have used a notch to mark the shoulder seam, side seam and waist seam. You don't need to mark the seam allowance at both ends of the seam, just one will do. Consider the order of construction when positioning your notches. For example, I normally sew the side seams of a garment from the armhole down, so I will put the notch at that end of the seam. 

notching_sewing_patterns_4

You also want to avoid notching two sides of the same corner. This can weaken the pattern and the fabric. 

notching_sewing_patterns_6

Put notches in the same places on the back pattern piece, so that when you join the pieces, the notches will match. For example, when putting a notch on the side seam of the back pattern piece, I will put it in the same position as the front - which is at the top of the seam. The back pattern piece has a centre back seam, so I added a notch to indicate that too.

Add balance points

notching_sewing_patterns_7

The next thing to do is to add 'balance point' notches. These are the notches that help you figure out what seam matches with what, and which way the pieces go, as well as help you ease pieces together, or sew ver long seams.

In the example, there is a shoulder panel piece that is attached to the front and back shoulder seams. It looks almost the same at both ends, so without these notches it would be really tricky to know which way to put the piece in. On the front pattern I used two single notches to indicate the front and on the back one single and one double notch (double notches are generally used to indicate the back pattern piece or back of a pattern piece). 

notching_sewing_patterns_8

Transfer the notches from the shoulder seam to the shoulder panel. Do this by simply matching the seams together, as if they were being sewn, and transfer the notches onto the pattern piece (a tracing wheel can help with this step). You can also transfer the seam allowance notch at this stage.

notching_sewing_patterns_9

Do the same for the back. 

Notch centre front and centre back

notching_sewing_patterns_10

Use notches to indicate the centre front and / or the centre back of the pattern. As the Peplum Top has a seam in the centre back, only the centre front requires notches. 

Mark any other details

notching_sewing_patterns_11

At this stage, use notches to mark any other design details, such as pocket location, dart arms etc. In the case of the Peplum Top, it has a gathered piece attached to the waist, so I added notches so that it is easy to know how much you need to gather the panel (it is a pet peeve of mine when patterns don't have notches for gathered panels).

Putting notches on curves

You may have noticed that there were no curved seams to add notches to in the example. When working with curves, you need to "walk" the curve into the seam it will be sewn to and transfer the notches along the way. This tutorial goes into more depth if you need to notch your curves - for example: sleeves, princess panels etc.

So, what do you think? Are you convinced that notches will help you sew better?


You may also like:

Pattern hack : How to add a full skirt to the Acton dress

Hello, hello, I hope you enjoyed the Acton sew-along! Today I thought I'd show you a little pattern hack. A customer got in touch to tell me she was planning on using the Acton pattern to make her bridesmaids dresses (swoon!) and wanted to know how she could go about adding a full circle skirt, instead of the standard A-line skirt (view A). I thought it would be a good tutorial to share on the blog, as I'm sure many of you would love an Acton with a full skirt, while some of you may also be interested in how you add a full circle skirt to a pattern that doesn't have a straight waist seam - and this tutorial fits the bill for both!

Getting started

To start, trace a copy of the front skirt pattern piece with seam allowance - be sure to also trace the stitch line (the grey line on the pattern) and transfer the notches, grainline and drill hole. Cut out the pattern piece. 

Take a large piece of pattern paper and draw a vertical line down the right hand side. Label line as "Centre Front."

Take your pattern piece and line up the centre front of the skirt, with the line marked as Centre Front on the paper. Tape in place (only down the centre front).

Mark in your 'Cut and Spread' lines

We will be using the 'Cut and Spread' method to add the extra fullness to the skirt.

Draw two straight lines from the top of the skirt to the bottom - roughly splitting the skirt into thirds. 

Starting at the hem of the skirt, carefully cut up each of the lines. Cut up to the stitch line, but do not cut through the stitch line. 

Cut the remainder of each line from the top edge (cutting down towards the stitch line). Don't cut all the way through though, stop a few millimetres from the stitch line, leaving a 1-2mm "hinge" to keep the pieces together (if they do accidentally come apart, just tape back in place). 

Cut and spread

Slowly open up the hemline of the skirt by swinging the section closest to the side seam out from the cut. You will see that the small hinge created will allow you to open (or close) the cut lines by the desired amount. 

Open up the second cut line (closest to the centre front) and then play around with the openings until you are happy with how much you are adding to the hemline overall (and both are opened evenly). 

When you are happy with the result, tape or glue the pieces in place on the backing paper. 

Re-draw the waistline

You will now notice that the waistline is looking a little scary! We will need to rectify that now. 

Re-draw the waistline with a smooth curve (on the stitch line). Be careful not to let the line stray too far from the original stitch line. The new line needs to be the same length as the original waistline so that the new skirt piece will still fit with the original bodice. 

Re-draw the hemline

Re-draw the hemline with a nice smooth curve. 

Trace the pattern

Take another large piece of pattern paper and trace a copy of the new pattern piece. Start by tracing the stitching line - centre front, new hemline, side seam and new waistline. 

Add seam allowance

Add seam allowance to the new pattern piece - either using the original cutting lines as a guide, or adding it yourself - 1.5cm at the side seam, 1.2cm at the hem and waistline. If you are wondering why the seam allowance sits at an angle on the side seam, check out this post

Add notches, grainline and drill hole

Transfer the notches from the original pattern, as well as the grainline and drillhole in the centre front. 

Finalise the pattern

Cut out your new pattern piece and add cutting instructions (i.e. "Cut 1 on fold"). Repeat process for the back pattern piece (opening up each cut and spread line by the same amount as you did on the front piece).

One last tip

Tip: Be sure to let your full skirt hang for a few days before you hem it. Due to the nature of a full skirt, some parts of the skirt are cut on the bias, which means they stretch (or "drop") more easily that other sections of the skirt, which means that if you hem it straight away, you are likely to end up with a wobbly hemline. Let your skirt hang and then re-cut the hemline before hemming. 

The Acton sew-along will continue tomorrow. Hope you are enjoying these posts and learning lots!


You may also like:

The Acton sew-along : Finishing up (view B)

Welcome back to the Acton sew-along! Today we will be finishing up the wrap version of the dress (view B). 

Prepare the lining

You should have assembled the bodice lining at the same time as you assembled the bodice. If you haven't done it already, check out this post for how to do it (it's exactly the same as the bodice). 

lining_1.jpg

Take the bodice lining and with right side facing down, fold back the centre back seam allowance 2cm (¾in) and press flat on both sides.

lining_2.jpg

With the lining still face down, turn up the bottom edge by 1.2cm (½in) and press.

ATTACH THE LINING TO THE BODICE

lining_3.jpg

With the dress right side out, pin the lining to the bodice (with right sides together). Start at the centre back and work your way around the armhole, matching each set of seam lines. Be sure to have the zip open and the centre back seam allowances pressed flat and not folded back.

lining_4.jpg

Continue pinning until you reach the centre back on the other side. This step can be a little awkward as the straps are quite short, so keep checking that the straps haven’t been caught up by the pins.

lining_5.jpg

Stitch along the edge with a 1cm (⅜in) seam allowance.

Trim down the seam allowance by 5-6mm (¼in) and clip into the curves. Turn the dress to the right side.

UNDERSTITCH

lining_6.jpg

Lay the seam flat, and with the seam allowances pushed towards the lining, understitch the seam
allowances to the lining. Start as close as you can get to the top of the back armhole and continue around the armhole.

lining_7.jpg

Stitch as close as you can to the strap, before back stitching and then moving on to the neckline.
Backstitch again when you get as close as you can to the second strap, before moving on to the
second armhole.

Attach lining at centre back

lining_8.jpg

With the bodice turned inside out, pin along the centre back seam - sandwiching the zip between
the bodice and the lining. Turn up the bottom edge by 1.2cm (½in) and pin in place (this is where the crease you made earlier comes in handy).

lining_9.jpg

Using a regular zip foot, stitch the lining in place, by stitching next to the zip on the side closest to the raw edges. Repeat for the second side.

CLIP THE CORNERS

lining_10.jpg

Trim back the seam allowances on either side of the corner to minimise bulk. On the lining, trim back the seam allowance from the bottom corner close to the zip, to minimise bulk in this area.

lining_11.jpg

Turn the bodice right side out and use a corner turner (or pencil) to get a nice sharp corner, before giving the bodice a good press.

Before pinning the lining in place, use the cuts in the seam allowance at either side, to overlap the
seam allowances. Pin seams flat to the bodice.

ATTACH LINING AT THE WAIST

With the seam allowance on the lining still folded under, pin the lining to the bodice, along the waistline.

If you would like to stitch the lining in place by machine, turn the bodice to the right side, insert pins through the wasitline (ensuring that you catch the lining) and then stitch in the ditch (look here for more details). 

To sew by hand (for a really clean finish on the inside and outside) take a sharp fine needle and pick up a few threads at the waistline seam, before feeding the needle through the fold line on the bodice lining and then going back through the waistline.

Hemming

Before hemming your dress it is a good idea to let it hang overnight to let the hem drop (particularly if you are using silk or similar). Trim down the hem if necessary after hanging.

With the dress inside out, turn up the hem by 6mm (¼in) and stitch. You can simply do this with your finger rather than pressing and pinning. Turn the hem by another 6mm (¼in) and press. Pin hem in place and stitch along the original stitch line to complete the hem.

Turn the hem by another 6mm (¼in) and press. Pin hem in place and stitch along the original stitch line to complete the hem.

And that's it! Both our Actons are all done. For a review of all the posts we've covered, have a look here

I hope you have enjoyed the sew-along, and learned a thing or two!


You may also like:

The Acton sew-along : Attaching the straps (view B)

Over the past few weeks we have been working our way through the Acton dress for the sew-along. It will finally come to an end this week, as we finish up the wrap version. I'd love to hear what you have thought of these posts, do you find them useful? 

A quick re-cap

Last week we assembled the bodice (it's the same process as the A-line version) and attached the skirt to the bodice. Before working tour way through this post, you will need to insert the invisible zip. The tutorial is for View A, but the process is exactly the same - you just have different back bodice pieces to attach. 

Attach the straps

bodice_straps_1.jpg

When the zip is inserted, it's time to make the straps. Use the same method as we did for View A (these straps are just much shorter). 

Take the straps and place them face down on the front of the bodice, pinning them in place between the neckline and the armholes. The straps need to be positioned with the short end sticking up beyond the top edge of the bodice (it will become right way up when the bodice is lined). Stitch in place 6mm (¼in) from the top edge.

TRY ON THE DRESS

Try on the dress and pin the straps in place at the back (this is when an extra set of hands really helps), at the length that they feel comfortable. Strap positioning is very important, so have a play around to ensure you have got it right. The peak of the princess seam on the bodice should sit on the peak of your bust. If you are struggling with this, it may help to check out some of the tester versions of the dress, to see how the bodice sits on a range of different figure shapes. 

Take the dress off and use a horizontal pin to mark the correct length on the back end of each of the straps, before taking off the dress.

Being careful not to twist the straps, pin the straps in place on the back of the bodice. When attaching the strap to the back, be sure to remember that there is a 1cm (⅜in) seam allowance around the armhole, and the strap will need to sit clear of that. Stitch in place 6mm (¼in) from the top edge.

I was planning on showing you how to line the bodice today too, but I have just realised, that would create a very very long blog post! So, as not to overwhelm you, I'll leave that until tomorrow.


You may also like:

The Acton sew-along : Adding waist ties

Welcome back to the Acton sew-along! Yesterday we got started on the wrap version of the Acton dress, and today we'll be continuing by adding the waist ties and finishing up the side seams on the wrap. 

Make the waist ties

Take the waist tie pieces and fold in half lengthways, right sides together. Stitch along the length of the strap with a 1cm (⅜in) seam allowance. Trim the seam allowance down to 3-4mm (⅛in) before using a safety pin (or bodkin) to turn right side out. Use a pin to tuck one short edge of the tie inside itself and stitch close to the edge to enclose.

Attach waist ties + finish side seams

36.jpg

Take the dress and with it right side out, pin the skirt side seams together, using the notches to guide you. Take the raw end of the waist tie and pin the tie in place at the top of the seam, overlapping the side seam by 1-2cm (⅜ - ¾in). I know this looks a little bit strange, but I promise it will work!

waist_tie_2.jpg

Stitch the side seam with a 6mm (¼in) seam allowance. Trim down the seam allowance by 2-3mm (⅛in).

Trim back the raw edge of the waist strap by the same amount. Repeat on the other side.

Turn the dress inside out and press the seam flat, being careful to check that the waist ties remain
straight. Pin in place, before stitching with a 6mm (¼in) seam allowance. Repeat on the other side.

And that's it for today's post! Next week we will be finishing up by sewing on the straps, attaching the bodice lining and hemming.


You may also like:

The Acton sew-along : Attaching the bodice to the skirt (View B)

If you have been following along with the Acton sew-along, you will have seen that yesterday we finished up View A (the A-line version).

Now it's time to start sewing view B (the wrap skirt version), which I am very excited as I must admit it is my personal favourite!

Construct the bodice

Construct the bodice in the same way that you would construct View A - check out this post if you need some guidance. Follow the same method to assemble the lining. 

Attach the bodice front to front skirt

The method for attaching the skirt to the bodice for the Acton, is probabaly a little different to any method you have used in the past, don't worry about that. Just follow the instructions carefully and I promise it will all come together beautifully!

Take the SKIRT FRONT and lay it right side up on your cutting table. Place the bodice right side down (so the pieces now have right sides together), aligning the opening in the centre front of
the bodice with the drill hole in the centre front of the skirt. Pin in place.

Using the notches on the skirt to guide you (they align with the princess seams on the bodice), pin the front of the bodice front to the skirt on just one side. Stop pinning when the side seam of the bodice lines up with the drill hole on the skirt front.

Move on to the other side of the front bodice, pinning from the centre front to the bodice side seam on the other side (you will notice that the small opening in the bottom of the centre front bodice seam really helps with this bit).

Stitch from one drill hole / bodice side seam, to the centre front, with a 1.2cm (1/2in) seam allowance. As you approach the centre front, go nice and slow - walking the final stitches if you need to. Insert the needle in the centre front and turn the corner before sewing to the other drill hole / bodice side seam.

Press the seam allowance up towards the bodice, before checking that there is no puckering at the point where the centre front bodice and skirt meet.

While the dress is still wrong up, make small cuts in the skirt piece. To do this, from the top edge of the skirt, at the point where the stitching stops, carefully snip into the seam allowance, towards the line of stitching (be careful not to cut through the stitches). This will help you achieve a clean finish when it comes to joining the top edges of the front and back skirt. Repeat on the other side.

Attach the bodice back to back skirt pieces

Take the the back pieces of the skirt and finish the raw edges of the centre back on both pieces. If you would like to get a really beautiful finish, consider finishing with a Hong Kong bind. 

With the dress right side up, fold back the SKIRT FRONT so that you can access the back
waistline on the bodice.

Take the SKIRT BACK and, matching the centre back on the skirt to the centre back on the bodice (with right sides together), pin the skirt waistline to the bodice waistline. Use the notches to guide you like you did with the front bodice. Pin until you reach the drill hole on the skirt back and the side seam on the bodice.

Fold back the unpinned part of the skirt to check that the seam is pinned up until the front skirt meets the bodice, but is not overlapping.

Stitch seam with a 1.2cm (1/2in) seam allowance, going nice and slow as you approach the drill hole.

From the top edge of the back skirt, at the point where the stitching stops, carefully cut into the skirt seam allowance towards the stitch line (in the same way that you did for the front skirt). Repeat on the other side. 

Join the front and back skirt

You will now join the top edges of the front and back skirt with a french seam (for more info on french seams, check out this tutorial). Turn the dress right side out and pin the top edge of the front skirt to the top edge of the back skirt.

Stitch with a 6mm (1/4in) seam allowance.

15.jpg

Trim down the seam allowance by 2-3mm (⅛in).

Turn the dress inside out and press the seam flat. Pin the seam, enclosing the raw edge inside the
seam.

Stitch with a 6mm (¼in) seam allowance.

Go nice and slow as you approach the bodice, being careful to meet the stitch line at the waistline. Repeat for the second side.

Turn the dress to the right side and give it a good press.

That's all for today's post. I hope you didn't find it too tricky! Tomorrow we'll be making the waist ties and sewing up the side seams of the skirt.


You may also like:

The Acton sew-along : Hemming

If you have been following along with the Acton sew-along, you will know we have almost finished sewing the Acton with A-line skirt (view A), which means that tomorrow we will be starting the Acton view B (wrap skirt version)! 

This post is a quick one, as all that we have left to do is the hem.

In the instructions I advise to just do a simple finish and turn hem, but you could consider using binding if you wanted something a little fancier (check out this post for making your own binding  if you want to give it a go). If you are using a really light-weight fabric, you may want to do a rolled hem for a cleaner finish (use this tutorial to learn how to sew a rolled hem without a rolled hem foot). 

Hemming the Acton 

Finish the hem with an overlocker or zig-zag stitch and then fold up by 1.2cm (1/2in). Press and in pin.

Give your dress a good press and you are ready to wear your Acton! 

Told you it was going to be a very quick post today!

All done!

Have you been sewing along with me? I'd love to know how you are going. Let me know by tagging me on Instagram @inthefolds with the hashtag #theactondress. I can't wait to see your progress!


You may also like:

The Acton sew-along : Attaching the bodice lining

One of my favourite things about the Acton is the lined bodice. It really helps you get a beautiful finish on the inside, and aligns well with the dressy and glamorous feel of the dress. In todays' post for the Acton sew-along, I'll be showing you how to attach the lining to the bodice. 

Prepare the lining

You should have assembled the bodice lining at the same time as you assembled the bodice. If you haven't done it already, check out this post for how to do it (it's exactly the same as the bodice). 

Take the bodice lining and with right side facing down, fold back the centre back seam allowance 2cm (¾in) and press flat on both sides.

With the lining still face down, turn up the bottom edge by 1.2cm (½in) and press.

Attach the lining to the bodice

With the dress right side out, pin the lining to the bodice, starting at the centre back, with right sides together. Be sure to have the zip open and the centre back seam allowances pressed flat and not folded. Pin until you reach the side seam. You will need to sew the top edge in small sections, as the straps make it difficult to get the top edge to lie flat. Stitch this section with a 1cm (⅜in) seam allowance.

Next, pin from the side seam, around the armhole, neckline and second armhole, until you reach the side seam on the other side. Again, stitch with a 1cm (⅜in) seam allowance.

Pin the remainder of the seam in place, before stitching with a 1cm (⅜in) seam allowance.

Before continuing, turn the dress to the right side and with the facing flipped up, check that the seam along the top edge is even on either side of the zip. Clip into the seam allowance (particularly around the curves).

Understitch

Lay the seam flat, and with the seam allowances pushed towards the lining, understitch (stitch the seam allowances to the lining). Start 2-3cm (1in) from the centre back and stitch as close as you can to the strap, before back stitching and moving on to the neckline and second armhole

With the bodice turned inside out, pin along the centre back seam - sandwiching the zip between the bodice and the lining. Keep the bottom edge of the lining turned up by 1.2cm (½in) and pin in place (this is when the crease you made earlier comes in handy).

With a regular zipper foot. Stitch the lining in place by sewing close to the zip on either side.

Clip the corners

Trim back both sides of the corner at the top of the zip. This will help you get a nice sharp corner and a lovely clean finish. 

Trim back the seam on the lining only from close to the waist seam, to minimise bulk around the zip and waist seam.

Turn the bodice right-side out

Turn the bodice right side out and use a corner turner (or pencil) to get a nice sharp corner at the centre back, before giving the bodice a good press. It's looking pretty nice, right?!

Attach bodice at the waist

Turn the dress inside out and with the seam allowance still folded under, pin the lining to the bodice, along the waistline. In the next steps I will show you how to attach the lining to the bodice using a sewing machine. If you would prefer to stitch by hand (to get a more discreet finish), I will show you how to do that later on in the sew-along (when we're working through view B).

Turn the dress over to the right side and pin along the waistline, checking regularly that you have caught the lining on the wrong side. Remove the pins from the wrong side.

Stitch the lining in place by carefully stitching in the groove created by the waist seam (this is called stitching in the ditch).

You'll see that we're almost done! Just to hem and then you'll be ready to wear your Acton!


You may also like:

The Acton sew-along : Making and attaching the straps

sewing_straps_cover.jpg

Over the last few days in the Acton sew-along, we have assembled the bodice, attached the pockets and assembled the skirt, joined the bodice to the skirt and inserted the invisible zip. Today we will be making and attaching the straps. 

Make the straps

Take the bodice strap pieces and fold in half lengthways, with right sides together. Press in place.

Stitch down the long side of each strap with a 1cm (⅜in) seam allowance. 

Trim down the seam allowance to about 3-4mm (⅛in) before using a safety pin (or bodkin) to turn the straps right side out. Press straps flat.

Position straps

Take the straps and place them face down on the front of the bodice, pinning them in place between the neckline and the armholes. The straps need to be positioned with the short end sticking up beyond the top edge of the bodice (it will become right way up when the bodice is lined). Stitch in place 6mm (¼in) from the top edge.

Try on the dress

Try on the dress and pin the straps in place at the back (this is when an extra set of hands really helps), at the length that they feel comfortable. Strap positioning is very important, so have a play around to ensure you have got it right. The peak of the princess seam on the bodice should sit on the peak of your bust. If you are struggling with this, it may help to check out some of the tester versions of the dress, to see how the bodice sits on a range of different figure shapes. 

Take the dress off and use a horizontal pin to mark the correct length on the back end of each of the straps, before unpinning.

With the dress right-side out again, being careful not to twist the strap, pin the strap in place
on the back, with right sides together. Stitch in place (within the 1cm (⅜in) seam allowance). Repeat for the second strap.

Okay, straps are in place! Tomorrow we'll be attaching the lining, then we just need to hem it, and the dress is done!


You may also like:

The Acton sew-along : Inserting the invisible zip

In yesterday's post for the Acton sew-along, we joined the bodice to skirt to form a dress, and today we'll be inserting the invisible zip. For any of you who just ran away screaming, please come back! Once you know how to do them (and with a few little tricks under your belt, which I'll be showing you today) they really are a piece of cake. 

Prepare the centre back seam

With the dress right side down, turn the centre back seam back by 2cm (¾in) and press . Repeat on the other side of the opening. This crease will help when you insert the zip.

Position the zip

And now it’s zip time! Take your zip and unzip it. Using a warm, dry iron, press the zipper teeth flat. Make sure you check your irons heat setting. You really don't want to melt the teeth!

Turn the dress right side up and unfold the centre back seam.

Starting at the right side of the centre back opening, take the zip and place it face down on the opening. Place the zip stop 1cm (⅜in) down from the bodice edge, and align the zip teeth with the creased line created in the previous step.

Pin the zip to the centre back, regularly checking that the zip teeth are aligned with the crease.

Baste zip in place (Top Tip #1 for sewing perfect invisible zips every time)

Take a needle and contrasting thread (a great chance to use all those strange coloured threads you have somehow accumulated over the years), and baste the zip tape to the dress by hand. This will ensure the zip does not shift while you are sewing it in. Remove the pins.

Stitch the first side in place

Using an invisible zip foot, stitch down the length of the zip, using your finger to uncoil the teeth as you sew. Try to get as close to the teeth as you can (without stitching them).

Backstitch just before you reach the end of the zip (you won’t be able to get past the zip pull).

With the dress right side out, turn the seam allowance under (flipping the zip tape to the inside of the dress) and press the fold nice and flat.

Line up the waist seam on either side of the zip (Top Tip #2 for sewing perfect invisible zips every time)

To ensure that the waist seam matches up on either side of the zip, take a pin and put it through the zip tape (on the side not yet sewn) horizontally, in line with the waist seam.

Now open the zip and place the tape face down on the left side of the back opening, aligning the
horizontal pin on the zip tape with the waist seam. Make sure the zip is not twisted. Pin in place.

Attach second side of zip

Place pins along the length of the zip, and again baste in place by hand.

Stitch in place with an invisible zip foot, again uncoiling the zip teeth with your finger and stitching as close as you can to the coil. 

Job done. Your zip is inserted! Now to finish off the centre back seam. 

Close the centre back seam

Turn the dress inside out and pin the remainder of the centre back opening closed, keeping the ends of the zip tape out of the way.

With an ordinary zip foot, stitch the centre back seam closed. Start by putting your needle in the
endpoint of the zip stitch line (or as close to it as you can get) and continue down the seam with a 2cm (¾in) seam allowance.

Give the centre back seam a good press, with the seam allowance pressed open.

And you have an invisible zip in your Acton dress!

How do you feel? Less daunted by invisible zips?


You may also like:

The Acton sew-along : How to attach the bodice to the skirt (view A)

Over the last couple of days, I have shown you how to assemble the bodice and skirt of the Acton (view A). In today's post for the Acton sew-along, we'll be attaching the bodice to the skirt.

Line up the side seams

join_skirt_bodice_acton_1.jpg

Take the bodice and skirt and match them together with right sides together. Start by matching the side seams. The side seams meet at different angles, so you will want to start by ensuring they line up at the point where you will stitch the bodice to the skirt (this position is different to wear the seams meet at the cut edge).

To do this, measure down the side seam on the bodice, and mark the stitch line, which is 1.2cm (½in) down, with a horizontal pin. 

join_skirt_bodice_acton_2.jpg

Use a second pin to push through the side seam on the bodice (at the position you just marked) and then through the side seam of the skirt, aligning the two seams at the point they will be stitched. Secure with a pin. Check that the seam allowance on the skirt side seam is still pressed towards the front.

Now that you know that the side seams are aligned, pin the bodice to the skirt on just one side, working from the centre back to the centre front. Use the notches and seam lines to guide you. The opening at the bottom of the centre front line should match up with the drill hole on the centre front of the skirt.

With a 1.2cm (½in) seam allowance, stitch the bodice to the skirt, being careful to start or finish (depending on which end you start stitching at) your row of stitching right at the centre front seam on the bodice.

Repeat the previous steps for the second side, remembering to carefully match the sides seams on the bodice and skirt first.

Press the seam allowance up towards the bodice. This seam does not need to be finished as it will be enclosed within the bodice lining (unless your fabric is prone to fraying).

Job done! The bodice and skirt have now become a dress. In the coming days we'll create the straps and insert the zip. It's really coming together now!


You may also like:

The Acton-sew along : Sewing in-seam pockets

how_to_sew_in_seam_pockets_1

Hello! Welcome back to the Acton sew-along! Yesterday, we finally got started on our bodice, and today we're onto the skirt. 

View A has in-seam pockets (pockets hidden in the side seams) because I love to put pockets in every dress I can! This post will guide you through inserting the pockets with a standard finish (zig zag or overlocking), if you are using a really soft or flimsy fabric, I would suggest using french seams instead. The process is a little more involved, but you will achieve a really beautiful finish. You can check out that tutorial here

If you aren't including pockets in your Acton, you can simple stitch the front and back side seams together with a 1.5cm seam allowance. Finish the seams and press them open. 

Getting started :

Finish the edge of each pocket individually

how_to_sew_in_seam_pockets_2

Take both pairs of IN-SEAM POCKETS and finish the curved edge of each pocket individually, using an overlocker, zig zag stitch or bias binding.

Stitch pockets to front skirt

how_to_sew_in_seam_pockets_3

Take one pair of IN-SEAM POCKET pieces and pin to the FRONT SKIRT (with right sides together) by lining up the straight edge of each pocket with the side seam of the skirt. Stitch from the top of the pocket to the bottom, with a 1.2cm (½in) seam allowance. Finish the side seams - capturing the edge of the pocket, as well as the side seam - using your chosen method.

Stitch pockets to back skirt

how_to_sew_in_seam_pockets_4

Take your BACK SKIRT pieces and place them side-by-side, with the centre back seams next to each other. Take the other pair of IN-SEAM POCKETS and match with the notches on the side seam of the BACK SKIRT pieces, with right sides together. Pin in place and stitch from top to bottom, with a 1.2cm (½in) seam allowance. Finish the side seams - capturing the edge of the pocket, as well as the side seam - using your chosen method.

At this point you can also finish the centre back seams with your chosen method. 

how_to_sew_in_seam_pockets_5

Press each pocket bag away from the body of the skirt. Understitch the seam allowance to the pocket bag on each pocket (this will help keep the pockets on the inside of the dress).

Join front and back skirt

how_to_sew_in_seam_pockets_6

With right sides together, match the SKIRT FRONT to the SKIRT BACK at each side seam. Pin in place, around the pocket and then continue pinning the rest of the seam.

how_to_sew_in_seam_pockets_7

Stitch along the side seam with a 1.5cm (⅝in) seam allowance, reducing to a 1cm (⅜in) seam allowance around the pocket edge. Pivot to get from the side seam to the pocket edge. Press the seams, and the pocket, towards the skirt front. 

And that's it. Your Acton dress now has pockets! Tomorrow we'll be attaching the skirt to the bodice and all these pieces are really going to start looking like a dress. Yay!


You may also like:

The Acton sew-along : Construct the bodice (sewing princess seams)

how_to_sew_princess_seams_1

I can't believe that I am saying this, but it is finally time to start sewing today! If you have been following the Acton sew-along, you will know that I have gone through A LOT of alterations (check them out here). When it comes to the Acton, fit is important, and I really wanted you all to feel confident to make any alterations you require. 

But by now, you should have printed the pattern, made the alterations required to the pattern, got some inspiration, cut your fabric and be ready to sew.

We'll be starting with the bodice. You will notice that seam allowances vary in my patterns. This is to help you get a really nice finish. Different seam types require different finishes. For example, when putting in a zip, you will want a 2cm (3/4in) seam allowance, to get a really nice finish, while around an armhole or neckline (which is quite a sharp curve), 1cm (3/8in) will work much better. So be careful to check wjat seam allowance is required for each step. 

Join the centre front bodice pieces

how_to_sew_princess_seams_2

Take the CENTRE FRONT BODICE pieces and pin together, down the centre front, with right sides
together. With a 12mm (1/2in) seam allowance, stitch down from the neckline to the drill hole (the point marked at the bottom of the seam). This little opening at the bottom of the seam will help you get a really nice point, when you join the bodice to the skirt. Repeat for the lining pieces. Seam allowances can be left raw, as the bodice will be fully lined, but if your fabric is prone to fraying, you may choose to overlock the seams (or cut with pinking shears). 

You can press the seam allowances open at this point, or wait to the bodice and lining are constructed and press all at once (I always wait until I have multiple seams to press at the same time, as it can be a big time saver). 

Stitch the princess seams

how_to_sew_princess_seams_3

Pin the SIDE FRONT BODICE pieces to the CENTRE FRONT BODICE (with right sides together), using the notches to guide you. The seam on the CENTRE FRONT BODICE is straight, while the panel line on the SIDE FRONT BODICE piece is curved, so you will need to ease the curved seam into the straight seam. It may seem like the curve is longer than the straight seam, but the stitch lines are the same length, it is just the added seam allowance that changes the length of the seams. Once your panels are nicely pinned, stitch with a 12mm (1/2in) seam allowance. Repeat for the lining.

Assemble the back bodice

how_to_sew_princess_seams_4

Take the SIDE BACK BODICE piece and pin to the CENTRE BACK BODICE, using the notches to guide you. These pattern pieces are quite similar to one another. If you think there is a chance you will mix them up (which could lead to an upside down bodice), put a pin, or chalk mark on the centre back pieces. Stitch seam with a 12mm (1/2in) seam allowance. Repeat for the lining pieces.

how_to_sew_princess_seams_5

With right sides together, pin the front bodice to the back bodice at the side seams, before stitching with a 15mm (5/8in) seam allowance. Repeat for the lining.

Press seams

Press all seams open (on both bodice and lining) - carefully clipping into the princess seams if you feel the need. This is a great time to use a tailor's ham if you have one. It can help you get a nice smooth curve over the bust. 

how_to_sew_princess_seams_6

Once pressed, carefully stay stitch (a line of stitching that is sewn along a shaped - or bias cut - seam to keep it from stretching as a garment is being made)  along the top edge of both the bodice and the lining 6mm (¼in) from the edge. This will mean the stay stitching remains inside the seam allowance (the seam allowance along the armhole / neckline is 1cm / 3/8in). 

Your bodice and lining can be set aside for the moment. Tomorrow we will be moving onto the skirt... starting with attaching the pockets!


You may also like:

The Acton sew-along : 6 tips for sewing with silk (or other delicate fabrics)

When the Acton pattern was in testing, a few of the testers ran into some problems working with silk (or similar shifty fabrics), which got me thinking that it would be a good idea to do a post in the Acton sew-along with some tips, as there are a number of things you can do to make life a lot easier for yourself when working with silk. 


1. PRE-WASH YOUR SILK

Just like with any other fabric, you will need to pre-wash your fabric before you get started. Use the method suggested on the fabric label. Some silks will require hand washing, while others will be fine with a cold machine wash. Wash your fabric and then hang it on the line to dry, before giving it a good press (this is a good time to see how your fabric handles being ironed, and whether a pressing cloth will be required when you're sewing). 


2. Sandwich fabric between thin layers of paper when cutting

This one has probably got a lot of you freaking out already. Yes, I said it... Cut your fabric between layers of paper! I know cutting paper with your fabric scissors is generally a big no-no in the sewing world, but I have been doing this for years (and was taught to do this when studying fashion at university) and my scissors have lived to tell the tale. When working with silk, I think the most important thing is cutting it correctly. If you have ever tried to cut silk without it being sandwiched between papers, you may have realised that it's REALLY difficult. It doesn't want to stay straight, and it is really easy to lose the grain. This leaves you with cut pieces that are not fun to work with. With paper, you can be sure the fabric is on grain, and that you have cut it out correctly (without any of those ragged edges). Convinced you yet?

How to do it...

tips_for_sewing_with_Silk_1.gif

The way I do it is I take a large sheet of paper (I use "dot and cross" drafting paper) and draw a straight line along one of the long sides and one of the short sides. 

I then take the amount of fabric I need, and tear (if possible) along each cut edge (not the selvedge), if they are not already torn. This helps ensure you have got the fabric on grain. If your fabric does not tear nicely (always good to check on a small scrap of fabric first), instead you can find your cross grain by snipping into the edge of the fabric and then pulling a thread or two down from the cross-wise grain. This will create a straight line that you can cut along. Check out this tutorial from Colette if you need more details on how to do it this way. 

tips_for_sewing_with_Silk_3.gif

Now, take the fabric and place it on top of the pattern paper, with right side up - lining up one edge (selvedge side) with the horizontal line on the paper (we'll deal with the vertical line soon). Pin in place, being careful to check the edge remains straight between each pin. 

tips_for_sewing_with_Silk_4.gif

If you are working on the fold (you will cut a pair of each piece), carefully fold the fabric in half, by bringing the opposite selvedge towards you. Line up the selvedge with the pinned edge, and then pin in place (using the original pins, so that the pins are now holding two layers of fabric and a layer of paper). 

tips_for_sewing_with_Silk_5.gif

Make sure both layers of fabric are also straight on the cross-wise grain (marked with the vertical line on the paper), and pin in place. I generally just pin the two sides, but if you feel it will make things easier for you, you can also pin the other two sides of fabric to the paper.

Gently smooth out any wrinkles or bubbles in the fabric. I use a long plastic ruler to do this. 

Put another layer of paper on top, sandwiching the fabric in between the two layers, before putting pins through all four layers.

Now, place the pattern pieces on top of the paper, and line up the grainline on each pattern piece with the selvedges pinned to the paper. 

I normally just pin the pieces in place and then cut.  If you have your pattern on card, you can simply trace around each piece, and use a few pins to anchor them. You could also use pattern weights instead. Carefully cut into each notch, and mark drill holes / darts (in the case of other patterns) etc. with a tailor's tack, rather than marking the fabric (use this Craftsy tutorial, if you're unsure how to do this). 

Tip

I find it easier to leave the cut pieces between the layers of paper until I'm ready to sew them. This way, they remain protected, but are also much easier to identify. 


3. Use the right tools

It's really important that, when you are working with silk, you use the right tools. Make sure your scissors are sharp, use sharp pins (or even better, use silk pins), and use the right machine needle. Using a standard machine needle can cause silk to pull - or may not even be able to get through the tightly woven fibers. Use a fine, sharp needle (such as a 60/8 or 70/10) to prevent this from happening. 


4. If in doubt, hand baste

When sewing with silk, hand basting is your friend. I know many people don't like having to pick up a hand needle and thread, but for me, I'd rather hand sew first, to prevent unpicking later. If your fabric is likely to stretch, and pins aren't going to cut it, then baste the seam before machine-stitching. If you have already made the Acton (or the Rushcutter), you will know that the instructions guide you to hand baste the zip in, before sewing it. You could also hand baste the princess seams, if you are worried that the seam will stretch, 

5. Use a pressing cloth

Before taking to your fabric with the iron, use a small scrap of fabric to check how it takes being pressed. Put your iron on the silk setting and see how it goes. If it looks like it may damage the fabric, use a pressing cloth, 

6. Use tear-away / vilene

When I was at university, as well as in studios doing casual production work, tear-away is used in almost all garments. I am always surprised to hear how few sewers use it. When sewing with flimsy fabric, that is likely to stretch, tear-away helps prevent that from happening. It is particularly useful to use on necklines and armholes.

If you'd like to use tear-away for the neckline / armholes of the Acton, put the SIDE FRONT BODICE and CENTRE FRONT BODICE together as if you have sewn them (stitch line on stitch line).

You will need a pattern piece that looks something like this. Draw a smooth curve 4-5cm (2") down from the neckline and armhole.

tips_for_sewing_with_Silk_10.gif

Trace the piece onto a blank piece of pattern paper, before adding cutting instructions. Repeat for the back pieces. Cut these pieces from tear-away / vilene. 

Stay stitch the tear-away to the neckline (once the bodice is assembled) and then sew as normal. Remove tear-away after you have sewn the neckline / armhole seam. For more details on this process, check out this tutorial from Tessuti.


Now, with those tips under your belt, you should find sewing silk a breeze!

Did I miss anything? Is there a tip you would like to add? I'd love to hear in the comments!


You may also like: